613 Blonde To Burgundy Red Deep Waves Using Water Color Method - Amazon
- Posted on 22 June, 2021
- Color Lace Wig
- By Anonymous
Hey Everybody,
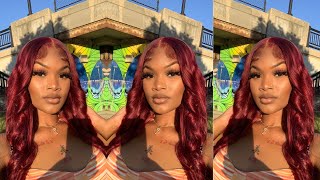
Check out the review of how I colored this Brazilian straight 613 blonde lace front closure to burgundy red using the water color method and added deep waves!!
**I do not own the rights to this music**
Wigs For Sale on My Website: https://msebonyveesbeautystore.bigcart...
Binge Watch My 2021 Playlist:
https://youtube.com/playlist?list=PLgA...
Long Human Hair Wigs Playlist:
https://youtube.com/playlist?list=PLgA...
Customized Human Hair Wigs Playlist:
https://youtube.com/playlist?list=PLgA...
Red Colored Wigs Playlist:
https://youtube.com/playlist?list=PLgA...
Video Schedule:
Mondays – Human Hair Slay
Wednesday – Synthetic Wig Reviews
Fridays – Budget Friendly Fridays (Wig Reviews under $25)
HAIR/PRODUCT INFORMATION:
613 Lace Front Wig Human Hair Straight Human Hair Wigs for Women, 4x4 Blonde Lace Front Wigs Human Hair Pre Plucked with Baby Hair, 150% Density Brazilian Virgin Straight Closure Wig (20inch)
Price: $116.90
https://www.amazon.com/Straight-Plucke...
TIMESTAMP
0:00 – Intro Video
0:15 – Unboxing of Wig
0:30 – Dying the Wig
2:48 – Styling the Wig
4:26 – Installing the Wig
6:53 – The Final Look / Closing
7:03 – Bye Shug Muffins!
HAIR SPECS:
COLOR: Blonde 613 to Burgundy Red
CAP SIZE: Medium
LACE: Lace Closure
TEXTURE: Textured
LENGTH: 20”
PARTING: 4x4”
SHEDDING: Moderate
TANGLING: Moderate
OVERALL RATING: 8.0/10
Follow me on social media!:
Instagram: https://www.instagram.com/msebonyvee/
Facebook: https://www.facebook.com/msebonyvee
Snapchat: @Ebonyvl
Twitter: @vee_ebony
TikTok: @msebonyvee
Email: [email protected]
Please be sure to Like, Share & Subscribe!
**FTC Disclosure: This video is NOT sponsored.**
Music: Epidemic Sound – Here’s my referral link: https://www.epidemicsound.com/referral...
“Wrong Girl” by Cleo Kelley
Hey: what's up everybody, it's me miss ebony v, welcome back or to my channel, so this is going to be a nice quick voice over type of video. I'M just going to take you through how i took this hair from blonde to this beautiful red. So for the unboxing, they included this wig cap, and this is the blonde 613 hair straight out of the package. It is a closure unit and it has a standard cap construction with the two combs on the front, one in the middle one. In the back with the adjustable straps, alright, so now, let's get into the dyeing process, as you can see, i'm going to be using this adore intense red color, along with this rich, amber color. Now i typically dye my blonde units using the watercolor method, so i'm going to be adding the two different dye colors, a half of each bottle into this bowl, followed by some hot boiling water, and then i'm just going to mix up this mixture with my whisk. So as a confession, i had a completely different plan for this hair and i actually washed it using the purple shampoo without using boiling water and, as you can see it kind of gave some purple stains on the blonde hair. It did get rid of that yellow color, but i could no longer go with my initial plan of how i was going to dye this hair, so i had to switch it to the watercolor method, all right. So now i'm just testing the color and it's a very deep red that i am looking for and now i'm just going to submerge the hair into this mixture into this hot water and make sure that um all of the hair strands is getting heavily coated. With this color, so the best way to make sure that all of the hair strands are getting coated is to just keep taking the hair out of the water, but be very careful when doing that, because this water is very hot, it is boiling water. Um just be very careful and you just kind of got to keep taking a look at the hair um. Usually the ends of the hair get darker the fastest um, and so you just kind of got to take it out brush through the brush through the hair and then you know, add more color if necessary, because as the hair is continuing to get in this water, It'S absorbing the color, and so the color is no longer as deep as it was. So i'm adding some more of i'm not sure which one of these colors i'm adding, but one of the colors i'm adding some more probably the deeper color. So now that the ends appear to be a little darker than the root i'm going to switch and place the root in the water first, so that that gets more of the deeper color before the ends do so now. I finally reached my desired color, and this is what it looks like as a result, and i let it air dry overnight, and this is what it looks like after that. So now, i'm just going to add some heat protectant and blow dry, the hair um. I just like the texture of hair when it's blow dry before i begin styling, so i tend to always blow dry, my wigs before i style them so just to give a few specs on this hair. This unit does come from amazon. It is a 4x4 brazilian straight lace, closure, wig um. It does come pre-plucked with baby hairs, it's 20 inches and i have her in 150 density. Of course. As always, i will leave all information down in the description box below. So i wanted to go for a deep wave style, so i'm going to be using my deep wave iron that i got from amazon. It'S one of those irons that have like different levels of wave. As you can see here, you can kind of change it. It is a bed head, wave iron and, as you can see, you can kind of make the waves smaller or larger, and i went with the largest setting, because i wanted the waves to be really really deep. Now, of course, when using a wave iron, you kind of just want to follow the groves of the wave as you go from the first wave that you create just continue to follow the groves, and it will create a nicely waved pattern. So after each row i would spray it with some got to be high. Insta hold spray just to make sure it stays, and this is what it looks like when it's all deep wave, because it came as a very light lace. I did go ahead and tint the lace for my skin color. Another note to mention is that this unit did claim to come. Pre-Plucked. However, i did go in and pluck it a lot more, i'm feeling good all right. So now i'm just going to continue with styling the wig. As you see, i already added my bobby pins to secure her in place on the sides, at least, and now i'm just going to get this parting area together and make sure that this top area is as flat as possible by using my hot comb. And i do have my hot comb on the highest setting as you can see, but it's human hair, and i tend to do that with human hair. Now i'm going to go in with my bed head and just spray along the hairline. I am pretty much going for that natural melt in the front and to do so, you just want to you know spray, your whatever adhesive spray, you desire to use and just kind of press it into the skin and then, of course, blow dry that, on the Cool setting now, i'm just going to tie it down using my elastic band for about 10 minutes and while that is tied, i'm going to go in with my hair fetish knot eraser and go into the parting space to brighten that up a little bit alright. So now it's time to cut off this lace and, as you can see, i am really trying to cut as close as possible and i'm also going in a jagged motion instead of cutting straight across. Of course, that is key to melting your lace. You never want to go straight across now, i'm just adding my contour powder right at that closure. Stop where the closure stops and even a little bit more along the hairline and i'm just adding a few little swoops in the front. I usually do that when i'm wearing a closure right at that closure edge just to kind of cover that that part up where it stops now for a little added shine, i like to go in with my bio silk: silk therapy. When i tell y'all, i always say this stuff makes the hair feel like butter, so soft and sleek and smooth it's like the best ever. But this is the final look y'all. I hope you enjoyed this video. I thank you all so so much for watching. Please be sure to thumbs up this video make sure you hit that subscribe button. If you have not, let me know what you think about her down in the comments and i will chat with you all in the next video


Comments
Terrific Tarsha: I love this unit! The color is pretty and the waves are really nice! I learned a lot seeing the entire process so thanks for the detailed walkthrough.
Keri No Hilson: I tried this method with the exact same color and it was so easy!! Never going back to the regular method!! This color looks really good on u btw!!
DeeDee Hair: Yes you know I am here for the colour you styled this to perfection ❤️❤️❤️
Silky Saks: You always do such a beautiful job dying your wigs. Great job sis
More Keta: The color came out beautifully and I’m love of the waves you put in her
Love Yourself: Love how you did the hot water method. Beautiful color. Nice burgundy eyebrows Very nice waver. Have a Great Week♀️♀️
Nyla Allure: You did that sis I’m taking notes cause you always give scalp with every unit you wear
Beverly Shealey: I love it you done a wonderful job its beautiful.
april G: Happy Tuesday this color is Gorgeous on you and I definitely love the waves
Fee-Bee Rome: Girl you know your stuff. This is so pretty
Blackberry- Rose: The color on you is . ❤️❤️❤️ this. You look Absolutely Beautiful.
Grandma Sandy: Thank you so much for a great video and read instructions on how to die away beautiful either way hugs and kisses from grandma Sandy thanks for sharing all the tips also
Magikalblackness: This is absolutely gorgeous queen send it over when u done lol
Magikalblackness: Color distribution is perfect
Tacha's Society: Heyyy boo heyyy!!! Gurl even if it wasn’t your original plan.. This turn out fyaaaaahhhhh ayeee
Gümüş fm: Nice