Best Highlight Curly Wig On Amazon Beyonce Inspired Wig | Ft. Cynosure Hair
- Posted on 08 January, 2022
- Color Lace Wig
- By Anonymous
Welcome to my channel❤️ Don’t forget to like, comment, and subscribe.
Wig Information:
Curly Highlighted Wig from CYNOSURE HAIR on Amazon. 20 inch 13x4 180% density
Direct link: https://www.amazon.com/gp/aw/d/B09936Z...
Products Used:
•Ebin 24 HR Sleek Extreme Firm Hold Wax Stick (mango scent)
https://www.amazon.com/Hour-Edge-Tamer...
•B&B Charcoal Foam Moisturizer Wrap Lotion
•Got2B High Hold Spray
•She is Bomb Edge Control
https://www.amazon.com/She-Bomb-Collec...
•Conair Infiniti You Curl Ceramic Styler Wand
https://www.amazon.com/CONAIR-Infiniti...
Check out my other socials:
INSTAGRAM: Kiannamoracia
Snapchat: Kiannamorae
Tiktok: Factualbrat
Email: [email protected] (Email for business inquiries)
Intro Song: Live your life by Uptown
https://soundcloud.app.goo.gl/WsawFGz8...
Music in Video by SouthStreet24- Media
FAQ:
Age? 17
Ethnicity: Jamaican
Fav Color: Dark green
Keywords
#amazonwig #lacefront #wiginstall #humanhairwig #humanhair #curlywig #wigtutorial #frontal, Wig install, curly wig install, human hair wig, amazon wig, affordable wig, cynosure, cynosure hair,, wig tutorial, easy install, lace front wig,highlight wig, amazon wig finds, beyonce inspired hair, honey blonde
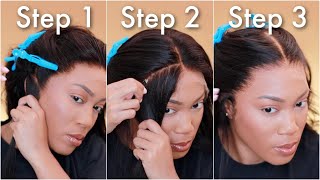
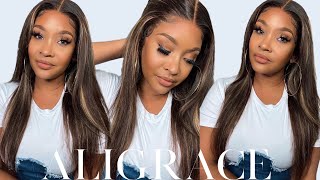
You thought there was going to be an intro huh so before we even get into the video i'm going to do a quick story time. All of this footage is from yesterday, meaning i recorded and installed this wig yesterday, but somehow i ended up losing the footage. So, as you can see right here, there is none of my footage left, not a single bit except these and videos. So what we're gon na do is we're gon na take the wig off and completely reinstall it cue the music. What'S good everybody, it's your girl, canna, marina, back with another video. So this is me just brushing through the hair to get started um. I did go ahead and wash the lace to get any of the spray residue off, because i had to uninstall the wig. Since i lost all my footage - and i decided to do a reinstall video, because i still wanted to show you guys the install process on this wig - this is a 20 inch. 13X4 highlighted wig from the company's synogia hair, with 180 density. The wig came pre-plugged and i'm glad to say that the hairline of this wig made it so easy to install. So you guys are going to see me zoom in on that right here and yeah. I'M just brushing through it to show you all the curls and how nice they look so right now, i'm just giving you guys an extra close-up of the hair and my voice sounds crazy. I'M sorry y'all! I currently have copin so yeah. First thing that i'm gon na do to get started is i'm just gon na put my foundation on the lace, because when i washed it all, the color did come out of it. So i'm just basically doing everything that i usually do all over again and yeah. My entire, like i recorded this video from start to finish yesterday and my entire video got deleted out of my camera by accident. When i was clearing out my storage and i did permanently delete it, so there was no way of getting it back and i was so mad because i'm sick right now, like i'm on my fifth day of quarantine, because i tested positive for covid, and i used My last bit of energy to make that video yesterday, because yesterday i felt sick like it was bad for those of you who always watch my channel. You know exactly what i'm doing here um for those of you who are new, i'm taking my wax stick and i'm just doing that to slick back my hairline. So that way that when i install it all the hair is at the back - and i don't have to worry about any hair coming to the front so right now, i'm going to use a spray bottle to spray some water all over the hair. Just so that it's not blocking my view when i'm trying to glue the wig down and so that the hair stays in place, a very important thing to do when you are doing frontal, installs, glueless, installs or any install in general, wipe any excess oil or makeup Off of your forehead, i cannot stress this enough. Otherwise, either your lace is gon na lift or won't even stick, and i'm making sure that i really get in there, because i do have some makeup um around the perimeter of my edges and i also have edge control that contains a lot of oil because i Use it to slick back my hair, so i want to make sure that my forehead is dry and clean to install that wig. What you see me trying to do here is i'm trying to part out the edges that i already cut on this wig, but i slicked them back by accident. So it's a little bit difficult for me. I ended up just finding them later after i had already sprayed down the wig, so yeah you're gon na see me struggle right here. So after heating up my wand, i'm about to grab it and just go back in on the hairline, making sure that everything is slicked. How i want it to. I was able to get some of the edges out. I burnt myself through i burnt myself yeah. I kept burning myself throughout this entire video. I had to cut some of those pieces out, but i was slicking back the hair, some more just to make sure it's really out of my face for when i installed this wig. One thing that i forgot to mention guys if you haven't already or if you're new here, don't forget to click that like button and also subscribe, and you guys should leave me a comment because i enjoy reading your comments and let's get back to it every time. I use my wax stick i like to just go over it with an edge brush or like a really hard brush to make sure all the hair is in place, because sometimes after you do the wand method, um a few stray hairs will come out. But when you brush it in it, just chef's kiss yeah so now we're gon na get into my favorite part of the video. Well, actually, my second favorite part spraying down the wig and i'm using the same spray that i always use. Um y'all are probably tired of me by now, but i'm using my got to be high, hold spray and i'm just going to spray that underneath the lace and then hold it in place with my finger, you know make sure that it sticks and stuff. I'M also going to use the edge of my edge brush and just hold it in place a little bit to make sure that the hair is fully stick. Now, whenever i spray down my ear tabs, i make sure to use extra spray just because the ear tabs are usually where it starts to lift. First, whenever you have on a lace, front, wig so make sure to use extra spray, and i take my time, um, holding the ear tabs down with my edge brush like the entire time until they dry. They did an amazing job on the hairline of this wig because hold on you're about to see it yeah it gave scalp it gave growing out of my head. I don't know people keep telling me this is giving them like beyonce vibes, so i'm probably gon na put that in the title, but right now, i'm just doing the same thing that i did on the next side. If you guys haven't noticed, i've been gluing my wig down in sections just because it's easier for me that way with frontals, whether it's a brand new wig or whether it's been installed before working in sections just gives you more space, and so that you don't miss Anything because all it takes is one gap for something to not be glued down, and then that's it. Your whole lace gon na be lifting so yeah. I don't know if y'all peep, my accent came out in that last voice that last voice recording but yeah. As you can see, it gave scalp right here. I was feeling myself um. I tried to tie my hair down with the elastic band um. It ended up like snagging on me, so i had to do it off camera and yeah, oh yeah, using the elastic band. I don't know why, but when you use an elastic band, it just melts your entire install and it makes your products dry faster, so you're welcome, while my hair is being laid, i'm just going to go over again with my wax steak and my wand just to Make sure that the hairline is exactly how i want it by time. I unwrap it because i it just saves me time. I don't have time to be doing all the extra stuff. I don't if i could save time with an install by all means, i'm going for it and i'm about to make my part right here. I'M trying to make sure that it's straight, but i was having a little bit of difficulty because i did slick it down in an even section so right now, i'm just parting it to make sure that it's, even because i wanted to do a middle part. I feel like my elastic band has been sitting for long enough. It only takes like a couple minutes for me and yeah. The hair was laid when i took it out so now. I'M just fixing my part once again and then we're about to start getting ready to do our edges and really finish the install. I look like sasha from the bratz. You guys know the bratz dolls. If you don't know the brush styles, i don't know what childhood you had, but right now, i'm just taking my mousse and i figured out that taking the mousse and just putting on the hair then brushing actually brings out like the perfect edges, where i want them To it's just light, though, so i ended up cutting some more um hair to make edges, but it worked out in the end because it was perfect, so i just kept putting mousse on it did some light brushing and then that's how i did my edges um. I did use edge control and mousse. I found that using edge control over the mousse on curly hair gives it this, like nice, fluffy effect where it's not like straight and like stuck to your forehead. So that's what i'm doing i'm using the she is bomb edge. Control recently, i've been thinking about doing a vlog, but i don't know what type of vlog i'd want to do if you guys want to see a day in my life. While i have kovid just comment like as soon as soon as i hear this or comment the type of vlogs that you guys want to see from me and i'll start doing them, because that's a type of video that i want to get into now, i'm gon Na warn y'all beforehand, my edges are lopsided. I don't know how that happened, because i did them even like the first time i installed the wig, but i guess this time i cut more on one side than i did on the other, so yeah. My edges are a little bit lopsided, don't don't look at it too much just just watch the video. I just noticed that the first time that i installed this wig, you know the lost footage i had on a velvet sweater too. Y'All probably saw in like the beginning with the clips that i included, of the footage that i still have, but i don't know i had to put on my pink one because i feel like it just gives off a good vibe like it just captures the whole. Like essence of the hair, it's giving me very much early 2000s beyonce. You know what the honey blonde highlights. I see why beyonce keeps going back to honey blonde, because now it's starting to become my favorite hair color. So now it's time to finally moisturize our curls and when i say we're going to define them, i mean we are going to define them like i'm spraying a whole bunch of water, i'm not putting as much mousse because the water does dry out fast. But i want to see how well the hair can hold the curl, even though i already know, but i'm just trying to moisturize it extra. So you guys know so, as you can see, i'm doing this in sections and when i'm done you're about to see the side, that's moisturized compared to the side that is dry. I don't know if y'all noticed, but the hair has been combing out seamlessly. Now we have our moisturized side versus our dry side and i'm gon na repeat the exact same steps on the side. That'S dry, so we can give you guys a full look. If you keep seeing like a little white mesh in the back of my head, do not worry about that. I forgot to cut the lace at the back of the wig, like you know that tiny little section that's at the back near the combs yeah. I forgot to cut that, but this is the hair. I was trying to give y'all a full 360., but i was sitting down so it wasn't really working and now i'm just showing y'all the hairline very much melted um the curls are bouncy. They just look good. Like i'm actually obsessed, i think i like this install video better than the one that the footage got lost in but yeah seeing i'm running my fingers through it, i'm not getting any shedding, i'm not getting any snagging. Nothing like this here is gorgeous, so this is where i decided to do my side. Part honestly, i feel like on me. The side part looks better with this wig, but it gave at all angles. I'M obsessed like this install is pretty and you can tell i'm feeling myself just by how i'm moving. I really do love this wig. That laugh was horrifying. I don't know why. I laughed like that. I think it's just because i was so shocked at how good the hair looked. Okay, so first thing that i have to say this hair is extremely soft, like snagging, weird snagging, wear no shedding on the oh, my gosh y'all be sleeping on amazon. Wigs, i'm telling you the hair is absolutely beautiful. I have no complaints. This is probably one of my favorite videos yet like the color, everything is just so pretty so yeah guys. I hope you liked the video don't forget to like comment and subscribe. Bye.

Comments
Bianca Cange: Thank you girl I’m about to order it now I needed to see this review!! You look gorgeous
cui: Thank you! I loveeee your finished look so much! ❤️❤️❤️
Aujanae Mason: How’s it holding up & density now?? I just ordered the same color just longer… Your hella bomb too babe ❤️
Rheanna Hinds: Love love love the hair
Tanyah Brown: Love that wig on u‼️
Ailyjay Jones: This fits you❤
Marsha Goldson: Sis that color really suits you.
Marcus Henderson:
Latoya Mckoy: Yasss Queen KiKi.
Kemesha Johnson:
Divine Goddess: You’re so cute!
Lea’sFairytale:
Latoya Mckoy: Feel better soon baby girl. Still fabulous tho.
Nichelle Bennett: ❤️❤️❤️❤️
Ujai Ekanem: How is the wig holding up ?
Fav Fatty: Link for hair ?
Elecia Robinson: This nice good gyal
Latoya Mckoy:
Myesha M: this is your colorrr
Latoya Mckoy: "A day the life"
Monique Bowers: My cousin used that link you uploaded for Amazon and got a used wig that’s been worn a few times. It was matted and dirty and cut into a bob. As though you wore it and then shipped it. Is that your personal link?