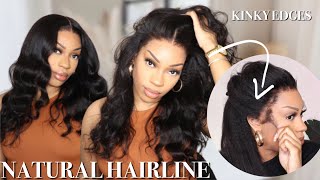
How To Make Your Lace Closure Look Like Scalp | Wiggins Hair
- Posted on 03 August, 2021
- Fake Scalp Wig
- By Anonymous
Hi! Thanks for watching my tutorial on how to make your closure look like natural like scalp!!
Today I will show you how to customise your closure:
How To Bleach Knots
How To Pluck Hairline
How To Get Natural, Fluffy Baby Hairs
The hair I am using is a 5x5 HD Lace Closure Wig from Wiggins Hair. This is a very detailed, beginner friendly video.
Don't forget to like, comment and subscribe x
Products/ Tools Used (contains affiliate links):
- Wahl Hot Comb
- Mini Hair Straightener (the exact one I used is so an alternative is linked)
- Black Got2B Gel
- Elasta QP Foam
You might be interested in:
The PERFECT Summer Hair | Loose Deep Wave HD Closure Wig Install | Wiggins Hair
How To: Easy GLUELESS Lace Front Wig Install | Maxglam Hair
════════დ #WigginsHair დ═══════
Get $10 off with coupon code“wiggins”!!
❤Direct Link➤https://bit.ly/2Sexike
Hair details:#Loosedeepwave #5*5hdlace closure wig 180% density 24 inches
Hot selling #lacefrontalwig➤https://bit.ly/35CeO08
You may also like:
1.Invisible skin melt #hdlacewig ➤https://bit.ly/3wSWvjn
2.Premade colored wig:https://bit.ly/2TJrpf9
3.Lazy girl approved headband wig➤https://bit.ly/35AhJWX
Follow @wigginshair on instagram:https://bit.ly/2Sexos6
Tiktok@wigginshairbest
Facebook @wigginshair:https://bit.ly/3vGHW0y
Email: [email protected]
WhatsApp Wholesale: 0086 18339906150
═══════════════════════
Keep up with me on social media:
Follow me on Instagram: ToniKelani
Add me on Snapchat: ToniKelani
For any enquiries:
Hi guys, thanks for tuning in to this video i'll, be showing you how i get my 5x5 hd lace closure to look like a frontal the wig i'm using was sent to me by wigan's hair. Let'S get started, i recommend that you use closures with really small knots, the smaller the knots, the better the blend. The lace is invisible. I have not cut the lace, i'm holding it against my wall and you cannot tell where the lace ends and where the wall begins i'll, be using blue bleaching powder and volume developer a mixing bowl. I apply the bleach mixture with a toothbrush and a dark clip. So you want to clip the hair back to avoid getting bleach in the hair mix, the blue bleaching powder and the developer to get like a toothpaste like consistency, i, like my bleach mixture, to be thick when i'm bleaching knots. If i'm bleaching hair, it can be a lot thinner, but for bleaching knots you want to make sure that you have more powder than developer so that it is a thick texture, so stir that away and see how it basically doesn't drop from the brush to apply The bleach mixture to the closure you want to use light strokes. You don't want to press so hard that the bleach seeps through the lace and ends up bleaching the hair, and you want to make sure you apply the bleach a bit in front of the hairline. So that, like everything processes, you don't miss anything and i'm going to sit and let this process for 30 minutes and in the meantime, i'm gon na just check it here and there to make sure that nothing's over processing. Let'S take a look at those knots, you can see they're already bleaching to wash out the closure i'll use. My john frieda violet crush shampoo and i'll. Let this rest under here for, like 20 minutes now to customize, i actually didn't watch the arrogant play videos, but i feel like i saw that he said he um plucks front doors and what not on a towel. I just figured i'm gon na pin a paper towel to my wig head and we're gon na. Pluck that way, you know makes sense so to press the hair in place. I'M going to use my elastic design, foam and my wall um. Is it wall wall? How do you say well my wall and my wall hot home, just to make sure everything is sleek and lies in the position that i need it to be in before i get to pluck in like i know this hair is pre-fluxed. I know i know i know, but i want baby hairs. I want swoops you'll, see that i hot comb, the hair in two directions. I hot comb, the hair going upwards so that there's a bit of height in the front because i don't like when hair just lands in your face anyhow, and i hot comb it downwards after in the center part, so that it lays. Naturally, if you guys get what i mean and just look at the hairline, it is beautiful. That is just already looking like relaxer like scalp, but because i'm going to go in a bit more, i'm parting out the front hairs of the closure, because they're going to serve as my baby hairs and i'm going to take a bit more hair from behind there And to begin plucking, i recommend using a very sharp well-angled tweezer, so i'm going to pluck behind the hairline a little bit, because the hairs in the front for me are baby hairs. That'S why i said, despite the fact that it's pre-plucked i'm still going to go in and pluck and you're, going to see, i'm going slow as hell very, very, very slow to pluck this hairline, because this is hd lace and i don't want to damage it. And i feel like a lot of people just think oh yeah plug to do it quickly, because all the big hairstylists do quickly. You don't have to like take your time. Look at what we're doing so, don't make any mistakes and ignore my dry hands. I washed the hair and they are just ashy, so look at the difference in the hair lines and everything we've done to the left side or the right side. I can't tell my left: alright we're going to do it to the other side. Just so everything matches it's important to keep like pulling the hair back, getting out the loose hairs. So you don't have hair that you think is there, but in truth, really isn't there and go over as much as you want, but bear in mind that the hair does shed over time, like closures, do lose the hair over time. So don't necessarily over pluck because with regular wear and tear you will lose some of the hair and just to go over what i have plucked and just make sure there's no loose hairs. I'M going to use my hot comb in the same motion that i told you guys earlier upwards for natural lift and some volume and down along the middle part, just so that it's flat and really sleek. So look at that. It'S looking like someone's hairline literally. This is someone's hairline and you can't tell me otherwise, so i'm going to just cut the baby hairs in a downward motion that just kind of tapers them so that they're, not too blunt as well. Oh, my gosh, don't baby hair the worst in my opinion, to form and shape my baby hairs. I'M using this kaposi pencil straightener that i got from amazon, i'm going to insert the link for this below, but when i last checked they were sold out. So if i can't find the exact straightener i'll link below an alternative with the same barrel, size baby, and just look at that - i like doing this because you get that baby hair shape and to set my baby hairs. I'M going to use my blackboard to be with a little bit of my elastic qp design, foam mix these together and after applying those products. You would then brush the baby hairs into place now, if your baby has to look a bit too long, like don't be afraid to cut them like trim them down if necessary, but with this process know that you're going to be going back and forth. A hundred thousand times like even watching this video to do the voiceover like i know i must have been frustrated so, like i said, cut them if you have to and just continue going forming them getting the right shape and to set the baby hairs, i'm going To use my wig grip band i'll, be laying the fabric side down, so the band soaks up the products that i used on the hair and then i'll use my blow dryer just to set it realistically dry dry. The baby hairs set them to activate the products. So i'm taking off the band now and you can see that the baby hairs are dry and all you have to do now is literally brush them into place, so that they're not so solid and they don't look so stiff. So this is what really gives you that fluffy baby hair? Look. You can't tell me this: isn't someone's hairline like i'm, going to put this on my head and it's going to be looking like, i have a relaxer, and that is the end of my tutorial. Thanks for tuning in guys, if there's anything, i missed, please drop me. A comment. Don'T forget to subscribe comment and like see you in my next video

Comments
Wiggins Hair: Such a great job!