How To Make & Style A Wig For A Client | Wiggins Hair | Beautycutright
- Posted on 13 July, 2019
- Fake Scalp Wig
- By Anonymous
In this video I show you step by step on how I make and style a wig for a client. Tips on selecting the best hair texture for styling is included.
JOIN MY WEBINAR ON HOW TO START A BUSINESS IN THE HAIR INDUSTRY:
July 14, 2019 at 2pm EST/1pm CST/ 11am PST 8pm Europe Time
https://www.wigmaking101.com/events/ho...
FOR ONLINE AND IN PERSON WIG MAKING CLASSES VISIT:
=========================================================
☎️CONTACT:
For Business + Reviews + Sponsorships +Inquiries
=========================================================
SOCIAL MEDIA:
@beautycutright
@wigmaking101
WEBSITES:
Beauty + Health + Lifestyle
https://www.beautycutright.com
Online Wig Making Courses + Hands On Wig Making Courses
=========================================================
Music Provided By:
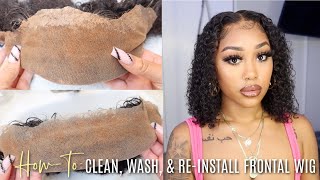
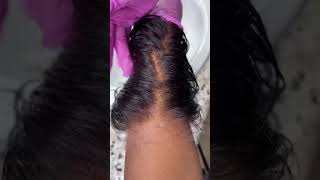
All right, so I am actually getting ready to teach my wig making sewing machine with using the sewing machine weapon, our live webinar. All the information that you need to know about. My live wig making courses are the link will be down below, but I wanted to shout out to this hair that was sent to me by Wiggins, hair dot-com. I believe I've get so much hair honestly and this they sent me a closure which is a 14 inch. They sent me a 16 an 18 and a 20 inch length of wavy like a nice, not deep, oh yeah, a nice deep wave here. So I wanted to showcase them, because I'm actually going to be using these this hair as an example for the wig making course that I'm going to be doing so. This is what the texture of the hair looks like, and it's nice and silky, and just bouncy very bouncy hair, and what I do like is the closure. How prominent this Center party is. It actually looks like this center part if you can see quite closely like where my fingers are looks like it's been like pre plucked in a sense to make it look like a real Center party, but we won't know until we actually get started. Putting this wig or together so I'm actually going to be doing this with a sewing machine. It'S actually how I'm going to install these wefts onto a wig kappes with a sewing machine, but I don't use a sewing machine to put the lace closure on. I tend to do that by hand. I do have basic week making sewing classes on my website as well, I'm just showing you how to do a lot of your hand, handmade wig making. So just the basics. You need the basics in order to understand how to do the rest of it. So just standard needle and thread sewing needle and thread for wig making. I'M going to attach this on to the way cap, which happens to be this week. Cap, because this is actually the best type of cap to be using for sewing machine wigs. So since I'm going to be making the wig with a sewing machine, I prefer to use these caps because they're easy to work with, so any other cap would never suggest these type of caps are the best. So first thing I'm going to do is place. The center part is what it is. I actually can make this a side part if I wanted to which I got a feeling, I might want to make it a side part uh-huh, whatever either way, I'm gon na place this first undo it by hand and then I'm going to sew the rest of The website alright, so this was actually recorded October of 28th of last year. This was a video recording that I did for the online wing making school that I do teach you guys are aware, or you may be aware, that I was in South Africa and Joubert training manufacturing facility on making wigs not on these type of sewing machines. This is what I teach on my online courses, but teaching them how to use a high post sewing machine week making sewing machine. So if you haven't seen those videos - because I did vlog on them - you can definitely check them out I'll link them down below, but making a wig on your home sewing machine is very simple. I mentioned all the types of caps that you can use how to sew how to use your sewing machine. All of that is on my wig making 101 course. You can check that out as well, but as usual I am I making this wait for a client and I'm using my sell machine so on to the styling part of winks. I do teach this. This isn't a master course number five. I believe four or five or I actually teach how to style wigs using all of the same techniques that you would use if you are in cosmetology school when it comes to cutting drying and all that stuff, but just a little tip. I prefer to use hair that is textured, so it's either very curly or it's very tight waiting to straighten it, because this type of hair holds a curl a lot better than bone straight hair. So if you make your own wigs or learning to make your own wigs or whatever, that may be in your looking for hair, that you want to curl and you've been looking on Amazon and Aliexpress, it's better to get a texture that is wavy or curly, because It just holds a curl better, so this client wanted a Hollywood style curls, so you do have to pay attention to the direction of how you're curling them. You also want to hold them like pin curls. In this case, I use roller sets like the old school plastic rollers. So that's what I'm using to do this with, but yeah using my big barrel, curlers curling it towards the back of the head and then wrapping it to hold the curl. I believe I kept these curlers in for about a day or two before I took them out so another tip when you're doing hollywood-style curls with a large barrel, curlers you'll notice that the top section I tend to do this slightly separately. From my side, I do the exact same thing as I actually go up above the head and then I roll back towards the back of the head. I'M taking everything and nice sections, not too large amount of hair because just trying to curl in and trying to do it all at once. It'S just a lazy way of doing it and it just does not fit make the wig look any better you just over it. Just doesn't get all the heat that you need in order for that curl to stay and then for the back aspect of it. They'Re in longer sections from the top of the head to the nape and I use a barrel curl, you know my barrel clothes roll it around. My fingers and I use clips pink lips. So you don't have to use curlers if you don't want to, but just really quickly. I just use the pink curls for it: the pink lips to hold the curl, so there's nothing like using a little holding spray just to spray the hair, and so I like, I said I left it for about a day or two, and then Here I am Taking them out and I'm going to like comb through them and style it as much as I need you just kind of slightly see. My client is over there off to the side. She'S a longtime friend, so I'm doing this week for her for her birthday. So yeah I'm coming back to you. So these are life yeah, Angela mother, start coloring. I don't have to redo a whole new one with the bangs, the French baby, the one that I do have so that's it guys. I hope you enjoyed this video. You can look down below in the description box for the videos when I was training in South Africa and you can also check out my website. Remaking. 101.Com. You definitely can just log in and see what courses that I am teaching there's more to come tomorrow. I will be hosting a webinar, so if you would like to join that, you can check down below for that link as well make sure you subscribe thumbs this video up, I'm going to try to do as many as I can and try to post every Saturday. If possible, but other than that, I will see you guys in the next video

Comments
MsLiberianLady: She was too happy!!! I’m goin to try one of your classes I wanna finally learn how to make a wig on the sewing match
S Small: Two Thumbs Up !! Thank you for sharing.
fhmrhnrhrn sfnegnegneyj: I have a small question. If i wanted to get my hair done,in a lace front at a hair salon do i go online and find a lace front or do they normally have one there at the hair salon?
Leticia C: GorgeousI know she happy
M Bell: amazing job
Sori Yazz: Her & the wig are both pretty.