Start To Finish Wig Install | Loose Deep Wave | Wiggins Hair
- Posted on 12 July, 2020
- Fake Scalp Wig
- By Anonymous
Hey Loves,
Thank you so much for tuning in and watching how I install this loose deep wave curly wig from start to finish. This was my first time filming content like this so let me know if you liked it or have any other video requests that you would like to see from me in the future. Till next time.
Kisses,
Bentina
•PRODUCTS USED
Eco Styler Gel https://go.magik.ly/ml/ymjz/
Cantu Curling Creme https://go.magik.ly/ml/ymjy/
Lotta Body Foaming Mousse https://go.magik.ly/ml/ymk0/
•LINK TO THE HAIR
https://www.wigginshair.com/26-40-long...
Loose Deep Wave 13X6 Length 26"
*This video is not sponsored*
• Social Media
IG: bentinak
email: [email protected]
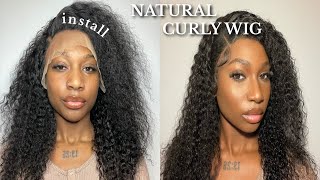
Hey you guys and welcome back to my channel, so today's video, i'm gon na, be showing you how i install and style my wigs, don't forget to give this video a thumbs up and subscribe to my channel and let's just get into it. So this is the wig. This is a loose deep wave texture, it's in the length 26 and it's from wigan's hair. So i already put my foundation inside the lace just to like blend it more with my scalp and i found that this works the best. For me, so i'm just gon na go ahead and put her on okay and it fits perfect. I'M gon na style it and whatnot afterwards, but um right now. I'M just gon na glue it down and i'm gon na use got to be glued. So i'm pretty sure y'all have already seen a bunch of people lay their wigs down. So i'm just gon na speed this part up and then um get back to you guys when i'm styling and stuff like that, so yeah i'll see you guys when i'm done with that. So right now i'm just pinning my hair back just to get it out of my face. I like to cut my lace off in sections just so i don't cut too much so right now, i'm just starting off in the middle and then i cut off the sides when i'm done with that. Oh me, so right now, i'm just kind of visualizing how the wig is going to lay on my head once the glue is on. I think it looks pretty good, so i'm going to go ahead and push the wig back, so i can start applying the glue. I like to use the got to be glued free spray and an applicator brush, just because it's less messy and more precise with where i want the glue to be so you're going to see me apply the glue a few times, because i like to apply it In layers, i found that this method works the best for the best results just so it can get tacky enough for the lace to stick onto it. So now i'm just lining up the wig, with the glue that i just put down, then i'm using the end of my rat tail comb to press the lace into the glue. Some of the glue didn't stick to the lace good enough, so here i'm just reapplying. It to the corners - and this is pretty common, because the corners can tend to be the most difficult to deal with when gluing down your lace and then i'm just using a wrap to melt the glue and the lace together even more so right. Now i'm just taking some alcohol and wiping off any excess glue that may have gotten on my skin or outside of the lace. This part is pretty important because the got to be glued spray does dry kind of shiny. So you will be able to see that if you don't take like alcohol or water, so i can get some phones scrolling in my ride chilling all day long. So here i'm just sectioning off the baby hairs before i go ahead and cut them um. I don't like to do too many baby hairs because i feel, like too much looks kind of fake, so i just kind of like to do a couple: swoops, nothing, crazy, um, yeah, just to make it look a little bit more natural. I'M going to attempt attempt to lay my edges: i'm gon na use the edge booster um just a little bit because this stuff's pretty strong full of girls. Oh what come on vision, i'm just way too shy. So i believe this wig did come pre-plugged all. I did was just bleach the knots and added my foundation to the lace so because this wig did come pre-plugged, i didn't feel the need to go any further with plucking or anything like that, so i kind of just left it, as is um. This wig was on the pricier side. I did purchase it with my own money and i just don't want to experience any balding or shedding on the lace, and i just want to keep it looking fresh as long as possible. So this is kind of like an overview of the hair in its natural state. Before i put product in it, the hair is really really pretty from the back um. The front is a little bit more wavy, but the back was definitely a lot more curly and bouncy and just full. So you can just walk out the door like this and call it a day. But i like to be a little bit more extra and add a little bit more umph to the hair, show the texture, the curls and give it a vibe. So i'm gon na go for like a wet type of look kind of like a summer time. Vibe and just kind of like show you guys how i get that so right here, i'm just adding some foundation to the front part of the lace, and you guys. Can you see how melted this lace looks once i did? The foundation like this looks really good, at least to me so yeah? I don't know why i just started doing this, but before girl my lace was looking so ashy and like i'm, a dark skinned girl. So ashy lace shows up on my skin like bad. So once i started doing this, my lace was starting to look so melted. So juicy like what lace you know what lady but anyways yeah. So if you're, finding yourself having this issue, i recommend using your foundation just to cover that up and like blend it with your scalp and it works so good like so good. So right now, i'm just drenching my hair with water. I'M really making sure that every single strand is wet. The wet look will not work if any of your hair is dry or you have any dry spots within your hair, so really make sure that your hair is drenched with water. What i use on my curly wigs to make the curls really pop is the cantu curling cream. I feel like this works so good. It really just makes the curls look really juicy and bouncy and it smells good. So i really like this product, the next product. I'M going to be using is the eco styler gel, and this gel just really locks in that curling cream. It makes your hair look really bouncy and wet like you, almost came out of a pool, but it also leaves your hair looking like that throughout the whole day. So i really like using these two products together to achieve that really pretty wet type of look. So so the third and final product that i'm going to be using is the lotta body foaming mousse, and i'm just using this on the top portion of my hair just to hold it in place and give it some shine. So this is the final look. I hope you guys enjoyed watching how i install my wigs, specifically my curly wigs, don't forget to give this video a thumbs up and comment down below what else do you guys want to see from me and subscribe to my channel and i'll see you guys in My next video

Comments
Ams: This is stunning
Wiggins Hair: Stunning Such a good job!Thank you so much for sharing us with this video!
Clayton Batten: Love it
Amanda Elsie: how long did the hair take to ship and arrive to you when your ordered it?
DivineKing: 11 months later you pop up on my timeline. Such a beautiful woman with or without the makeover. My god
fishing with filitsa: Beautiful
Eduardo Ortiz: Sin palabras hermosa
J Simmons: Welcome back.... we need more try on videos!
Gorilla Entertainment: Glad to see you back love
Sara Kilburn: gorgeous what density is this please?
D Mariie: How long did it take for you to get your hair ??
Samuel Pierce: You are quite BEAUTIFUL... Your Chocolate skin is MOST ELECTRIC. I Love it! Blessings to you...
Tykeria S:
Im_ Preciiouss: Can you make a video speaking about why you like wearing wigs and how it helps benefits your lifestyle ?
Manfredo Millan: you're beautiful!
Amber Smith: density?
Colette: Video recommendation: facts about you or Glad you're back!
Ghislain Te Selone - Digital Hacking: Kouadio ??? sounds like IVORIAN ROOTS ( IVORY COAST) .... big support to you !!!
Boy Vanbrussel: Love you baby❤
Karim Song: l hope show try on hual swimsout
sallami nourdine: Jl.