Slay 11 Or 30❤️ Burgundy Fake Scalp Wig Cut With Layers❤️|Thebeautifulhustlerbrand| Julia Hair ❤️
- Posted on 28 September, 2020
- Fake Scalp Wig
- By Anonymous
!!USE MY SPECIAL CODE GET Extra $10 OFF(work for all the goods):JULIAYTB99
♡ #JuliaHair #HumanHair #LacePart♡
I’m wearing Brazilian Burgundy Wig in the video ➤ https://bit.ly/337RTt1
Hair Details: lace part wig burgundy in 24 inches, 150% density
★ Follow store to get coupons: https://bit.ly/36ixeoh
Affordable hot curly headband wig to choose: https://bit.ly/342wtwJ
Every Month Lucky 17th Flash Deal, Fans extra 7% off /New Arrival extra $15 off
No.1 sold: Hot sale Malaysian Curly hair Bundles ➤ https://bit.ly/2ECUotS
No.2 sold: Super Affordable 8A/10A straight hair bundles ➤ https://bit.ly/2S5cM1S
2020 Julia Hot sale hair ☞ http://bit.ly/37YbgoD
https://www.juliahair.com/ ➤ http://bit.ly/38JkwgA
YouTube Channel: http://bit.ly/2DxVD9C
Instagram: @juliahair_no1: http://bit.ly/34GPcwT
@juliahair_aliexpress : http://bit.ly/34EB47p
Welcome to IAmBeautifulHustler TV
Be sure to SUBSCRIBE & Turn ON Your Bells✨
TO PURCHASE MY HAIR & PRODUCTS FROM MY BRAND: (TheBeautifulHustlerBrand )
Use Link Below ⤵️
WWW.iBhSlays.com✨
We Ship Internationally ✈️
TO CONNECT WITH ME ✨
Personal IG: Iambeautifulhustler
Business Instagram:_Beautifulhustler & @thebeautifulhustlerbrand
Twitter:_Beautifulhustl
YouTube: IAmBeautifulHustlerTV
CONTACT ME✨
☎️ 786-571-1313
Email : [email protected]
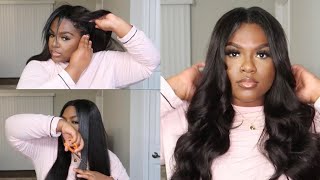
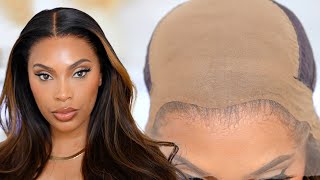
Party, hey beauties and welcome back to i'm beautiful hustler tv today, we'll be doing a quick and simple uh lace, closure, wig and today's hair is provided by julia hair. Now they did send me over this uh burgundy, fake scalp, um 4x4 closure wig, and this is what it looks like you see the little um fake scalp fabric in the inside or whatever, and you know this color uh. You know the wig came in this color. So i did not do any coloring to get this. Look. I just pretty much, you know, put it out the box and i'm getting ready to install it now, as y'all can see, my braids is old um. These are the same braids from two weeks ago, and this is the growth that i have from using my growth oil within those two weeks and of course i never take my braids out - i'm going to keep them things right on in, but now i'm just going To go in with some more of my beautiful hustler, hair growth and repair serum, and i'm just going to apply my oil right throughout my braids and my scalp. And i'm just going to massage that in there really good, just making sure um that my hair is moisturized. And i even added some of my ends. And now i'm going to go ahead and take my lace, prep and a napkin. And i'm just going to spray that lace, prep right in the front, um everywhere, where my closure is going to stick just wiping away um. You know all that dirt that oil in that makeup, that is sitting there, then once i apply my skin protectant, i mean my lace prep, i'm going in with my skin protectant and i sprayed it in that same area where that closure is going to lay, and I'M just going to blow dry that so um, you know just to make sure all of my hair is dry and everything not usually after this step, you can go ahead and spray back. Your hairline um with you know, holding spray or hold on pause. Let me take a shot real, quick, yes and i'm sipping on that crown royal, so um anywho, though um after i blow dried that hair. You can spray it back on your holding spray. I use the goddamn b gel, but, to be honest, i feel like doing all that, so i just went ahead and took my beautiful hustle wig cap and i put it on top of my edges and just pushed it back and it you know it pushed those Hairs back out the way, and now i'm going in with my um java color foundation, i'm just applying it on applying on top of my cap, because i will not be doing a ball cap method because with the fake scalp thing you know, you really don't need That and honestly i didn't even have to use the foundation on the cap, but i just did it anyway, so it's not needed because of the materials already underneath the wig. So now i'm just going to go ahead and place the wig on my head and add that same foundation, color on that little lace, part right there in the center underneath and on top - and you know just to make sure it's going to blend in with my Color but to be honest, once you actually glue the wig down all that gets cut off anyway, so it is kind of like a another unnecessary step but um. This is what the wig is looking like. So far, i'm just showing you what it look like and i'm gon na go ahead and get ready to glue it down, and i did show you guys all the layers that i did today just to show you guys how quickly um the glue dries so um. I'M just going to show y'all like i mentioned all four layers and just show you guys how quick it dried and i'm just gon na you know, begin to pull my lace down and i'm using my large bottle of my lace, mid adhesive and i'm just applying That right in that little area, you decided um. I didn't you know, make it too wide, because it's only a 4x4 closure wig, but i'm just taking the back of my rat tail and just smoothing um that glue all the way out and i'm just going to vibe a little bit. Vibe take another shot of my crown royale and, as you can see, as i'm sipping, it is turning clear that quickly and now i'm going in now with my second layer and as i mentioned um i will do four uh for my closure install. So i'm just gon na let y'all you know vibe it out and see. You know how quick it turns clear and i'm going in here with layer number three and then, of course, after this layer i will be doing my last layer, which is layer number, four and um once that layer is complete. I will go ahead and begin to pull my lace down into my glue. Y'All see i did my little makeup: child okay, i'm cute or whatever cute, but here is layer, four i'm spreading that glue out and then we're gon na go ahead and take that wig. So, let's get into it and now that all four layers is on there, we're just going to go ahead and pull that lace right into the glue and i'm just going to press it in with my fingertips. You know making sure it's you know stuck down and then i'm just going to go on with my razor eyebrow razor and just raise that extra lace off and then tack down the little pieces in the front. That'S still lifting um a little bit that i missed and after that, i'm just pretty much going to get into the styling of this video um, really to be honest, y'all like with these fake scalp wig, it's not really much. You can do as far as like the styling um, you know, so i just did like a middle part, blonde cut with layers, because i never like did the layered look on myself and you know i actually loved it overall, but you know i would prefer, like 13 by fours and stuff like that, so i could really pluck - and you know, get into the baby hairs and everything like that. But, however, as i mentioned, i'm just going to go ahead and tuck down the rest of this wig and then get into the actual styling portion. So stay tuned. And now i'm going to go in with my glam wax and i'm just going to apply the wax on the top of that closure part. So i can get ready to hot comb, smooth and sleek everything down and i'll also just be using my big flat iron and pressing the hair out really good. I didn't add any product to the hair, it's other than my wax look at the top part. So pretty much how this hair flat iron is dry. That'S how it looks it's nice. You know, and still you know, sleek sleek, looking of course, but once i get everything hot combed and flat ironed, i will get into the actual cutting part. Okay, talking talking foreign, oh so now that i have everything down, i'm just going in with that same java, colored uh foundation, i'm just going ahead. You know and concealing a part to make the part more visible and then i'm going to take my high beam spray in the color burgundy and just lay the rat tail of my comb on a part and spray around it. With that burgundy spray to really help define that part, and now that that part is complete, i will go ahead and begin to do the cutting part um first. Well, you know. For me, this is a little bit hard, so i have my sister come in and you know help me with getting the back straight. So y'all will see her make a quick little appearance, but right now i'm just stepping back and i'm taking my scissors, i'm just splitting my hair into two pretty much and i'm putting all the hair to the front and then i'm just going to take my scissors And just go all the way down to the desired length where i want it to be and go ahead and begin to um chop their hair um right off. As you can see, i went ahead and did a blunt cut now, i'm just currently looking in the mirror in front of me and just trying to even it up as far as in the front, so i can have my guidelines so once i toss it behind Me she would just even up the cut with whatever the shortest length is. So that's what i'm explaining to her now, like hey girl, can you cut the back of my wig for me because i ain't trying to walk around looking crazy, but now that i have cut the front i'm just going to sip on my crown royal while she Um get me together in the back saying that's la la y'all say: what's up, lala did, i just say say: what's up lala y'all yeah, but she just went ahead and y'all know my sister does hair as well. So i just had her get that right. For me so she's just going in doing her thing doing her little snippy, snip snip and once she get the back of his hair all even and cut for me, y'all see it's looking cute cute cute or whatever straighten that out and now i'm going to go In and add my layers in the front and for the layers in the front, i'm going to use an eyebrow razor, let me fix my lashes, shall i had to use um a eyebrow razor because i didn't have a razor comb, but it's a fresh eyebrow razor. So all i did was like start the razor cutting where i wanted my layers to start. You know my shorter long layers, so i just went in with the eyebrow razor and i just kept razor in it soft now. If you want soft looking natural layers, you can use a razor comb, but if you do want more blunt layers, you can just use like some shears and make your cut as blunt as you want it. You know as blunt as you want it to be, but i did want like a soft um razor cut. Look so i did go ahead and you know just eyebrow razor it in an angle on both sides in the front, and i went pretty you know far down just to really have that look and like i mentioned this is like my first time doing this razer Look on myself, so you know i know it's going to be cute because one of the colors already popping and everything like that, so once you just get to bump the layers it just all comes together, so the same flat iron that i use to flat iron. My hair, i'm going to bump my layers with once i get it razor to you, know my liking, but even after you do bump it. If it's some places that you feel need to be a little shorter or whatever the case is, you can go in some more and do that part as well, so yeah, i'm just getting everything cut to the t. How i like it and just gon na, go in and just really bump um the ends of that wig. Now with this, you could bump it. To be honest, you know pretty hard um. If you want those legs to be like very, very noticeable or you can do it just soften gently just to your preference on how you want the finishing results to look, and i also did bump the ends of the you know, the blunt cop, the blunt cut Part at the bottom just so you can really get that curled look effect, so i'm going to curl all of that hair even down to the bottom. To really have that cute little look, but you know overall, i really did enjoy this. Look like. I love the color of the wig. I love the quality of the wig, i'm just not like a big fan of the whole fake scalp thing. To be honest, but you know you can finesse it. You can finesse it for the most part to really get a nice look but um, as i mentioned, i'm just going to go in you know again after bumping and just touch up any spots that i feel is not you know up to par or to my Liking and once i get it fixed up that pretty much sums up this tutorial, let me know what you guys think down below on this look: leave some feedback below um. You know, like i said you know, fake scalp. Wigs are not my favorite, but you know it's definitely beginner friendly, especially on how to plug and everything like that, so it was very quick and simple to install as well as you see so um. Overall, though i did love this color. I did love this wig and i did love the style that i chose to. You know do on this wig and it's really cute bouncy flowing, and you know, let me know what y'all think down below um yeah. Thank you guys for tuning in. I would drop my little selfie video towards the end, but leave me some feedback. Some comments, questions thumbs up. All of that. I love you all and continue to stay tuned until my 30 days of sleigh series see you next time you
Comments
Elizabeth Johnson: Love your talent this came out so cute you did your thang as always ♥️
Jason E: Periodt ❤️ I am loving these slays
Kia: First off let me say i just got my ibhslays pkg in the mail!! Im super excited! I ordered the Pretty Loose Wave unit from Bilace.com. I plucked and bleached and also watercolrored it black using the adore black velvet. It cane out soo good..i cant wait to install it tomorrow!I learned everything by watching your videos so thank you huntyy!
Shell Shell Beyond Beauty: You killed this stlye. Love it. That color looks great on you. I got you email massive love to you boo. Thank you so so much
Princess Toyia: I really liked last night's live!!! And as usual you slayed this babydoll!! You are the best!!! Period!!! ❤❤❤❤And unless you have used that glue, you will never understand its magic!!! Please believe me ladies, it really is the BEST DAMN GLUE!!! It lasted me 3 weeks and I went swimming. It would have lasted longer but I wanted to change my wig but it was still stuck on my head after 3 weeks!!! BUY IT!!!
Kemo Bennett: that hair is everything, plus it looks beautiful on you....continue to shine and showcase your talent dear.
Jamilla Worsley: Yassss honey you definitely slayed that!!! Take a shot for me too!!! I definitely love this look on you!!! What’s up lala!!!!
Weight loss Journey with Tam: First off you r a great stylist, wish you were in Dallas. That looked wiggy.
Simplyamazing102: She be giving me life
Julia Hair: dear, it is your first time try this color wig but looks great .
Nnikah Ellerby: This wig is a no for me. It's just something about the front part thats giving that "wiggy" look. (No shade) Because you always slay baby
Oooh Lala: Hey LaLa. Lol. I love the layers
Cynthia Wilson: Beautiful
Tamara Pulmas: New subbie alert. Love yur work.
Lynesim G: How can I order your hair products please
Jaames Higgins: The only thing I don't like about the fake scalp wigs is the party down the middle that you must keep
Chosen ByGod TV: Hey Shae
solo Twan: Hey