How To Make A Quickweave Wig W/ 2X6 Closure | Dola Hair
- Posted on 29 August, 2018
- Fake Scalp Wig
- By Anonymous
This video is sponsored by DolaHair.com
$10 off with code: dola10
Hair Bundles With 2*6 Closure http://bit.ly/2BogoGK
Hair Bundles Deal http://bit.ly/2MqvqQm
One Pieces Closure http://bit.ly/2MO2ezS
Dont Want A Sew In? Try Our 13X6 Lace Wig
Pre Plucked Lace Front Wig http://bit.ly/2KZl6Kq
Contact Dolahair
Email : [email protected]
Us Tel : +1 504 266 0468
Imessage 008615973156752
Follow us On Social Win Free Wig And Bundles
Dola Hair Instagram : http://bit./dolains
Dola Hair FaceBook :http://bit.ly/dolahairfb
KEEP UP WITH ME!
I N S T A G R A M:
IG: https://www.instagram.com/makemeovermi...
SUBSCRIBE TO MY NEW CHANNEL: https://www.youtube.com/channel/UC72RT...
WHERE I PURCHASED MY DRESS:
CAMERA I USE:
LIGHTING I USE:
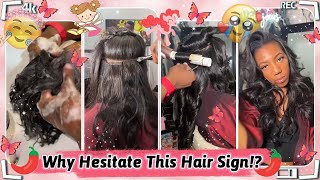
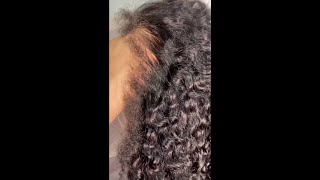
Hey guys welcome back to my channel today we'll be doing a hair tutorial featuring Dola hair calm. They send me a 2x6 each closure that i will be doing a review on for you. So this is the packaging that they sent me super cute and I have a lace closure, that's a two by six, so it goes six inches back and I believe it's 14 inches long. I have a 16 inch bundle. A 18 inch bundle and a 20 inch bundle as well, and they also sent this off flyer. So if you take a photo where, in their hair, they will see you ten dollars in cash and if you make a video wearing their hair, they will see you twenty dollars, cash, so yeah and they also send me a little pamphlet about their hair company and Their last they send me this pouch and inside the pouch. It has two silver clips: a wig comb and a hair net. So what I'm just going to do is braid my hair down. I'M not doing this perfect. This is a mess. You know just braid it down, I'm not even braiding it tight to get your hair braided down. Then. The next thing you want to do is apply your plastic cap. Normally, I would use a dome cap and when you use the dome cap you don't have to do this step, but since I am using stocking caps, they are way thinner than a dome cap. So I have to use the plastic cap up under it, because I do not want the glue to touch my hair at all. So here is the 2x6 closure. It'S so that you get that deep parting, and I just love the fact that it goes back. So far because lately I've been wondering where middle parts, but they just don't, go far back enough and it kind of looks a little weird. So this is perfect, so I'm gluing it on - and I forgot to put the lace also just make sure you cut the lace off the front and then I'm trying to get it in the middle of my head is best as possible, using my nose as a Guide, of course, and I'm just going to press down on it, so let the glue see through both of the caps and then I'm gon na take my 20 inch bundle and I'm just measuring each track out. This is not perfect, so once the glue is on the track, I'm just going to lay it down a lot of pressure and I'm just gon na continue with the same process, measuring it out, cutting it gluing it I like to put the glue on both ends. First, so that the ants are taking and don't lift, and then I just adhere the track to the cap and there's it just repeating this step, making sure I measure out the track, make sure that it is long enough, even the ones that aren't long enough. I'M still going to like put them in somewhere you'll see where the shorter tracks I just kind of pretty now all of the hair is in, and I just put a little mousse on just to kind of tame the hair, but we're gon na take the week Off and cut the little black cap, that's under the lace and then I'm just going to put the lid back on and receive we're plucking it. This does take a little time, especially if you don't bleach your nuts bleaching. The knots help the hair come out a little bit because obviously the bleach is kind of damaging it. But I didn't bleach the night. So it is a little tougher to pluck the hair out and it does take a little bit more time. But I'm just going to take my time and put this part, so that is not so harsh. I just kind of wanted to gradually fade. I guess or like a gradient effect with the line. I don't want the lines to be so harsh. As you can see, it was kind of a struggle in certain areas and it's like the hair just being one of look at all, but I took my time and tried to do this as I came in that make it look natural. So now, I'm just using my wax stick to tame any flyaways on the closure, and then I'm just gon na take my flat iron. It has a ceramic side and I'm using it to flatten out the top of the closure. Next, I'm just going to take the flat iron you'll run it through the hair. Try to get it as straight as possible. I took a little hairspray just to kind of keep the Flyway stained and flat. I don't know I just have to do a few little extra stairs just to make sure my hair is right. Next, I'm just going to take some foundation. That is the same color as my skin tone. You don't want to use nothing lighter. You want to use something: that's same color as your skin tone. I know your scalp is not the same color as your skin tone, but when it comes to these closures, it's best that you don't have a variation of colors in the top of your Heat. So this is what it looks like after I have plugged it in put the foundation on. I did trim like some little hairs down to kind of do some baby hairs, but I really I didn't. I don't really do the baby here thing, it's just there. Now. I just want to show you how flat it was. Even we, those big ol, braids and money, I took a little ol Sheen, just to kind of give it some shine, and here I'm just kind of showing you the quality of the hair. Then I decided I want to see if it would take some heat and I just kind of put some loose curls in the front just to kind of keep it like a bang like I had some layers, so I'm just checking out my hair. If it's okay, I did add some got to be chill and kind of try to lay down the hairs, then in the front, but yes, so this is my final look. What do you think about the closure y'all? I love how deep the part of me is. I hate when the closure barely goes down. The middle of your head is like sitting down there at the front. If you want to know more about the hair. Just let me know in the comments - and I will give you more details on the here - make sure you thumbs up this video subscribe. If you haven't already, and I will catch you on my next one,


Comments
Katrinne Libre: This tutorial is exactly what I was looking for! I only have bundles a closure and glue and i broke my leg so I can't leave the house yet
Dola Hair: thank you so much , this is a great review
Sharice Boykin: You bodied that wig
Elizabeth Cole: Did you cut all of the wig cap under the closure of both of them?
Makayla Renae: How many bundles did u use