How To: Diy Ventilate Full Lace Wig Using Diagonal Method With Braid Extensions|Beginners Friendly|
- Posted on 15 January, 2023
- Full Lace Wig
- By Anonymous
@minarbeauty how to ventilate 360 full lace wig using diagonal/symmetry method of ventilation with braids extensions and how to make it have weavon texture using hot water and straighten method
Check my page for other amazing content
Please don’t forget to like, comment and subscribe
Material used for the tutorial
1. Ventilating pin
2. Full lace cap
3. T pin
4. Mannequin head
5. Tripod stand
6. Braid extensions
7. Metallic pen
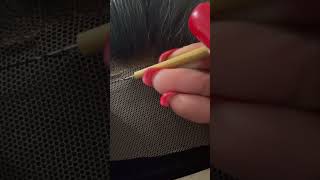
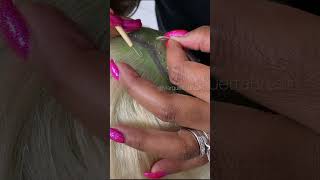
Hello, beautiful people yeah welcome back to my channel. If this is your first time here, please click on subscribe button down below give this video a thumbs up and turn on notification Bell to get notified. Whenever I drop another video, so in today's video I'll be teaching you how to ventilate a full lace with braiding hair extension using diagonal method of ventilation, how to make it after weave on texture and also how to ventilate the thick Parts at the back. These are the material you need for the tutorial. You need the operating extension. You can use any band and color of your choice. You need full lace, metallic pen and ventilation. Pin the full lace is divided into three parts: the back the middle part and the front part. The front part usually come with a line which indicates where your ventilation will stop. The back comes with adjustable straps, which will be inside when you want to place it on the mannequin head, and you want to ventilate over that seat. Part at the back then place your next on the mannequin head, make sure the parts you want to ventilate is very flat on the mannequin head, then use your t pin to secure heat so that you should not be pulling up. When you start, your ventilation use metallic paint to Mark half inch below the thick Parts at the back cut your base extension into size of your choice. I cut mine into six bring small pieces out of the air combat to make sure it's tangle. Free then make sure I won't end is longer than the other, because you don't want the hair to be too short, when you're done with the ventilation and pinch and twist pinch and twist then use your hands to bring some hair out so that you can see The number of air you want to be working with it. Like I said earlier, we are using diagonal method of ventilation. You can check my previous video to see the vertical method of ventilation. So, instead of following a straight line, we are going to follow the slanted line as you're playing through the net, bring out two strands of hair, wrap your pinch through the hair and pass it to the loop pass. Your paint through the net, bring out two strands of hair pop your pain through the ear and pass it to the loop. So you Skip One straight line and move to the next pass. Your pin through the net, bring out two strands of hair and pass it to the loop. That'S how you keep going make sure you are not picking more than two strand over here, because you want the wig to be natural as possible. You don't want the knots to be too big or too facible packing too much of air in one, or we only store down your work, make it full of an unattractive. If you have interest in any of the week you see on my page or you want to order for any week on my page. Please add me up on IG, Mina dot beauty or you should message me on Whatsapp, with this phone number. You are seeing on your screen foreign straps at the back, so we are going to ventilate on that net to cover the White Stripes at the back. So you will continue your ventilation until you reach, where you use your mentally paint to Mark at the back. I'M almost done with the back section here, so I decided to show the video so that you can see. I have to ventilate the rest of camera so that the video will not be too long, so we are moving on to the major part so in the same process as the beginning, instead of following the vertical line, which is the straight slam, we are going to Follow this slanting one, so you pass your pin through the next bring out two strand of here: wrap your pin through the air and pass it through the loop. So you leave one straight line: move on to the next pass. Your pinch through the next bring out two strand of your wrap, your paint through the hair and pass it to the loop. It'S the same process once you know how to pass your print to the next I'll, bring out the air. It will be very easy to ventilate foreign, so I have to fight for some parts, because I don't want the video to be too long. If you notice that you are tired, please take a day or two days off even a week. You can take it off because ventilation is not a day job, it's not something you can finish within a day or two. It takes a lot of time and dedication. So if you're tired, just take a break and continue, if you are forcing yourself to ventilate, you will notice that if you are doing rubbish so whenever I attire just take a break foreign section here, so this is how it looks like when I'm done with the Meat too, on the back section, I started ventilating the phone section using same method, which is diagonal method of ventilation. So you have to look closely when you reach the front section, because if the line is very confusing, so that should not end up using fat camera top instead of diagonal method, foreign I've tried both method, which is mathematical and diagonal. Boost methods are okay, but I personally prefer this diagonal method because it looks more natural than the vertical method and, let's be truthful. Nobody goes here on a straight line, so this is how it looks like when I'm done with the ventilation, see the frontier line. You can see what I'm saying like diagonal method is the best so to have that swivel texture, you add your conditioner into the pocket. After that, you add hot water, then you dip your hair inside the hot water make sure the water is very, very hot because the other it is the softer the air becomes. After that you leave it to dry. You see that you leave it to dry overnight or use sun dry it. Then you pick up your stress now to straighten the ear, but please make sure the straightener is not too hot like make sure it's on the lowest heat. You know it's a synthetic here. So that you will not burn the air, this is how it looks like when I'm done with this straightening see how beautiful it is. You can use it for any style. You can install it directly. You can coil it using flexible and not water method. You can use this for any braided trick. So if you enjoyed this video, please help this channel out by giving this video a thumbs up drop a comment. If you have any question, please hit the Subscribe button down below and turn on notification Bell to get notified whenever I drop another amazing content, see you in my next video bye,


Comments
Lavender Loco: Thankoo so much for this I made my own needle and now I'm learning myself how to ventilate and honestly by hearing people take a day or 2 to ventilate a closure it makes me just wanna sit the whole day and just practice.. strange enough I'm looking at the piece I started and I see I'm doing your method and I actually like it better. But would it work for a whole closure?
Dpweety Well: can you please do a detailed video on how you ventilate the hairline to look natural
Rene Tabrey: Where can I order for the wig cap dr
noura's hair: Hello my dear please can you do a video to show how to install this wig
prettypearl creations: Where can I order the wig cap?
Oduyebo Halimat: Thanks ma'am
Chinomso Stella: Your work is very good Please how can I get this net, you use
Victoria Mensah: Please where do i get the full lace
Rene Tabrey: Hello dr thanks so much. Did you sell it bc i want to buy this one darling . How much for this, I'm in Cameroon dr and i need your hair
blessing lucyann: Do you sell these. If yes how do I get it
noura's hair: Thank you my baby
CHINENYE AGWU: Please explain more on dignosis pattern
Rukayat Kasimawo: Hello can I purchase this?
Dpweety Well: please do you skip a hole ?