Easy Bald Cap Method Lace Wig Install Beginner Friendly! Ft. Luvme Hair
- Posted on 13 March, 2019
- Full Lace Wig
- By Anonymous
Easy Bald Cap Method Lace Wig Install Beginner Friendly!!
This video is from a beautiful ma'am @Adrina Ragland
Checkout and get the method to rock your wigs.
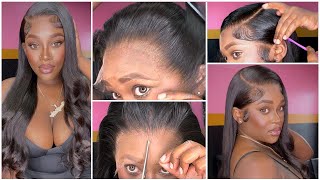
Unit: @LuvmeHair full lace wig body wave 20"
View the product link herehttp://bit.ly/2Wygyp0
Watch Customer Honest Social Reviews: http://bit.ly/2NT2KS0
Don't forget to add coupon code "SALE20" for extra off.
Today, I'm going to be showing you guys how to apply your love me less weight, ball cap method and this tutorial is going to be beginner friendly. So if you want to see my tutorials stick around and check it out, this lovely lace wig, it is 20 inches. It is a full lace, wing, 20 inches body way. The only thing I've done was cut the lace in the front. I didn't plug any hairs. I have it clipped back so that way when I'm gluing it, the baby hairs won't be in the way the products going to be used in this video is the got to be glued blasting frizz spray, which you can get online. You can get at Walmart Target. Your local beauty supply store and then, of course, we have to use the guys to be glued styling spider gel. Now some people use the one in the black bottle and some people use the one in the yellow. This is the only one I've ever tried and I like it, it works for me and you want to make sure you have a stocking cap. This came with the love me uh lace, wig. They sent a box and a half tons of these in it. This is one which is the wake up is to wait caps in there. It also comes. It also comes with a guide on how to take care of your wig. It has the styling the care and about the product, and it also has the return and refund information on the back came with this little pouch, which, before I got away from them and had a little pouch, had all kinds of goodies. There is a rat tail comb. There is some bobby pins. Usually I don't sew down the back of my wig. I might this time, but if not there, some bobby pins you can use, even though there's combs already in it just so it can be secured. It comes with two clips. This way we have an elastic band. If you want to sew it down your wig, so your weight can feel more sick here, I don't know if I'll be using, that it has tweezers as well. So if you want to pluck your wig, I didn't pluck mine this time. I want to see how it looks because kind of looks pre plucked already and then, if it needs to then I'll go back in and this time I can't wait to try this. This is a wax stick that it came with, which I can't wait to use I'll, definitely be using it on my edges, I'll show you guys how I use that into this video. So the first thing you want to do is make sure you have a flat surface a flat base, so I braid my hair into six corner roll right now, I'm gon na spray, my hairline! Sorry! If I'm looking in mind, Oh my viewfinder, my little camera! Sorry, if I'm looking at my camera, sorry, if I'm looking the other way, I definitely have to see what I'm doing so. We'Re gon na put that on like say, see and pull it down. So the concept of this is to look completely bald, so your wave will be on your wig will have like a flawless finish. It'Ll be laying down flat. It'Ll, look like the hair is actually coming from your scalp. So now that I have that on there, when I did mark my base, my braids, I made sure my edges were like secured back, so I'm just going to spray along my hairline with a spray, and this is basically like gon na glue this cap down. Now I can never get like the corners perfect, but it doesn't matter, I'm just basically doing it to protect my edges and then we're going to blow-dry to try it. And if you don't have a blow-dryer, you can sit around the house. Do some chores do whatever you want to do, giving it time to to dry it, but I'm gon na speed up the process by blow-drying. Now I think it is dry. What I'm gon na do is take some scissors. It doesn't matter what kind of centers these are my daughter's little crafting scissors and gon na cut the excess stocking cap off now. This definitely doesn't have to be perfect, and if it's not sticking down in certain places - and all you need to do is go back over it once you have it cut now for the back, I'm just going to like keep it. However, I'm not gon na I'm just going to keep it, I'm not going to glue it down. However, this week is a 360 wig, but I will be putting it up into a high ponytail this time, so so yeah just cut that excess scarf off your edges and everything are already gelled down. So you really don't have to worry about that, but you still want to be extra careful. So now, at this point that we have our stocking cap spray down, it's all dry. I do have like a little hair out right here, which I usually do. I don't because I don't like it all the way on my forehead, I hate to see girls with their lace wig on and it's like way down here, and they don't have a forehead anymore. It'S like a two-hit or one head. I definitely don't want to do that, so I usually leave mine a little back. I'M not worried about my edges right there, because they're they're pretty much like sealed down with the got to be gel. So at this point I'm going to take some powder, I'm going to use my Mac powder, which I really don't use anymore. It is in the color NC 45. You can use whatever color you want and a brush. You can take any powder, you have and just you're going to put it on your cap on your stocking cap, so you can make it blends in with your skin as much as possible unless you have a stocking cap, that is your color. Now we're going to use the styling gel, which is, of course the got to be glued styling spike gel. You can use whatever kind of lace wig I mean what kind of way blue you want to use, but I like this because it only lasts for like three or four days when I do it and when I take it off all I do is spray around The hairline with a wet water, massage it and it comes off in like 60 seconds. I don't like using that other's hard like actual glue stuff. So all I'm doing is placing a layer of glue around around the stocking cap, the hairline and, like I said I definitely don't want this down on my forehead and it depends on if you like, a lot of glue. If you like a little glue, you can put a lot on the first try. You can go back in and put for something. So now I have the glue all around the hairline. I'M just going to go and blow dry that out and you want to blow dry it down to it's like sticky and tacky kind of like when you do your eyelashes. You don't want it to be all the way dry and you don't want it to be wet like this, but if you don't have a blow dryer, this part you'll go to doin chores, watching your favorite TV show or whatever and give it a few minutes to Dry when it dries, it will look a little more clear. Now, it's dry, you can see it's a little more transparent than white. Nothing. Now I'm gon na apply my wig, like I said I have it back in the clip, so the baby hair won't get too much caught in the gel glue. Gel got to be whatever I'm just taking my teeth. Heads out - and I didn't do anything to this way - guys just brushed it. How I want my part to go, you can always do it Harvey one that I'm going to be wearing it like, let's the eye part. So that's how I have mines. Here'S the inside of the wink, it is a fool, lace, wig. It has one two three: it has four combs as well as the adjustable strap. This is a full 360 lace wig, but I'm not applying the back to Dan. Doing all that, because I want this tutorial to be beginner-friendly, so I'm gon na just put this on, but not all the way I'm gon na find out where that back home is so. I can make sure I have it right where it needs to be so. The back comb is right about there, so this is how it is now. I'M not gon na pull the whole week over at one time. I'M gon na do this side and then once I have that down to the other side, because sometimes when I do it all at once and pull the weight forward, I don't like the way it looks, and then it's kind of too late for me to fix It so I'm basically gon na do one side at a time now I really have to get close because so you're just gon na, take it I'll pretty much just place it over where you have the glyph, so that one side is placed to where I want It I'm looking in the mirror, making sure that's how I want it and if that's exactly where you want it, you can take a comb or whatever I'm just going to take the end of my blush brush and like go over it like really melt that down. So really melt that down into my skin, so it looks like it's coming out. It feels thick here so now I'm gon na go ahead and do this side. When do it like this? It'S way easier, then been doing the whole thing at one time, because you can definitely mess it up. So I'm trying to look in my mirror, which is behind the camera. You see that it already looks so good and when I'm done doing this, I'm just going to tie it down for like five to ten minutes and make sure it's like all the way dry, so that side is down. Okay, I think I just broke my Mac Foundation and just taking the end of that blush brush whatever you have, you can do it with a comb. You can do it with your finger and just basically melting that lace melting that lace down. So it looks normal see, it doesn't look like it needs to be plugged, it's like it's already pre plus, so I'm not gon na do anything to it. So that's basically that now I'm gon na tie a scarf around it, so it can like totally dry. You can leave the scarf on there as long as you want. You can leave it all day. Twenty thirty minutes I'll - probably leave mines on there five to ten minutes, so I can come back and show you guys, but I'm just going to take off the clips and put them on there, making sure that I don't when I tie it down. I don't want like the baby hairs, all stuck down, you might feel it popping up a little bit on the sides right now, but just kind of make sure it's down if you feel like popping up it's all good, because you're gon na try to look at My mirror, then I tie it down with the scarf and once it dries, it definitely won't pop up like that. Now you want to use a long scarf, so you can have it go all the way around and then you can bring it back to the top. Now I'm putting a lot of pressure on this now, I'm going to tie it tight, but not too tight. I just let see what we got here now, it's like all in there is definitely on there's good to go so that is the finished product of gluing. It down I'm just gon na, do a little bit of styling tool, a map


Comments
mahria harris: YOUR TUTORIAL WAS THE MOST HELPFUL I HAVE SEEN!!! I just wished you had shown what you used to lay your baby hairs down with. But really - yours was the best! step by step! thanks much!!!
Mrs.RED'VON 77: Love the video the hair is Just Beautiful 1 tip I would like to share that I have been doing for over 7months now that has been great for the bald cap method is when you're pulling the stocking cap down over the your ears go ahead put a hole where you clean your ear at pull your ear through the hole on the stocking cap this will allow the stocking cap to lay flat and then proceed with their products of got to be glue or spray if you would like to see a visual of what I am talking about feel free to stop by my channel I have a video on it it's called No More rolling up stocking cap method I hope this helps thank you #keepsupportingsmall like mind God bless
Lora West: Beautiful job. I’m new to luvme hair and you video is perfect in helping me to do it myself. Thank you. Hope it comes out as beautiful as yours did.
RaiRaiBrown: That looks great I love it!. I wish I had you to do mine, I'm looking for an installer in CT. I feel like my state is still in the dark when it comes to lace wig installs. When I mention it people look at me like I'm crazy. Most of the ladies that i know who wear lace wigs have them installed by friends and relatives who are self taught through trial error and YouTube. I've ordered some wigs today from a competor site that offered me an unbelievable Christmas discount, but that was confusing too when it came to color, density, and all these another common lace front wig concepts it was nerve racking. I hope I got the right ones, now to find someone who can help me install. It's kinda scary for me, I've never had one before. I definitely can't do this myself, I can't braid glue, or style myself with professional accuracy. Wish me luck, thanks for the nice video.
Essence Doiley: This video was a great tutorial thank you ❤️❤️
Luvme Hair: Unit: @LuvmeHair full lace wig body wave 20" View the product link herehttp://bit.ly/2Wygyp0 Don't forget to add coupon code "SALE20" for extra off.
Sallie Bullock: did she wash the wig before the install? the wig I bought looks very thin
Dorothy Hurd: Did u wash the wig first??.. I'm new to this wig life
Genease Smith: But why must I put foundation on my face to wear this wig?
Valerie Davis: Slay
rihshotme: Is this a sponsored video?
Lashae Patterson: Do I cut the black thing inside