Making A Diy 2X5 Ventilated Lace Wig With Just 2 Bundles Of Human Hair | From Scratch
- Posted on 14 December, 2021
- Full Lace Wig
- By Anonymous
Hello guys, welcome back to my channel!
Thanks for watching
Please LIKE, SHARE, COMMENT, and SUBSCRIBE for more videos!
✨ IG: https://instagram.com/vivianbeautyands...
✨ Email: [email protected] (For business inquiries)
✨ Based in Abu Dhabi (UAE)
✨ My second channel https://youtube.com/c/StylebyViv (Sewing channel)
✨ DIY 5X1 Lace Closure Wig: Video
$15 Hair | How To Make A Beautiful Wig Using One Pack Of Kinky Straight Hair https://youtu.be/Lg9RFZ9A4UU
How I prep Human Hair Bundles For Ventilating https://youtu.be/NnNUgmEoFa4
Click here
CLOSE-UP: How-to Make A Lace Closure/Lace Frontal Using A Tiny Crochet Hook | Latch Hook Method https://youtu.be/LlcjrN4FKsY
CLOSE-UP: How-to Ventilate Hair Lace Closure/Frontal wig Using Ventilating Needle https://youtu.be/XrS_9brWL5g
Where I purchase my materials/tools (Aliepxpress Links )
Wig mannequin head https://s.click.aliexpress.com/e/_9zLJ...
Adjustable Wig Stand https://s.click.aliexpress.com/e/_ADOR...
✨SWISS LACE NET FOR WIG MAKING✨
1/4 Yard Swiss Lace For Wig Making https://s.click.aliexpress.com/e/_A8SI...
Closure/Frontal Lace Material For Wig Making https://s.click.aliexpress.com/e/_9yye... (4x4'' 13x4'' 2x4'' 2x6 and more)
3 Pcs Pin ventilating needle https://s.click.aliexpress.com/e/_Agco...
Small/ Tiny Latch Hook https://s.click.aliexpress.com/e/_AO7y...
✨✨CAPS✨✨
Spandex Dome Cap and Mesh Dome Caps (Small-Large Size) https://s.click.aliexpress.com/e/_At3T...
Thick Mesh Dome Cap (Net Free Size) https://s.click.aliexpress.com/e/_A3t6...
Black Elastic Band For Wigs
AMAZON LINKS
Swiss Lace For Wig Making https://amzn.to/33JaChD
4 Pcs Pin ventilating needle https://amzn.to/3IfIfXw
Spandex Dome cap & Mesh Caps For Wigs Making (Small-Large Size) https://amzn.to/3BFOKAp
Black Elastic Band For Wigs https://amzn.to/3LW3FLy
This video is not sponsored. The links above are affiliate links. This means I'll make a small commission if you make a purchase using any of the links
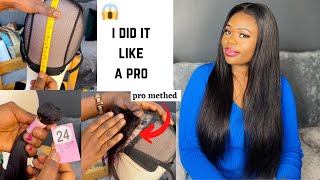
Hello guys and welcome back to my channel if you're new, here you're welcome, and i hope you are doing well so for today's video we're going to be learning how to make a beautiful wig from scratch using only two bundles of human hair. Okay, so with that said, let's jump right into the video, so the first thing we're going to be doing is to make the the wig cap so right here, i'm going to hate to paint the black cap in place. So this up, i'm painting to prevent it from moving. So next i'm going to go ahead and um sew down the uh, the lace, so we're going to go ahead and paint your lace in place and go ahead and mark the size of lace. You'Re going to be using for your project so for this project i use a 2 by 5 lace, so after painting and cutting off the excess lace right here, i'm going ahead to sew it in place. So once you're done sewing down your lace, the next step is to cut out the the black cap on the the lace. Okay, so here is the wig cap. I'Ve already went ahead and i'll paint it in place. So it's time to move on to the next step, so i'm going to be taking the longest bundle um that i'm going to be using that for the closure part so right here, i'm just going ahead to um um cut the hairs that way i can prep It so i have a separate video, showing you guys how i prep my human hair, bundles for ventilation, so i'll put the link in the description box down below. So if you haven't seen that video go ahead and check the link in the description box down below so right here, i'm going ahead to come out some of the short strands and i'm putting and i'm putting those outside so for the project. I'M only going to be using the long strands of hair and also when cutting out the hair out of the bundle. You want to make sure not to cut everything at once. So you want to cut a little bit at a time, so once you're done with the ones that you've already cut, then you can go back and cut a little bit more. So that way you will only be cut in only the amount you need to finish. The closure part instead of cutting excess, hair or unnecessary amount of hair. So, okay, so once you're done with that, the next step is to start with the ventilation. You want to take your ventilating needle pass it through the hole on the lace. So next you want to hook two strands of hair and pass it through the loop, okay and um. I have a mall a very detailed and close up video, showing you guys how to use how to properly use the ventilating needle and also have a separate video up, close and very detailed video, showing you guys how to ventilate the hair using the tiny crochet hook. So i'll put all the links in the description box down below and also um the links for the tools i use in the video will be in the description box down below like the link for the ventilating needle the cap and the lace. Everything will be in the description box down below so be sure to check it. So, like i said, uh to ventilate the hair you're only going to be using two strands of hair, and also you can space out the hair by skipping one hole on the lace. So, by skipping every other hole on the laser actually spaced out this uh the hair on this very project because of the amount of hair i'm working with and also spacing out the hair help to cut down the time you will have to spend in ventilating the Hair on the lace, so i didn't calculate the exact time it took me to make uh this wig, because i had other projects that i was um working on. So i walked on the wig on and off for one week because, like i said earlier, i had other stuff in hand that i was doing, but if you spend um an hour to two hours every day, working on the wig, since the lace is a small Lace before you know it, your wig will be ready and also remember you want to take your time if your fingers feel tired. That is a time to call it a day. Take a break. Okay, rest, your fingers, rest your booty and get back to rates either same day or the next day until you're done making your lace closure. Okay, remember the more time you give yourself to create it, the more beautiful your project will come out, looking okay! So now that i'm done making the lace closures time to uh finish up the rest of the wig, so this is what is left from the from the one bundle i use in creating the lace closure. So here is what is left from that. So i'm going to be using this one and the remaining one bundle to finish up the rest of the wig, so i already went ahead and put the the lace closure into a ponytail ponytail a bun. So that way i can work on the uh. The black cap, okay, so moving on to the next step with so now, we need to make sure that the hair that we have left will be enough to finish up the wig okay, so we're going to be doing a little trick, not really a trick. We'Re going to be spacing out the hair on the track. Okay, so to start right here, i'm going ahead to paint the the truth they went in place and i'm going making sure to pin it a little bit away from the lace closure parts. Just a few inches away from the lace closure part just um using it, so i'm use the ear on the mannequin just above the ear, not below the ear above the ear on the mannequin. So if you, if the mannequin you're using, doesn't have uh doesn't have ears, then you have to measure three and a half inches away from the from the lace closure. Okay, so once you mark that you want to go ahead and pin down the first track following the edge of the black cap. Okay, so once you're done pinning down the weft, the next step is to take your needle and shred and sew it down. So for this wig i won't be doing the fold over metal, so once i get once i sew to the other end of the uh to the other side of the ear, i'm going to be cutting the weft. So i'm just going to let you guys watch this part and i'll show you uh come back and the next clip to explain a little bit more okay. So once you sew it all the way to the other side of the ear. If you decide to do the fold over metal, you want to go ahead and fold it over and secure it in place. But for me, i'm going ahead to cut the weft right here, making sure to put the thread outside. I don't want to cut the tray. So i'm just cutting the weft right there, okay and i'm going to secure the end of this very track in place before moving on to the next track. Okay, so moving on to the next track, as you can see right here, i'm going doing the same thing. I'M going to go ahead and paint it in place, following where i want the the the weft to sit and also the amount of space i need to give on the um on the black cap so pinning it have to keep it in place, keeping it on The line where you want it to be so you want to make sure to give it enough space on the back. So all the spacing that you need to do needs to be on the back. Okay, so because when you get close to the um to the crown, you need to start reducing the amount of space you give on the black cap. So right there doing the same thing. I pinned it following where i want the the wife to sit. So right now i'm going ahead to sew it in place, so i'll be back to show you guys once i'm done so doing the same thing once i sew all the way to the other side of the ear, i'm gon na cut the weft and secure the Track in place so i'll be back once i'm done, um sewing down the one bundle of hair okay, so i'm back and uh so right here. This is one. This is the one bundle of hair i haven't used the remaining one from the second bundle. Yet so right here this is just one bundle of hair and i'm going to be showing you guys the amount of space i get i gave between each um track. So, as you can see right there, that's the amount of space i gave on this very line right here, oh and they have the hair bundle. Um i used in this video is a double weft and not single wife. So you want to make sure of that see if the the bundle is double weft or single weft, so the one i use in this video is double weft. Okay, so now that i'm done with the one bundle right here, this is the remaining one from the second bottle, so i'm going to be using this remaining hair to finish up the the rest of the black cap. So, as you can see right here, i'm placing this very well next track close to the previous uh track. So it's better to space out the hair at the beginning. So it's better to have some hair left at the end of of the the once you're done sewing down the wig. So once you get to the closest part, it's best to have some hair left that not done not to have enough hair to close up the black cap. So if you have uh some, if you stick so once you're done, sewing down the the hair to the black cap once once you close it up like this. If you stay have some hair, um, um or wet left over, you can always go back and fill in some of the space that you have okay. But if you don't have enough hair to finish off the black cap, then you have to undo it and re-saw the whole thing over again. So it's best to take care of that at the beginning of the um of the wig, okay, okay guys. So this is the final result of the beautiful wig made with just two bundles of human hair right here. Beautiful went ahead and uh lay down the baby hair, as you can see right here, deep and clean middle part. So you can start this wig. Since it's a two by five lace closure, you can style it as a middle part or as a side part, and also i won't be installing this wig on me, because i made it for a friend so i'll be uh, giving the wig over handing it over To her but anyways, this is it's right here. This is the result. I hope you enjoyed this video. I hope you find this video helpful. If you do, please don't forget to give it a big thumbs up and also, if you're new to my channel. Please do not forget to hit the subscribe button down below and if you already subscribed. Thank you so much for subscribing. Thank you so much for popping by today and i'll see you all in my next one. You


Comments
Annie Parker: Vivian you are an angel! So thankful I found your page! You were exactly the person I needed to find to start my professional wig journey !
Authenticity Is Key: I love your skills! Do you know how to ventilate a V part lace closure? Like a lace close but with a V part? Could you do a video on that if you know how?
Akossiwa Gouvide: Viviane vous êtes vraiment fantastique. J'adore ce que vous fetes merci beaucoup
Tupokiwe B: You are so talented. Great work mummy God bless
Ejiofor Somtochukwu: This is gorgeous
Gwen Wright: Very nice! Really enjoy your work!
Winifred Chiamaka: Thanks again Vivv❣️❣️ Special request on how to revamp and colour wigs ma'am
Gen: Beautifullll omg
Izabel Camargo Plus: thanks, a lot of thanks, i want too learn too doo wigs because of people with cancer that have not a good professional in my region of the globe, you gonna bee my teacher rsrsrs, thanks a lot
Damilola Faffa: Viv please I need a crochet pin for ventilation..Im finding it hard to use ventilation pin.do u sell?
Ronda Lomax: Where did you get the AFRO???
Ememodu Archibong: Please why does my knots look loose even when using ventilating pin?
Eleonore M.S: C'est beau
Romoya: I love you beautiful Viv
Adelaide Owusu: Hello do teach when one want to learn