This My Hair Period ||How To Make A U-Part Wig Look Natural ||Protective Style || Everything Nat
- Posted on 24 February, 2021
- Full Lace Wig
- By Anonymous
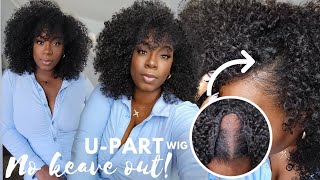
Yes, this is my hair, Period. Today I want to share how to make a u-part wig look natural. This is the first style i'll be doing for my 3 month protective style journey.
Giveaway rules
1. subscribe to this channel & like this video
2. follow me on instagram @everything_nat
3. leave a comment under this video with your IG @
winners will be announced on instagram on May 25th.
#protectivestylejourney #upartwig #grow4chair
U part wig is another appearance hair item in Julia hair. Not the same as the other human hair wig, it turns into another style in view of the simple introduce path without stick and sew in, modest value, very common looking, and save time. Today we will impart to you an outline of U part wig.
Knowing the characters of U part wig. can help you use it effectively, even to the clients, they will get the most data about a U part hairpiece. Alright, let us start it!
What is a U part wig.?
A U part hairpiece is made by engineered hair or genuine hair. The U part hairpiece in Julia's hair is 100 human hair. Not quite the same as full ribbon hairpieces or trim front facing hairpieces, there is a U shape forget about on the temple. Clients who introduce a U part hairpiece can satisfy this part by there own hair which makes an imperceptible and normal hairline.
What highlights of a U part wig.
1. Hair materials are 100% crude hair, there is no compound interaction, tangle free, shedding free, reflexive, glossy, no lice, and no split.
2. A ribbon cap with a U shape plan, you can leave out your own hair for this part, there is no need trim conclusion or ribbon front facing to sew in. One thing should focus harder, you would do well to pick a similar hair tone with your own hair, or color it to a similar shading, or it will not match with your own hair.
3. 5 clasps in the hairpiece cap, you can cut the hairpiece on your own hair effectively quickly without paste, steady and secure. No mischief to your own hair.
4. Flexible lashes on the rear of the hairpiece cap. So you can change the size of the U part hairpiece, not very close, nor excessively free. Truly agreeable!
Does a U part wig shed without any problem?
Ordinarily it will not. U part hairpieces were sewed by hair weft on the ribbon cap, the hair wefts were twofold machine wefts, entirely solid and solid. Clients utilized it and take great care of it, the hair won’t shed a lot. But if you use for a long time, 4 or 5 hair strands shedding is normal.
How to make a U part wig
If you want to save time, you can purchase a U part wig from Julia hair, if you want to make it by yourself, you can purchase hair bundles from Julia hair also. Here we will teach you how to make a U part wig by yourself.
First, get the length and width of your head, the length should be along with the hairline around your head, the width from the front to the back of your head.
Who needs to use a U part wig
Wigs for black women is a necessary part of their daily life. The U part wig as a kind of wig can be used by African American women. They braid their own hair can clip the U part wig on the hairlines, blend their own hair match with the wig.
People who want to add their hair volume, they can use u part wig to add the hair volume. Just like the hair extensions, clip-on your own hair to make the hair thick and full. Then make a hairstyle they like. Please make sure to choose the same hair color and hair texture to your own hair, or it won’t match with their hair, it is another problem.
Subscribe this channel : https://www.youtube.com/channel/UCpr7m...
This video link : https://www.youtube.com/watch?v=Vy3w41...
My other video : https://www.youtube.com/watch?v=oUT6Pv...
: https://www.youtube.com/watch?v=QBxUtz...
: https://www.youtube.com/watch?v=OqzVlO...
: https://www.youtube.com/watch?v=C1nzY0...
: https://www.youtube.com/watch?v=5MCR0D...
Kw : How to make a u part wig look real, u part wig, u part wig tutorial, how to make a u part wig for beginners, how to make a u-part wig, how to install a upart wig, u part wigs, u part, easy u part wig, how to make a u part sew in, curly hair, natural hair, so good hair, make a wig, 3b hair, Everything Nat, this is my hair period, How to make a u-part wig look natural, Protective style journey, hair care in periods, dry hair, wig, how to make a custom upart wig, period hair & makeup from, period tips, u part wig natural hair, should we wash our hair during periods,
Oh hey: what is up guys and welcome back to the channel so today is going to officially be the start of the three month. Heavy protective style journey, all right. So from my first perspective style, i'm going to be doing a u-part wig, so i will have a little bit of a leave out, but um we're gon na see how it goes so. Keep watching this video. If you want to join - and you want to know what the prizes will be, because i'm not just going to give it away right off rip i'll, be letting you guys know the prizes somewhere in this video. So if you're interested keep on watching all right. So to prep my hair for the you part, wait. Of course i need to section out my leave out girl. Okay, then braid the rest of my hair up all right, so i'm gon na part out my hair in the middle, because i'm i'm gon na do a u-port. Now, i'm gon na put this piece into a little cornrow so that it stays out of the way. Then i'm basically going to do the same type of part on the other side. Alright, so i'm just gon na go ahead and braid this piece down as well, and i'm gon na part out some of my leave up. So i really don't want it to be too much just like edges twist it out of the way and i'll do the same thing on the other side, all right now, this is going to be a super, easy and simple braid down because ain't, nobody got it. So what i'm gon na basically do. I'M gon na do some anchor braids, which will be around the perimeter and right around the leave out so that i have something to sew the park wig down to and then the rest of my hair will just be braided into like a big. What you call it inside inverted corn - i don't know a cornrow okay, i'm gon na start right here and i'm gon na basically braid not too much because you don't want it to be too thick because it's like right at the hairline. It needs to be as flat as possible, so i'm just going to cornrow this thin piece like right at the end, then i'm going to go ahead and part out the back piece and do the same thing make sure you keep your leave out out of the Way because they try to sneak in, especially when it's such a small leave out. So now, i'm just gon na part down the back all right, so you don't want to braid too tight, because you don't want to put any tension and remember. You will be stitching on that section too, so you don't want to add like extra tension all right. So now i'm gon na go ahead and part out around here and down the side. So you want this section to be super thin, because it's like right where your leave out is so you don't want there to be any like humpy bumpy thickness in that area. Now you're going to just braid this down right here, you don't want to take it around, or else like the hair will keep building up, and this part right here won't be as flat right right, hey as we get ready to braid. This piece make sure that this anchor braid that comes around your leave out crosses over like this, so that it will have something to grip on in the middle instead of being open like this, this down the middle in the back, doesn't have to be neat or Anything ain't. Nobody gon na see it all right. So now i'm gon na braid, this section back. You can bring it in a regular cornrow or you can braid it in a inverted cornrow. If you want it to be even flatter. So now i already applied my hair growth, oil and everything before i started braiding. So i suggest you do that as well or you can put it in at this point. That'S what i did before installing the style i put my growth oil all over my scalp, give myself a good scalp, massage and even ran some of it down the strands of my hair, so my hair will be like nice and moisturized, even though it's in this Protective style and remember this does not need to be super tight. We want our hair to be able to grow and flourish. We don't want to create any type of tension or anything don't forget to incorporate this little piece as you break down the length of the hair braided tightly so that it doesn't unravel all right. So now you have your two little pigtails. You can just go ahead and make an x with them at the back and then tuck them into the braid all right. So now that everything is nicely anchored, it is time for the fun part. Now i have my wig right here. Most viewport wigs will have combs like two on the side, one in the back and the side for the lower um ear, flap pieces and in the back as well, and they will also have the elastic to adjust the fit. You part. Wigs can be worn without being sewn down. This is like a alternative to a sew-in. It'S like a super fast sew-in with less tension. So now i have to cut the elastic out of here. You could actually put the wig on and then cut the elastic, but since i'm doing it on myself we're not trying to play them games and then end up chopping, a piece of my hair out, then it's going to be protective style. Wear not here all right. So usually, as you would any wig just start by hooking, the comb in the back and use the combs - hey guys futurenet here about to sneak in randomly in the video. So if you are still watching at this point kudos to you girlfriend. So these are the prizes that i am going to be giving away for this three month. Protective style journey, i'm going to be awarding the person who gets the most length within the three months and i'm also going to be giving a price to the runner up. So the first prize that i'm going to be giving away is one headband, wig curly or straight you. When, when i choosey you can tell me which texture you prefer. If you want curl your straight and as well, i'm going to be giving you a 25 amazon gift card for the person who gets second place. The runner up, they're gon na get a 25 amazon gift card. So if you want to be in on this thing, girl read the description box down below for the rules and how you can win all right back to the video all right. So now. What you're going to do is to take your needle and thread and sew. These parts down - you can wear it like this. If you want girl, you ain't got to sew it down, but i'm going to sew it down for the purpose of keeping it in as a long-term style and not having to worry about it, slipping and pulling. When i actually comb my hair all right so now that you've threaded your needle you're, going to want to start right here, make sure your little baby hairs out the window. So first, what you're going to do? You want to insert the needle into the wig only so that the knot stays on the inside of the wig cap. Then now you're going to go ahead and loop, it under your braid, through the braid and through the wig, to secure it down so you're. Basically, going in a loop motion, starting through your braid and up through the wefts, just feel for where the tracks are, and you go kind of like in between the tracks on the wig. So now that you're, like close to where this is you're, going to continue going upward. But when you get here, you're going to go in like a diagonal angle to ensure that that little flat piece stays down, then you come behind it like you're. Doing kind of x shape your needle through the center of the thread. So it creates a little loop and then you pull and you secure so now that little flat piece there it's completely flat without you actually adding any tension to the area right here, and you just continue to sew it down now now that i'm in the back Here i'm actually looping it through the center of the thread. When i go under i'm going under the diagonal, then i'm basically looping it through the center of the thread, because you're always combing your ear and brushing it like that. This piece can come loose and you don't want any tension at the top here either. So you want to make sure it's really secure to that braid. But when it's at your edges we don't play them games like that. Okay! So now that we're back where we started - or i should say where we ended - we're just gon na wrap the thread around the needle a few times and clip it now that you're at this ear piece you want to do the same thing by looping, the needle Through the thread to make sure this ear, flap is secure and, as you cannotice, i'm pulling the hair upwards, but i want the cap to be in front of my braid. So that way i don't sew any of the hairs down in an awkward angle. Just the cap will be sewn down and when i let the hair go, it will fall naturally and cover everything perfectly all right guys. So i finished sewing everything down. It'S nice and secure. You can catch me outside how about that. My wig is still going to be attached to my head, okay, so that is done so, basically, all you need to do now is style, your hair undo your little leave out and you are absolutely good to go and like that you're good to go like your Style is all together: you can chill in the house protective style it you need to run to walmart, whatever, whatever, whatever uh. You can go ahead and do your edges, and this is the final style guys. This video is just about the install, not necessarily about styling, but since this is body wave hair, it has a natural kind of styling to it. It'S not super duper glammed up, but it's like. Oh she cute. Okay, all right guys. This is it for the video. I hope you enjoyed the quick little tutorial on this, my first protective style for this three month. Protective style journey all right. So if you guys enjoyed the video and you feel like it, gave you a little bit of knowledge or you just enjoyed it, go ahead and hit the thumbs up button and hit the subscribe button. So you can be a part of the fam and don't forget to hit that notification bell, so you'll never miss one of my uploads. I would love to chat it up with you guys in the comment section down below. If you check my other videos, i'm always responding to um messages and everything giving out hearts and stuff. I love interacting with you guys so go ahead and leave me a comment down below and that's it until next time guys bye, bye,
Comments
Everything Nat: Guys! I’m so gassed for the results of this journey! We just started and I’m already dreaming about the hang time
RiRi: Just started going natural for the second time lol. It’s a struggle but I hope I pull thru
Natisha Molhoop: Love it. 3 months is nothing. Let's get it!
RiRi: Nice love it (ig Ri._.Ri18