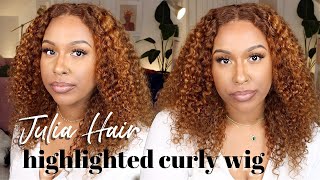
Honey Brown Highlights For The Summer | In Depth Install + Styling Tutorial | Slove Hair
- Posted on 09 June, 2021
- HD Lace Wig
- By Anonymous
●▬▬▬▬▬ ❤#Slovehair ❤ ▬▬▬▬▬●
Official Website: http://bit.ly/ManiJean
❤SLOVE HAIR INDEPENDENCE DAY SALES❤
Post a Youtube video+IG selfies/videos to get A FREE WIG(random style)+Lashes and a $35 off coupon for your next purchase
Extra 5% off sitewide code: ID5 | Extra 6% off over $299 code: ID6 | Extra 7% off over $499 code: ID7 | YOUTUBE to get $15 off | SLOVE to get $10 off
I’m Using 200% Density 24 inches Highlight Straight Lace Frontal https://bit.ly/2STvRYs
Similar style wigs:
200% Density Highlight Straight Bob Lace Frontal Wigs: https://bit.ly/3fHr7y2
200% Density Highlight Loose Wave Lace Frontal Wigs: https://bit.ly/3wVTbTR
Bestseller:
❤HD Lace Straight Wig: https://bit.ly/3ea078u
❤Natural Black Straight Lace Wig: https://bit.ly/3dhl8P1
❤Romantic Wave Curly Natural Black Wig: https://bit.ly/2QudE28
❤Beyonce Piano Highlights Straight Lace Frontal Wig: https://bit.ly/2PVMrG3
New in the stock:
HD Lace Straight Wig: https://bit.ly/3ea078u
Headband Wigs: https://bit.ly/3mPM5wz
♡ C O N T A C T U S ♡
Instagram: https://www.instagram.com/slovehair.co...
Twitter: https://www.instagram.com/slovehair.co...
Facebook: https://www.facebook.com/slovehairshop...
Wholesale+Customize (8-40 inches all in the stock /HD Lace restock now)
Messages/ WhatsApp: +86 15314471220
PR/Business: [email protected]
My Socials let’s be friends! (literally) :)
IG: @kamanijeann
Twitter: @kamanijeann
TikTok: @kamanijeann
Snap: @manijean
Email me for business inquiries only [email protected]
Hey guys welcome back to my channel and welcome girl. If you are new here, wants to come to the camera. Looking like this, this first thing i see i look crazy, but first thing first hold on. I just want to say here's the tv in the back. You got here, i'm sorry, my name is hard of hearing, so i'm not about to make her turn down her tv to turn down her tv just because i'm recording. So if y'all hear fox 4 news in the back, please don't mind it, but y'all probably won't be able to hear it since i'll have music in the back. I'M gon na push back these edges as y'all see there everywhere. Now i'm using my janky blow dryer, because my mom doesn't want me using her blow dryer for some reason: she's being stingy and selfish, so we're using this junky one that doesn't really have settings it does, but they don't work so whatever setting it is. I don't know if it's going to be hot cold medium, just now it's going to get dry and now that we are slipped back, i'm going to take my wig cap cut our ear tabs. Now i'm going to take my got to be glute spray and do two layers of this i'm going to blow dry the first one, then we're going to blow dry. The second one then boom we're done. Um wow i'm going to take this brush and the leftover amounts that i used to tip my lace of this rubykiss cream foundation in um rd15. Okay. So this right here now that we are bald, i'm going to take this wig show you guys what we are working with for today. So this is the hair. It is not washes it straight out the pack. Besides the fact that i did bleach these knots and just rinsed out the bleach, i didn't actually wash the hair. So that's why this part of the hair in the front is puffy and a little bit it's still kind of weird, but not really. Nevertheless, this is the inside of the wig, so i did tint the lace and then it has one two three four comes in the back. I mean in the inside with this, which we always cut off then yeah. This is the construction of the wig and the amount of parting space. As you can see, i did pluck this wig. I didn't necessarily have to at all because it did come pre-plucked, but i did pluck on the side where, because we're doing a soup right, so i did pluck this side. You know where the baby hairs are going to be, and i didn't pluck the front or the other side, but you guys will notice how it is pre-plugged, let's place this on our head. This is the hairline that was pre-plugged. I'M gon na cut off the ear tabs now now that that is done, i'm going to take my hot comb and just run that through this hair, before i get the glue now, i'm going to take my 70 percent israel, alcohol, removing all oils dirts makeup so That the lace can melt seamlessly now i'm going to take my skin protectant. This is my first time trying this. This is by the same brand of the glue, beautiful hustler and i'm going to blow dry this now that that is done. I'M going to take my beauty, hustler melts lace, melts glue and apply that around the perimeter of my hairline and i'm going to do five layers. It might not look that droughty, but it definitely is tacky. It'S just around my bald cap, but i'm going to go ahead and melt. This lace into this glue know that that is into our skin using a fine-tooth comb along with the blow dryer helps further melt the lace into the skin that fine tooth comb is really helping with the hairline and getting it nice and seamless. I'M also going to be taking this chi or chai hair protector. I don't know how to pronounce it just know: it's the brain chi in that big red bottle and i'm taking my hot comb to further press out this hair so pressing off the hair. When it comes to this swoop, bang style is very important because it gets everything nice and flat. Now, i'm plucking the part to make it look more natural. This part isn't necessary, but it is all about preference, and i prefer my parts to look a little bit more natural, i'm taking that chi product again, along with a fine-tooth comb and my flat iron, like i said before at the beginning of this video that this Front part of the hair was a little bit more poofy because i did rinse the hair out and get it wet from bleaching than not, and i'm also going to be taking my hot comb to further press out this hair. I'M using my hot comb a whole lot in this tutorial because y'all it needs to be flat. So now i'm just cutting off the lace. After cutting off the lace with the razor i like to take my scissors and cut off any excess lace that is left over any part of the lace that doesn't have hair on it is considered excess and you don't need it after the first step of melting. The lace, it is completely normal to have pieces of lace still sticking up, so what you want to do is take a little bit of that glue. Whatever you use to melt it and blow dry that on warm cool, whatever temperature, you prefer, it really honestly doesn't matter, but to further melt this lace, i'm going to take my got to be glue spray as well and blow dry that as well. Now that i have the part in place for the swoop, i'm going to take the section for the swoop out and clip it back so that i can do the side burn for this side of the hair i like to go in and take a small flat Iron to press out the hair, it just gives the baby hairs a more natural look. This is a new technique that i'm doing and that i am sticking to i'm also going to be taking my got to be glue gel, which i always use my holy grail. I highly recommend, if you want your edges to last long. I cut the baby hairs as i go, especially the sideburns. So really all the baby hairs that i do it's just um more convenient because when you cut them too short, it's no going back. But when you cut them too long, you can always go back and customize it. I'M also plucking the part a little bit more just to give it a more of like a side part and not a regular part going into a swoop. If that makes sense, i don't know, but i'm taking a thin layer of baby hairs. I wanted the baby hairs to look thin, but still very much dramatic, because that is the new look and i love it. So i'm pushing back this hairline with my hot comb and then i'm going to get into shaving off these hairs. The key to achieving a soft baby hair is one taking a thin layer, as i did as you guys seen and using everything to your advantage. As you can see, i'm using my pinky finger to really mold the hair together and i'm using a c kind of swoop motion like i'm pushing the hair towards my face instead of away from my face. If that makes sense - and i just repeatedly do this - and i like to take my got to be blue gel as well - around the hairline okay - i'm blow drying it now. I went to the next step, i'm moving fast, but you guys see what i'm doing like you guys have to understand. You have to take your time with your baby hairs like oh and when it comes to the c-spoop like on the middle part of the edges. I like to use the end of the edge brush, which is very, very, very convenient because it really molds everything in place. I use it as like a tool like y'all. This is art for real, but yeah so on to the last section of the baby hairs. These side burns, i take a slightly more thicker piece for the sideburns, just because i prefer that look. It looks very, i don't know dramatic, but still very soft and natural at the same time, so i'm curling those and i'm going to repeat the same process which is molding the hairs, basically using my fingers, the edge brush in the end of the brush as well. Cutting those baby hairs off that are not needed anymore now time for the spook, so i'm going to be doing it in two sections um. I really like doing this method. I got it from. I am beautiful hustler, as you guys can see. I love her and her brand and all of her tutorials shout out to her. But yes, i'm going to be using two sections, as well as a fine-tooth comb and i'm using the comb to actually smooth out the hair with the side and actually combing it out, and i'm repeating this process and also taking the hair behind my ear. To help. Get it molded, so key things to know when achieving this swoop is that it is very, very important to use your hand a fine tooth comb, a blow dryer and a nice molding spray. The two sprays that i like to use is got to be glue spray in the insta hold and the original yellow can, which is the freeze spray. I'M using the palm of my hand, in my hand, period to help smooth out the hair and mold it into place. Also, i want to mention that combing out the hair and getting it getting it in the direction that you want. It is important with this as well, so it's really a repetitive process, but if you want to achieve a nice swoop that is like super flat, you have to do these steps repeatedly. It took a lot of you know. Uh, it's very tedious. I should just say it's very tedious, but the end result is always worth it. So, as you can see, i'm just repeating these steps really using my comb to my advantage using all parts of it, as you can see, i'm using the edges of the teeth to kind of make it um. I don't know like slanted, get it nice and slanted. I'M taking a bobby, oh wait: no, i'm not taking a bobby pin yet i just use my got to be glued gel in black to help smooth it out as well even further and make it molded behind my ear blow drying that and now i'm taking my Bobby pin to place everything into place to make this frontal lay even more flat on my head, i'm using my lusters nutrient slick stick and i'm using my fingers to smooth that out all around and then further smoothing that out and pressing that oil out with my Hot comb so now onto the layers, i'm using this um, i don't know what to call this tool, but y'all know what this is and i know y'all seen it in the hair store. I really don't even know what it is just know that it creates layers, as you can see, i'm really just freestyling it like nothing too serious. It'S really self-explanatory. What i'm doing like taking it in a gradient effect with the layers, then i'm going to use my cheese spray all around the hair to um, ensure that this flat iron really presses out this hair, i'm going to brush that product out and then we are going To get into curling, so this part is self-explanatory too. I'M just taking the um flat iron with the hair in two sections to press it out and give it a curl and bump. At the end. Now i'm going to take a small makeup brush that is slanted and defined the part more with this cream foundation. Don'T know what brand this is to just know that it is a cream foundation. You can find this kind of stuff at your local beauty supply store. You don't have to use exactly what i use, because it's really not that fancy nothing to recommend. Lastly, i added bio silk oil to the hair to create more shine to the hair. Thank you guys so much for watching. This is the end of the tutorial. I hope you guys enjoyed the same way i enjoyed filming it, for you guys make sure to leave a like comment and subscribe and i'll see you guys in my next one
Comments
BeautifulDisaster: Your hair is always doing what it needs to do!! You kill it every time & I’m a beautiful hustler supporter too!!!
zz world: The best slove hair review I’ve seen ❤️
Cynthia M: Love your videos so helpful! I have a question .. why so many layers of the bond glue? I’m just super curious is it so it can glue down better or does it dry fast and u need to apply more? Thank you!
Abigail Pommellls: I love ur hair videos
meme: Love ur hair videos I wanna try a lace front on myself but I’m scared so you have wait to the glue is tacky & clear to add another layer ? Does it matter what type of bald cap do you put on ? Do you have to add the makeup underneath the wig/lace before putting it on ?
Rose Nunez: I need my hair done by you
Itsmeslimtee: Beautifulhustler says her adhesive is waterproof!! You should definitely put it to the test
Barbie folks:
erin breann: Girllll so prettyyyyyy
Akeil Brown: its a razor comb