Red Reverse Ombre Tutorial Using The Water Color Method + How To Replace An Old Closure On A Wig
- Posted on 14 April, 2021
- HD Lace Wig
- By Anonymous
Hey Beauties
Welcome back to my channel Hope You Enjoy This Tutorial !
Shop My Refurbished Wigs - https://stylesbydestiny.bigcartel.com
_ _ _ _ _ _ _ _ _ _ _ _ _ _ _ _ _ _ _ _ _ _ _ _ _ _ _
PRODUCTS MENTIONED:
Powder Bleach - https://www.amazon.com/LOreal-Quick-Bl...
30 Volume Developer - https://www.amazon.com/LOreal-Techniqu...
Adore Hair Dye (Rich amber) - https://www.amazon.com/Adore-Semi-Perm...
Adore Hair Dye (Off black) - https://www.amazon.com/Adore-Semi-Perm...
Adore Hair Dye (Burgundy Envy) - https://www.amazon.com/Adore-Semi-Perm...
Adore Hair Dye - (Ruby Red) - https://www.amazon.com/Adore-Semi-Perm...
BUSINESS INQUIRIES & COLLABS PLEASE EMAIL : [email protected]
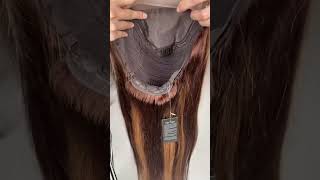
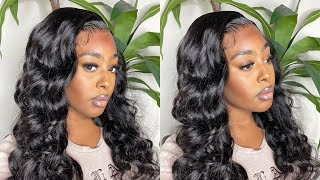
All right, you guys so, as you can see, this closure is in horrible shape. It is balding so badly and this hair is from white label now. This is not to bash the company or anything like this, but this wig um was a client of mine and she only wore this wig for about two three weeks, and this is how bad that closure should, in the matter of that time and y'all white label, Hair, their products are a little bit more on the pricey side, so for the price you pay, there's no reason why your closure should be shedding like this in only three weeks, but that's neither here nor there um. The quality of the hair, i can say, was actually good like it took the color well and everything like that, but as far as the you know, actual closure shedding the way it did. I don't know if it was just a bad batch or what, but it was just horrible, but the lace on the closure was very good. I can say it was super thin and it melted good. But you know that doesn't matter if your closure is bald and shedding so anyway. First thing i'm going to be doing um as a part of my wig revamp. Is i'm going to be replacing the old closure with a new one? So i'm going to start by making sure all the hair from the closure is separated from the hair um, that's sewn on the wig, the tracks, that's on the wig and then i'm just pinning my wig in place. Now, if you are replacing your closure or front so you want to make sure that your wig is pinned down in place, because once you take off that closure or your frontal, the wig is going to lose its wig form. So to speak. So once you try to put it back on the mannequin head, it's going to be a complete mess, so make sure your wig is pinned down in place first, because once you take off that lace, your wig is just going to lose all form and then you're Going to have a super super hard time trying to get it pinned back in the right position and it's just it's going to be a mess, so make sure that wig is pinned securely um to your mannequin head and then i'm just pretty much going to make Sure that i'm cutting the thread that is sewn onto the closure do not start cutting your tracks, make sure you are only cutting the thread that is sewn on the closure through the wig. So that's pretty much what i'm going to be doing and then, when things get interesting i will come back and talk to you guys every time we i get this feeling like it's something on your mind. The way you look at me tells me okay. So once i finish removing the old closure, this is what the wig looks like like. I said it was pinned in place, so that is pretty much that so now i'm going to be bleaching my new closure, because obviously i want it to be red and, as you can tell by the thumbnail, we zoom in red. So that's the closure and i'm pretty much just going to be using um, some quick blue powder bleach and then i'm going to be using a 30 volume developer um to mix with it, and i did use the water bleach method because your girl was being lazy. I'M not gon na lie to ya um. I honestly could have hand painted this on because it's only a closure, but i was just being real lazy, like i said so: i'm gon na mix the bleach and the developer together. So i get the consistency i want. Then i'm just going to add some hot water mix that together and once i'm comfortable with that consistency, i'm just going to dump the whole closure in the water, because i want everything to be in one color. I don't want to ombre on the closure. I want the closure to be all in one color, so i'm going to just put the whole thing in there and let it sit um i did put this in. I did put the closure in aluminum foil after i finished coating the hair and i think i let it sit for about like 20 25 minutes until i got the color that i wanted. These are mine. So once i finish, coating the hair with the bleach. I let it sit in some foil, like i said, for about 20 to 25 minutes, and this is what the color turned out to be. So, of course you want to protect your canvas head, so i have a plastic bag over mine um just to protect it from staining and getting more messed up. So i'm pretty much just going to pin my closure in place and i'm going to begin hand painting it. I'M not doing a watercolor method um you can do that. But for me this wig was for a client um and whenever it comes to like my custom, coloring for clients, i always go to extra mile. Just to make sure everything comes out perfect. And i don't have any issues with like staying in the lace or anything like that, so i'm going to be hand painting, but you can do the watercolor method um, if you like, so i'm using ruby red. I believe, and i used adore cherry um they're all from the adore brand, but i will leave the actual um names of all the dies that i use in this video down in the description box below. So, as you can see, i'm taking my edge control brush and i'm using that to get really really close to the roots on the closure, because personally, i feel like this just helps really make sure, like the roots are coated versus using like an actual applicator brush. Where you can't really get that close to the roots without you know, messing them up, so i like to use my edge control brush and then, after that, once i finish coloring the roots, i just work the die on to the um, the ends of the hair. Just using the actual applicator brush itself, but for the roots, i'm using my edge control brush to make sure they are super, super saturated and um colored correctly. Have you looking crazy, not knowing what's up for real? I hope this next song just don't bring you to tell us every time we i get this feeling like it's something on your mind, tells me don't wan na, be the one to tell you that you're right, these are mine. So now we're on to the fun part coloring. So these are the three colors i'm going to be using off black rich, amber and burgundy envy and i'm adding some salt to the water, because i've seen every everyone say: do it so i'm going to do it too period. So now i'm adding my rich amber to the water and it was given a bit of a brown tint to it, which i wasn't expecting. So i did end up going and adding some of that burgundy envy um to the water and then i'm going to just mix those two together and then i'm pretty much just gon na put the wig in there. This is pretty much self-explanatory. Um i'm doing like that reverse ombre, so my roots on the wig, which is where the closure and everything is, is going to be like a super bright, vibrant red. As you can see, and then it's going to transition into like a burgundy and then into like a darker darker burgundy, almost like a a blackish color, so that's pretty much the look i'm going for so, as you can see, i'm only dipping the ends well from The middle of the wig um to the ends into this um color, and i let it sit for maybe about like five minutes just to let the color really penetrate the hair and then i'm going to add some of that off black to this water mixture. So i'm not going to dump out the water and make a new batch. I'M just going to add some of that off black to this mixture, and then i condition the hair. Of course, i use silicone mix which is holy holy grail, especially when you are coloring here or anything like that. You want to add that moisture back into the hair, so i did use silicon mix after i finished um watercoloring, my hair and everything like that. So i'm going to stop talking and just let you guys continue to for watch. I hope this next song just don't bring you to tell cause i'm gon na be on the switch every time we i get this feeling like it's something on your mind, all right. So this is how the hair looks when it is freshly washed and conditioned. I let it sit in some silicone mix. Of course that's holy grail, and this is the final result of how the hair looks when it is freshly dried styled and everything like that. So i'm also going to show you guys how it looks um as a side part, because this was a 5x5 closure, so it does have a little bit more versatility with um how you want to style it, whether it be middle side or whatever. But this is how it looks as a side part. I prefer the middle part, but i did um leave it as a middle part for my client, which i am going to show you guys now, which is going to be super super funny and interesting. Look at this closure, y'all y'all, look at this closure. I just can't even tell you when this happened. I literally had tears in my eyes, and this was from white label - hair white label y'all. I kid you not my label. If you see the video i got all the receipts, i got even when y'all delivered the hair, because that should stay in my my shop pay and i will profit yeah, i'm not lying about that. Hair is good yeah. It was good. This was after one wear literally one where i don't know what was shutting like a door. I don't know if the factory was, it was doing doing a little fire drill. They couldn't put all the hairs on the. I don't know i'm not a fire drill, but we got the back. We went. We got this into this, something, let's talk about it very much, and this is this is very much something this is. This is given it's not what y'all was rocking that fake ombre with one shade another shade and no transition. This is really an ombre. Let'S talk about it, we go from fire, hydrant red cast to black black licorice licorice. We can talk about it because i can talk all day if y'all don't know the gram i'm gon na show you the gram, and i want you to take a screenshot of this, because it's something that's real important, real, real important. This is it get into it. Get into it, please don't get into it. The real badass you see that get into it. Let'S go get the work very much something very much, not just hyping her to hyper, because it is something okay, something can we talk about it. Please talk about it. You want to see emotional video, we got motion video understand, let's talk about it, let's talk about little fellow red. Do you see her lace, because i know y'all like to stop videos and zoom, so i'm gon na stop the video for y'all where's that not neglected not included. It'S not included. Okay. I can't do all of this because she's really not one of them, she's, really not who's, that that's me, hey, y'all, who's, that let's talk about it, let's really talk about it. Where is the lace? And don't you say it's because the coloring and just setting the third? No, she really knows how to do her thing and don't be like coming for her. As far as always because of my shade listen, my sister will work with asian latinos, black black and nice. South caribbean, it doesn't matter what color you are mama's. It'S about the skill because she's darker than me shout out to all my chicks all my little brown chocolate chips on fire. I look at that. Where'S, the lace. It'S not there! It'S not there! Okay and continue going knowing that? No, no, no, but basically what i'm trying to tell y'all is book with my lady with her, and if this video don't convince you then baby, i don't know it must be cracky smoking from a pipe bye.


Comments
Zoey China: That’s probably why dem Instagram girls only be having these companies hair in for a couple of days then change it lmao
Chyna Fernandez: What was the song playing when you were cutting the closure
Taelor Hill: what did the salt do?
Rikiah Seid: Lmaooo your client cute
Zoey China: That’s ohdeeee