The Most Natural Looking Wig Ever |Chimerenicole
- Posted on 01 December, 2020
- HD Lace Wig
- By Anonymous
This is the fastest lace wig install I ever installed. This wig from Dyhair777 is for my ladies who need an everyday slay. In this video, I will show you how I customized and styled this wig. This tutorial is beginner-friendly. Make sure you thumbs up so I know you guys are feeling these videos.
Visit my BEAUTY and FASHION BLOG: http://www.ChimereNicole.com
Items mentioned/used in this video:
$10 coupon code: nico
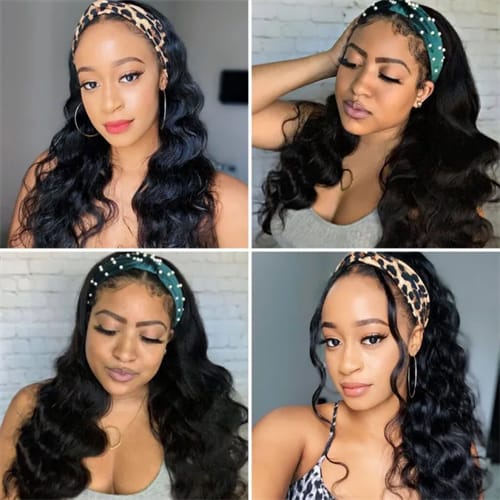
Hair info: Brazilian 4*4 lace closure wig 22" straight 1b color m cap size
hair link: https://www.dyhair777.com/product_Clos...
Curling Wand: https://go.magik.ly/ml/12yeu/
Got2Be hair gel
Hairspray
VLOG Channel ChimereNicoleTV: http://bit.ly/1H3yUd6
...................
FREEBIES + Products
FREE Daily Planning Planner: https://bit.ly/2zj6gi7
FREE Productivity Guide: https://bit.ly/3bKhGKl
BUSINESS INQUIRIES ONLY: [email protected]
Hey guys welcome back to the channel if you are new here, my name is shimmer nicole. Thank you so much for stopping by today, i'm going to be showing you guys how i transformed this wig, i'm going to show you straight out of the package how it looked what i did to customize it, which was really really simple and how i achieved these Curls, so if you guys are interested in how i got this look stay tuned and we're going to jump right into today's video, so the hair we're going to be using today is by dy hair 777 i'll have everything listed in the description box. It came in a large drawstring bag and, of course, it had a net on top of the wig, so this wig is in a straight texture. It also does come with three combs and the combs are on both sides and one large comb in the back. This wig also features a lace closure. I personally prefer lace closure, wigs versus lace, frontals. I know that frontals are the wave right now, but i feel like you can get that same natural. Looking hairline and seamless look with a lace frontal, as well as with the lace closure. So that's just my personal preference and of course you can see that this wig is made really well and it does have a nice breathable cap. The hair again is 22 inches and the ends of the hair look great. The density of this wig is 180 and, as you can see, i gave myself some braids and we're going to apply this wig. So i am going to be applying a stocking cap and i'm going to be using the stocking cap in the color nude. You do not have to use this color stocking cap, but i feel, like you, do get a natural looking parting when you're doing this. So for customization of this wig. All i did was bleach the knots underneath the lace and i did tweeze the parting to give it more of a distinct part. I also took a little bit of my setting powder and i put it underneath the lace portion of this wig and that just helps to give my knots a little more of a skin tone. Appearance. Sometimes, if you over bleach or even if you under bleach taking a little bit of setting powder, will help to fix that problem. So now i'm just going to apply the wig, and you see that my part is really distinct. I did do some tweezing to it because i don't like my parts to be too straight back, so i do not tweeze my parting to be even i tweeze it to mimic a natural part, so i am going to be wearing this wig temporarily, so i am Going to be using a gel and hairspray method, i am going to take my got to be glue and i'm going to apply a little bit right at the top of the stocking cap. And then i'm going to go in with my hairspray and i'm going to apply a little bit of hairspray directly on top of that glue, i'm going to allow that to dry for just a few minutes. I am going to take my small blow dryer to help me out and then i'm going to do this process two times before. I apply the lace to my forehead and, of course, when i'm filming i have to have my coffee and my music. So i'm having a little party over here, but now i'm going to wait for that to get tacky and then i'm going to apply the lace directly onto my forehead. I like to take my comb and i like to help kind of blend the hair into the skin, so that the gel doesn't just stick to my forehead and it also helps to mold the lace to where i want it. So it's kind of like i'm melting, the lace onto my skin and to the stocking cap. I'M going to continue to do this, tie everything down and then i'm going to let that dry and i'm going to put a little bit of makeup on and i'll be right back. So, as i was applying my makeup, i didn't realize i wasn't filming me, cutting the lace, but all i did was cut the lace in two sections. I don't like to cut it straight across. I just cut it down the middle. I cut one side and then i cut the other side. So, as you guys can see, the wig is melted into my forehead. It does give you that lace, frontal look, but it's used with a closure. So much simpler. You don't have to worry about. Having so much stuff on your forehead products - or you don't have to worry about your lace lifting up so now that we have everything in place, we're going to comb out our wig and i'm going to take a little bit of concealer and i'm just going to Blend that into the excess lace that i have on my forehead and i just want to create a seamless part so now we're going to cut and style so for this wig today. I do want to keep it long again. This is 22 inches, so i'm just going to do a little bit of face. Framing i'm going to take my scissors and the way that i like to do my layers is i like to what we call over direct, so i pulled the hair backwards that just assures that my layers are going to be long and that i'm going to get The flow of how i want my curls to lay so i'm just going to cut my hair in a downward motion. If you are new to cutting your own hair, i highly recommend that you do this when the hair is wet and as you can see, i'm just moving the hair back so that once that curls, i know where it's going to lay i'm going to continue this On both sides and again this is a really rough cut, but i'm just focusing on the front of my hair to frame my face. These layers are again going to be very long, and i just want to get some of that flimsy hair off of the ends and then we're going to curl. So now that i feel like, i have a little more shape into this wig. I'M going to be curling my hair away from my face, so that means all of the curls are going to be going backwards. This next tool that i'm going to show you is such a lifesaver. I use it all the time and this is a kiss automatic curling wand. So, as you can see, it has a button that will curl the hair forward or curl it backwards. So i'm going to place the hair inside of the machine. As you can see, i press the button and it will curl automatically. When i tell you it saves me so much time i use it when i'm at my pageants. I use it when i'm doing stuff behind the scenes. I'M on photo shoots. It just works so fast. Now i've had this machine for quite a while. So if i can find a link for it, i will leave it in the description box, but there are other brands that have this type of curling wand and i'll link. Those in the description box as well, so i'm going to continue to curl my hair again, i'm curling away from my face. So that means all of the curls are going backwards. I'M going to do this on the opposite side. Allow the curls to set before you comb them out and then we're going to style. If you guys notice, i did not apply any styling products to the wig. I did that for a reason, one, because i want these curls to be as fluffy as possible, and i also want to show you guys how this hair looks in this natural state, natural shine and natural luster. So again before you comb, your curls out make sure they are cooled down. You don't want to comb out the curls when your hair is still warm. The curls will not sit in place. I love fluffy hair. I love hair that moves that has bounce that has shine and, as you guys can see, this hair is giving me all of the vibes. I absolutely love it and you see the layers go a long way. Okay, you guys, so that's it for today's video. I hope you guys enjoyed it. This was so simple to create. I'M telling you guys, throw it awake on. Do a little bit of customization, throw some curls in, like i just showed you guys and voila. I highly recommend that you get you a large wide tooth comb. It makes it so much easier. If you don't have a comb, you can get a brush you'll be able to get the really fluffy curls. Just like this. If you guys are new to this channel, this brush is older than my kids, so it doesn't have to be anything fancy. I would just say, brush your curls out, fluff them up and that's a look guys. It'S so simple to do. I love this. Look very easy, simple and, as you guys seen it's fast, i will have all of the hair details listed in the description box. Everything that i use will be listed in the description box. I will also have a discount code if i can find it for you guys also listed in the description box as well, because this hair is giving me all types of vibes. So that's it guys for today's video, don't forget to thumbs up and subscribe, and i will see you guys in the next video


Comments
ChimereNicole: Girl! I found THIS wig was only $15, don't say I didn't tell you. https://youtu.be/vW6GNdZDZ1Q
Nachy G.: Makeup tutorial please!!!! The wig is niceeeee and looks so natural
LoTTaLeGGs Beauty: TFS!! I’ve been trying to figure out the name of this wig site...I couldn’t remember lol! Love the curls
Dyhair777: you slay girl.
Fuego Babiii: love it
Because_I_Have_To:
Colby L: Poppin
4CKINKYDIVA: Thought this was your hear on IG