Simple Quick Weave Install *Beginner Friendly* | Very Detailed Ft. Arabella Hair
- Posted on 02 January, 2023
- HD Lace Wig
- By Anonymous
This video details step-by-step how to install a quick weave with middle part on yourself!
OPEN FOR STEP-BY-STEP Instructions & HAIR INFO!!
●▬▬▬▬▬▬ #ARABELLAHAIR ▬▬▬▬▬▬●
❤ Buy Now, Pay Later, 4 interest-free payments
☛ Link to the Hair➤ https://bit.ly/3jFohxH
Hair Detail: Deep wave bundles 28" 28 " 28"
Exclusive discount 18% OFF Code: AYTB
Buy 1 Get 2 Sale➤https://bit.ly/3Ig4e3g
No work Needed Real Glueless Wigs➤ https://bit.ly/3vnoYi2
Hot Selling Auburn wigs➤https://bit.ly/3WuDWyy
Popular Fashion Color Wigs➤https://bit.ly/3GptSBp
Invisible HD Lace wigs ➤https://bit.ly/3YXHWcB
Arabella Hair Youtube➤ https://bit.ly/3SEjgSF
Arabella Hair Instagram➤https://bit.ly/3ecpZEC
Arabella Hair Tiktok ➤https://bit.ly/3SSFZKQ
WhatsApp:+86 18937456160
Steps to install quick weave:
PREP:
1. Braid down your hair (optional, can pull into ponytail/slick down), and make sure to leave out enough hair at the top to cover your tracks.
2. Put on the wig cap (any color)
3. Use a white eyeliner/lip liner pencil to mark the area around your leave out
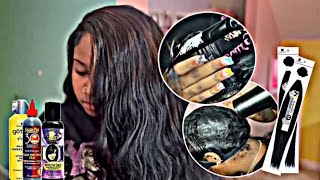
3. Apply hair protectant to cap avoiding areas of leave out , can use gorilla snot hair spray or morning glory hair protectant
4. Blow dry hair protectant making sure it is COMPLETELY dry
INSTALL
1. Measure the track hair against your head from ear to ear
2. Cut the weft that you measured
3. Apply hair glue to track and allow to dry for no longer than 30 seconds
4. Lay the track onto your cap beginning at the bottom working your way up
5. Repeat the above steps until you reach your leave out
6. cut off the remaining cap that's exposed (be careful!!)
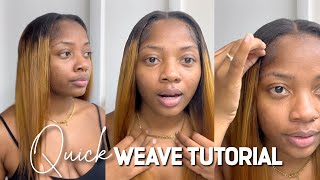
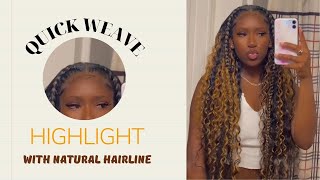
7. Style your leave out as desired
Watch my other videos!!
How to Takedown your quick weave:
Follow me on IG https://www.instagram.com/dionalatia/
For Business Inquiries ONLY:
Psalm 27:12 The LORD is my light and my salvation; whom shall I fear?
Foreign, so before I begin braiding my hair, I'm first separating my leave out. I'M only leaving out a little bit here like for my edges and then I'm leaving out only a little bit at the top for a middle part, because I decided to do a middle part with this style. But I'm not leaving out like a bunch of hair. On the sides really just enough for my edges and now I'm just braiding down the hair at the top of my head that I'm using for my leave out just so it's out of the way. While I do my style next, I'm going to begin physically braiding. My hair, I decided to do cornrows going straight to the back. That'S how I always do my quick weaves. Only because, like it's simplest for me, I'm not a good braider at all, I'm pretty much doing like plaits um, going straight to the back of my head. If you know how to do fancy Braids by all mean you can do that, if you don't know how to braid, you can put your hair into like a lower bun or like a ponytail, but this is just what works best for me, because I feel like It keeps the hair super flat underneath the wig cap. It'S also very important just to make sure your hair is flat on the sides at the top whenever, if you're deciding to braid um, because it'll be bulky underneath the cap, if you don't so after I'm done, I'm going to use my hair growth oil just to Grease my scalp I'm trying not to go too heavy in the front because I know that's where my leave out is going to be um. But definitely I'm going to heavy in the back. Because that's going to be underneath the cap - and I just want to make sure my hair is not dry and it's moisturized and then I'm going to pin up the braids that are hanging in the back with bobby pins. I don't like using crochet needles to tuck. My braids underneath other braids one because it I feel like it hurts sometimes when I do that and it like tugs on my hair. I don't know I just don't like doing that. It'S more convenient for me to just use a simple bobby pin, but if you want to use a crochet needle, you can definitely do that. Now, I'm applying my wig cap, I'm just using a single black wig cap. I know some people use two, but one is good enough for me because I use enough layers of hair protectant, so I feel, like my hair - is still protected. Now, I'm just using a white eyeliner pen to Mark out where my leave out is so. I know where to stop when putting on the hair protectant and where to stop when applying my tracks um, it just helps as a guide, so I cut off the excess stocking cap behind my ear holes on each side. Just so the cap can lay flatter because now I'm going to get ready and apply the hair protectant, so first, I'm using the Morning Glory Glory, Hair protectant and I'm applying that with like a flat brush, um yeah. I don't. I guess you could use your fingers. I recommend using like an applicator brush and then I'm also going to use some got to be free spray. I'M going to use both of these together um but, as you can see here, I'm putting it on the brush and then I'm gon na start right behind that white line and just start putting it all over my hair and all over that cap. And then I'm just going to alternate like first I'll put on a layer of this and then I blow dried it and then I put on a layer of got to be free spray, and I blow dried that foreign also. I understand some people actually put the hair protectant on your actual braids. I don't like to do that because I feel, like my hair is protected enough by just putting it on the cap and along with the free spray. Also, I don't like doing it because it makes the takeout Messier. This is for an easy take out for me, because then I have to not only wash the cap off, but I have to wash that morning, glory like out of my actual hair and even though it's okay, it's safe for hair. I just don't like having all that product in my hair, so I just put it on top of the cap and it just creates like a solid layer on top foreign. I'M using is from Arabella. They sent me three bundles of the 28 inch deep wave and, as you can see, it's pretty long hair and when stretched it comes all the way down to my hip and all the information will be in the description box below with the pack. They sent me a wig cap, some eyelashes um, this Edge brush, as well as a hairband and a really cute clip. So let's go ahead and get started so really quickly. I want to show you how much hair comes in one bundle. This is what it looks like stretched out, but to begin, I'm going to take about Begin by taking one end of the hair and measuring it from ear to ear, and then I'm going to cut that as you see here and I'm using the 30 second hair Bond glue, this is my favorite glue. I feel like it's the most sturdiest um, the most secure anyways and I'm applying just a thin layer to the actual weft and I'm going to let it dry for a couple of seconds. I don't wait the full 30 seconds to let it dry. I just blow on it for a couple seconds and then I apply it to the back of my head. So, as you can see here, I'm taking my middle finger and my index finger to feel where the track should go, because I can't see what I'm doing so. You'Re really just gon na have to feel your way around and then I'm going to lay it flat and blow dry it, and I know that was kind of fast. So I'm going to show you everything one more time again: I'm measuring the track from ear to ear making sure it goes from one end of the cap to the other, and then I'm going to cut off a piece and then after I cut it, I just Re-Measure again after it's cut to make sure it fits properly. If it's not the right size, then you can go back and cut some more, but now I'm applying the hair glue to the weft um. This can be the trickiest part. Sometimes, if it's like a super long weft but yeah, I'm applying it to the weft I'm going to let it dry for a couple of seconds and then I'm going to take my fingers to feel where the last track is and I'm going to set the new Track um one step like above the previous one. I typically typically do like a fingers width apart, maybe one or two fingers, but usually like one finger um and just I use my fingers to feel how far apart they are in the back and then I'm going to blow dry it just to seal it in Place foreign steps, as I work my way up the back of my head: I'm officially done with the first bundle. So this is how far the first bundle took me. Um setting my tracks about fingertips, length, width apart and now, I'm getting into the second bundle and I'm just going to repeat those same steps and as I get closer to the top, I'm going to start curving the tracks in more of a u-shape. This just helps the hair fall in place more naturally, and it helps each track cover each other in the front. Just so, you don't see any tracks like when the wind blows, and so this is what it looks like at the top um. This is the last little track that I laid down um in this u-shaped motion. As you can see, the back part of the track covered the end of the white um, the white liner in the back. So now I'm going to cut two little pieces on the sides um just to fill in those gaps, so um one covering one side for the white eyeliner and then the other one covering the other side. Now the installation part of the install is done all of the hair is put in We're, Not Gon na. You know install any more hair, but now we're going to go to styling the hair. So here I'm just cutting off the excess wig cap and then I am going to touch up my leave out questions. So I forgot to mention that, before flat ironing my leave out, I put Biosilk on my leave out and also my edges um, just to make it you know shinier or whatever Biosilk does, but now I'm using my Edge booster edge control and my black gel and I'M going to do my edges um, I used both of those because, typically I relax my edges, but after hearing all the stuff about relaxers I stomped um. So I have to use like both of these, because my edges are a little rebellious, so I had to use both of these in combination to help lay my edges down and then I'm going to wrap them. Thank you. While my edges set I'm going to go through and Define my curls at the bottom, I'm just taking some spray spray bottles of water and a spray bottle, as well as the Cantu curling cream and um. This brushed Demi, denim brush or whatever, and I'm combing through the curls just to Define them and make them pop a little bit foreign foreign. So I want to explain a couple things I originally began by trying to blend my leave out at the top with these curls at the bottom by curling my leave out, and I decided that was a hot mess. So what I did was re-flat iron. My leave out - and I also partially flat ironed some of the curls at the top, so that I can make it flat like what you see right here, so that it can blend. While you can curl your own leave out. My hair is shorter at the top and it just looked all kinds of crazy, so I just decided this was better um and then so now I'm just gon na. You know this is what it looks like when it's done now. I'M just going to show you a couple of hairstyles. I put it in a ponytail and also put it in a claw clip um. Just you know some cute little hairstyle Alternatives that you can do. I really did that because my hair was kind of flat at the top here, so I felt like that was kind of appropriate, but anyway is it's completely optional? So, while you watch me do these Styles, I just want to talk a little bit about this hair. So the first thing for me is even though the hair looks pretty um full right here, I feel like I could have went through and added some extra tracks in the middle because after everything was said and done, um it the style, felt kind of thin. To me - and I want it a little bit thicker, especially after you like apply water to the leave out in the back. The hair is very lightweight like super super lightweight like it looks full and thick, but it's actually very lightweight and a little bit thinner. So I could have added some more tracks to the back after I like put water and like Define the curls um, the curls last all day like that um. But when I go to sleep and wake up, they are a little tangly um. I do sleep with a bonnet, but I do have to detangle the curls in the morning, which is fine because after I detangle it, it lasts. You know like regularly all day, but you will have to put in just a little bit of effort. This is not like a wake up and go style, but I feel like that's the same with all curly hair. You will have to give it some TLC before heading out the door, but besides that the hair was super cute um. The style was just something different that I usually do anyway, so I appreciate it y'all, don't mind me: I'm ignorant anyways um, but yeah, but that is it for this video. You guys. Thank you so much for watching and yeah. That'S it adios till next time.
Comments
Patrice Whitiker: This is and always been my go to style for about 15 years ipy it's so convenient easy for bun styles,I love it ty for the video
arabella hair: GREAT JOB!