Yall!! Best Wig Of 2023! New Method On 4C Kinky Edges Hd Wig #Naturalhair #Kinkystraight
- Posted on 01 December, 2022
- HD Lace Wig
- By Anonymous
▬▬★★Cyber Monday Sale is Underway! ★★▬▬
15% OFF | Code: Cyber
▬▬▬★ Free Shipping & Buy Now, Pay Later ★▬▬▬
▶ ▶ : https://www.omgherhair.com/4c-kinky-ed...
$ $ | :
Length: 18 inch
Density: 150%
▬▬▬★ OMGHerHair Quality Glueless HD Wigs ★▬▬▬
√ Super Fitted Glueless Wig Cap
√ Real Invisible HD Lace
√ Clean Bleached Hairline
√ Deep Parting 13x6
√ Adjustable Straps & Elastic Band
▬▬▬★ MORE WIGS FOUND HERE ★▬▬▬
▶ OMGHerHair Official Website:
▶ Fitted Glueless HD Wigs:
https://www.omgherhair.com/fitted-glue...
▶ Beginner Friendly 360 Wigs:
https://www.omgherhair.com/360-lace-wi...
▶ Luxury 13x6 HD Wigs:
https://www.omgherhair.com/13x6-hd-lac...
#hdlace #curlyedgeswig #13x6lacefrontalwig #gluelesswigs
▬▬▬▬★ OMGHerHair Social Media ★▬▬▬▬
Instagram: https://www.instagram.com/omgherhair/
YouTube: https://www.youtube.com/c/OMGHerHairOf...
Facebook: https://www.facebook.com/omgherhair
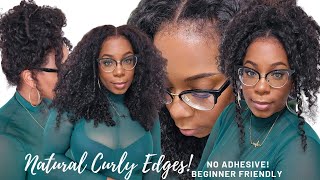
Foreign, hey guys, welcome back to my channel. My name is beige. If you're new here welcome, don't forget to give this video a huge thumbs up and comment down below before you leave. So today's video, of course the future is here. This wig is Flawless. This wig is so futuristic and natural. Looking I'm just so obsessed with it, let's jump straight into it. This wig is from OMG her hair I'll have all of their information the promo codes and direct links Down Below in the description box. The wig that I was sent is an 18 inch, coarse, Yaki, textured wig. The density is 150 density and, of course, this wig features their natural Kinky Curly, baby hair hairline, this hairline mimics natural hair for a more realistic look and the lace is skin, melted, HD, lace with a clean hairline. The Cap Construction features four Combs an adjustable strap and the knots are bleached. The hairline is also pre-plucked for us, taking the wig out of the package and placing the wig straight onto my head. I at first I was like what am I about to do to this wig like I was speechless. I really didn't know what to do. First, because I feel like the hairline was really really thick and I'm not used to seeing a thick hairline on my head and then the actual shape of the frontal kind of worried me a little bit, because I know that I needed to wear baby hairs in The front because the hairline of the frontal had like an arc and it gave square and my hairline is more round than it is square. So I was a little confused as to what I could do with this wig. But I am so glad that I took the extra steps that I did because it came out looking flawless. So what do you think about the natural hairline of this wig? What would you do straight out of the package? Let me know Down Below in the comment section: would you just install this wig and go? Would you press the hairline out to make it more straight? What would you do leave me a comment down below, so I decided to pluck some hairs from the hairline because I felt like it was too thick and to do that I'll be doing the beige method of zigzag, plucking and parting all right. So, do you remember how the hairline had an arc shape in the front, and it was more squared because of that, I'm just going to pluck away some of that hair in the very front of it, so that it won't be so much of a harsh Arc. There - and it can look a little bit more round to blend in with my natural hairline - shape a little bit more, so this is the result from doing that. Next, I'm just going to continue doing the zigzag, plucking method, my method on the other side, until I am fully satisfied with how the hairline is looking. Thank you - and here we are. I am obsessed look at that. That looks like my natural hairline that looks like on a natural hairline. I'M really excited about this one. I'M gon na grab two different colors of lace tint. This is a lace tint that I did create myself. I do have a video on that. The first color of lace, tint, is the color of my Foundation, which I spray along. The hairline portion of the wig and the second color is the color of my scalp, which I spray on the inner portion of the wig I'll, be doing two different layers of each color of lace, tint and then blow drying in between each layer, foreign. So now I'm just going to spray some water on the hairline and I'm just going to use my blow dryer and a boar bristle brush to brush those hairs backwards. This is going to get those hairs to relax and be more straight, but not I didn't want to use a pressing comb because that completely defeats the purpose of having kinky edges. So I did want it to look natural by using that blow dryer. But I wanted to still keep some kink in it as well, and I'm just going to grab this oil and apply it to the hairline for a more silk pressed, look and here's how the hairline looks before blow drying the edges, and you guys just saw how It looks after blow drying the edges, which do you prefer straight out of the package, with no blow dry or using my method to blow dry the edges and for a quick recap. This is how the wig looked before. I changed the shape of the hairline before I did: the beige method of zigzag, plucking and parting to thin out the hairline and before I blew out the edges, and here is how this wig looks now comment down below. What do you think about this hairline? So far, let's chat in the comments. So now I'm just going to get started with styling. The first thing that I'm going to do is cut face framing layers into this hair. I am going for a sleek and Polished look, but I don't want to get rid of The Kinks from the baby hair. So I'm just going to section off the baby. Hairs use this hair oil, the same hair oil that I applied when I was blowing out. The edges I'm going to apply that to the roots where The Parting space is, as well as the roots of the front of the wig, and I'm going to use my pressing comb and a hair wax stick from caracare. I'M just going to press the hairs into place, so the point of that oil is to make the hair look a lot more natural, and it's going to give us that fresh out of the salon. Freshly pressed look next, I'm just going to grab my brush and brush the baby hairs back over the hairs that we just flat ironed in look how natural looks all right so now, I'm just going to style the rest of the hair, I'm going to apply a Hair serum to the hair and then in small sections, just start to curl the wig. So now it is time to cut away that extra lace. I'M going to grab a pair of zigzag scissors and carefully follow the natural hairline of this wig to cut away that extra lace. It'S now time to prep my skin for install grabbing some alcohol, I'm going to apply that to my forehead and then I'll be using scalp protector and applying that to my scalp grabbing the wig. I'M just going to position it onto my head in its proper placement, and here is how the wig looks straight out of the package. If you forgot and I'll show you guys the finished look in just a second typically, I would just pull the wig backwards spray. Some adhesive on my makeup sponge and then just go over my edges with this makeup sponge. The good thing about this sponge is the more you use it the harder it gets. You hear that and it picks up more products when the adhesive is hardened. On the makeup sponge, so you don't have to wash it as often as you would if it was um your typical makeup, applicator the Wonder, lace Bond on the makeup sponge. It'S a good amount of it and I'll zoom in so you guys can see and I'm just going to press it into the lace on the very edge now for the ear tabs. I am going to probably have to spray the actual spray underneath the ear tabs, but oh y'all see how tight this thing's stuck on already: okay, okay, I ain't even about to put my scarf on all right, wonderly spawn coming through. I love this method, especially when you're working with kinky edges, because you don't have to worry about the gel or the adhesive, getting stuck and sticking the hairs together and making it look a natural looking mess and this method is the best method of all. Let me show you guys why, in a minute I feel like this is the easiest most natural method. Y'All. I think the magic is happening because Wonder lace bond is so bomb. You don't really even have to put your headscarf on to set it, but because the ear tabs never really stick down, because my hair is thicker on the sides, I'm just going to spray. The Wonder lays Bond underneath y'all, that's the best method for saving your edges seriously, because if you notice, I didn't really put any of that adhesive on my edges at all, I moved the wig forward past my edges and I only put that adhesive on the edge Of the wig, so now I'm just going to put my scarf on do my eye makeup and then I'm gon na come back and just comb out any adhesive that may be stuck to the hairs. But it's not going to be that much. But I'll come back for that part. So I'll see you guys in just a second foreign, so doing my sponge method. There were some people requesting that I do a pull test pulling the wig to see. If it is that secure - and here you go it's on y'all it's on - and here is the finished look. This wig is 2023 ready. This wig is the best wig of 2023 already, because I really don't think you can get any better than this. I don't like the wig technology from 10 years ago, five years ago, two years ago, eight months ago, y'all, nothing is nothing is touching. This nothing is coming close to this nothing's. Coming close to this, I can say honestly: this is the most natural wig that I have tried like hands down. One major thing that I noticed, which you probably won't notice, is that the the wig has sideburns and a few other wigs, that I've tried that had kinky edges didn't have natural sideburns and it was my own natural hair. That was The Sideburns. But the fact that my entire hairline is protected and covered, and I didn't have to put adhesive on my hairline - and it looks this natural and the texture is looking good and the the freaking layers everything about this y'all. This one is close to my heart. This is dear to my heart. This is a wig that is for the bucks y'all. This is a must-have. Getting your wig closet tomorrow, type of wig make sure you guys check that link out down below leave your comments down below, because I I'm dying to hear what you think about this way, because I know I'm obsessed with it. If you saw me walking down the street, would you think this was my hair? Let'S chat all things this week down below in the comments. Thank you so much for watching. If you're new here don't forget to give this video a huge thumbs up, comment down below and subscribe down below, and I can't wait to see you all in my next video bye, guys: hey, hey

Comments
SuperVeeveez: It looks so cute!! And that technique with the makeup sponge! That was amazing!
Ruthie's Girl: Thanks for this technique. I used to wear 360s years ago and hated the process, and wear lace fronts now but never melt them down, but I thought I'd give it a go again and purchased this unit last week. I'm definitely going to try this method. If it can be done this easily, I might go back to gluing them down.
fashun008: I ordered this when i first saw ur video. Can't wait to get it !!! I will be following ur routine of plucking and detailing the wig. Thanks for all the tips. If everything turns out, i would like to buy another one.
Al W: I need you to do mine when I get one. And your eyebrows are everything.