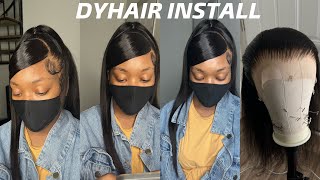
How To Make An Easy Hot Glue Gun Lace Wig Dyhair777 Cambodian Kinky Straight Hair
- Posted on 16 December, 2016
- HD Lace Wig
- By Anonymous
HI EVERYONE! HOW TO MAKE AN EASY HOT GLUE GUN WIG IS THE TUTORIAL I DIY IN THIS VIDEO.I USED DYHAIR777 CAMBODIAN KINKY STRAIGHT LACE CLOSURE AND BUNDLES,LACE WIGS CAN BE DIY USING HOT GLUE GUN FOR FAST RESULTS..THIS HOT GLUE GUN METHOD IS VERY EASY TO FOLLOW SO PLEASE ENJOY!!!
HAIR SPECS : Cambodian 18'' 20'' 22'' 22'' N 16'' Lace closure recommended, http://www.dyhair777.com/product_3-or-...
COUPON CODE 810103 AT http://www.dyhair777.com
Hi everybody today, I'm coming with another DIY week, tutorial using hot glue gun to make a wig. It'S really made easily quickly, but of course, with hot glue gun. I have to put it out there. You have to be careful, it's not that it burns so badly or anything that you know with anything that is warm or hot. You always have to take precaution. We have 218 and 220. So if you want to see how I di why this fabulous kinky straight hair stay tuned, of course the head is from a do. I have 77, the closure is 16 inches and then we have 18 inches to 18 inches and then to 20 inches. So we need a hot glue gun and the glue sticks that come with it. I got it from eBay as well as this pandas, and I use this clear tape to cover my mannequins head so that the glue doesn't stick to the mannequins head very important. Also, yet to this panda soul here I'm laying the closure making sure it lays really flat. So I used for chippings through at the front and toward the back, and also I will be needing the hair clips just to put the hair away so that the glue doesn't get in the way. Now I remove one of the dippings at the front and then I lady give the hot glue making sure everything lays really flat, and then I put another layer, then I remove another TP and I'm gon na do the back. So it's important to do this in small sessions because you don't want the glue to dry on you. So that's why I'm doing it step-by-step so after that one and then remove the chipping and then do the third part in small sections. And then I remove the last pin and I make sure the closure lays really flat and as you can see, the fundus is really stretch on the mannequins head just to give us space. Now these are the bundles 20 inch and 18. Is we, starting with the 20 inch bundle? So, as you can see, I lay the weft and then I fix it with tipping's, and then I remove the tip in from one side, and I start in small session by applying the glue as I go along, you. Don'T want to do it all the way because the glue will dry, so it's always better to do it. This way is the simplest method. Actually, so if you want to be using your weak in a ponytail, you might want to lay that weft inside of this Pandits, that's real. You know first well inside instead of outside. Like I'm doing so now, you see I remove the tipping and then I seal the wet so because we are cutting the weft, we want to make sure we seal it with glue so that it doesn't shed later on. So I'm gon na show this a second time. You did you measure the weft fix it with pin cut the wet and then you remove it from one side and start gluing. So clearing small sections take your time. So don't worry about the glue because when it gets on the way it dries really fast, it doesn't stick to anything. So I said in small session work in small sections, just to make sure you are drying and that the glue will dry and the wave will stay put. So now we cannot go back after this. We cannot go back at the beginning, remove that chipping on the other side, yeah. We are removing the tip in from this side and then that's big. We glue just to seal the wax in the hockey, and this is our first bottle. 20-Inch, and here comes our second bundle, just lady hair like so it's pretty self-explanatory. So, just because I need to make sure we don't get back in the middle lay in the West, the first swept close to the closure, so same thing fix with tipping and then glue in small sessions. So, as you can see, I lay that cut really close to the edges of the closure, just to make sure it looks flat and natural. So you go ahead and do all that now, our first pack, next to the closure is all laid and nice. So we can follow with other tags to make sure our week is done properly. So I keep laying the tags and gluing until the week is fully done. This is the last wave, the last hack. That'S what is left that I'm cutting right now. Our week is already that's how fast it takes less than 30 minutes to make a wheel using glucan. That'S how fast and easy it is. You just have to make sure you don't spoil the hair with glue. You know try to be neat in your application and use hair clips to put the hair away, so hair is ready, so I remove the week and that's inside it has already tried. So this hair is a combo chain kinky straight now you see me cut the SS pandas inside so that I can leave space for the closure. So once this pun, this is cut. That'S what our week looks like and that's what the inside looks like. I use a little bit of my concealer to lighten day passing and just you know customize it so that it looks like my skin tone. I use some move, so this argan oil mousse is really amazing. With these hair stone, I use like two pumps to just tame the hair and also just give it a shape and because I don't want it so so fussy so depending on how much you want to tame it down, you can use a lot more most, but I want it to have this volume, so I'm happy with that, and also we can use a little bit of hairspray just to make it turn shiny and then my favorite training actually beaufart resume. My favorite transform a styling spray, so these are the products I intend to use to take care of this hair. I absolutely love the natural look of it is for protective style. You know, is really cold outside and all that and my hair needs to be protected. So this is just perfect, so what I wanted to quickly highlight, I use a little bit of eco styler gel because I'm transitioning and I don't want to perm my hair anymore. So I have a lot of growth. The last six months I haven't touched a relaxer, so my hair has brought a lot and this eco styler is perfect for taming down. They prove and just smooth my edges down. So that's my you know. You need to look really nice and well said so. This eco styler be generous with it. If you wanna, tame natural hair down and smooth your edges is really helpful. So thank you so much for watching my hot glue gun DIY week. Makings

Comments
Mayra Fuerte: I want to start wearing wigs so I can change up my hair! I love how you can customize this. Thanks for sharing!
Vicky J: Girl this hair is freaking amazing on you..... Definitely a 2017 look. Love it..
Sophia Ebrahim: This hair looks so natural I love it and great job
Crystal Munford: Looks amazing!
paris yally: Wow sista! I like this hair on you ☺ looks very super gorgeous on you Perfect! great tutorial I really enjoyed it! ☺ Thanks for sharing have an cozy weekend
Dania Lanese: Very creative, I love it!!!
Healing Hannah: Your hair looks amaze! Thanks for sharing, I love your channel! I uploaded two recent xmas videos and if you haven’t already I would love if you could go check them out?x
Magikalblackness: so beautiful
Keeping it Simple with Bridget: This unit is really cute on you hun!
ShenFashFab: great tutorial hun
FRANZÖSISCH AVEC ADJOA : Le maquillage des yeux est vraiment en phase avec cette nouvelle coiffure qui te va à ravir, bien fait, ma chérie, bises. :)
Kristina CC: Great video!
Dilias Empire: Wao....great. So beautiful.
DivaNy hair: love it
Maxinescorner: Wonderful like