Auburn Deep Wave Wig | Start To Finish Install & Styling | Ft. Alipearl Hair
- Posted on 12 January, 2023
- HD Lace Wig
- By Anonymous
Like, comment & subscribe!
Instagram & TikTok | @zoenahabwe
____________________________________________________________________
Shop Now➤ https://bit.ly/3jm1Z41
Hair Info: h24'' ginger deep wave 13*4 lace frontal wig, 180%density
❤#AlipearlHair Official Store:➤ https://bit.ly/3YOlS3Q
Up To 50% Off, Lace Frontal Wigs!➤ https://bit.ly/3YN3BE5
In FB Group, EXCLUSIVE DISCOUNT! ➤https://bit.ly/3O1I8ku
1. 24h Flash Sale!
2. Free Hair and Cash Back!
3. Unlimited Coupons!
#alipearlhairwig #alipearlhighlighthair #alipearlhdlacewig
Instagram @alipearl_hair: https://bit.ly/34I3Oyd
Youtube @Ali Pearl Hair: http://bit.ly/2H0Gmmc
WhatsApp: +86 15890076489 E-mail: [email protected]
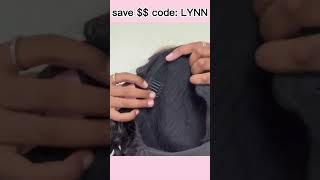
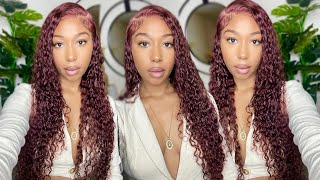
Hey guys, it's Zoe welcome back to my channel, I hope you're all doing amazing. Today, I'm going to be showing you how I installed this gorgeous deep wave, Ginger wig from alipo hair, I'm going to show you how I styled it my thoughts on this wig Etc. So if you want to know how I installed this make sure you keep on watching and I'll see you guys in a sec, okay, so jumping right into it. As I said at the start, this hair is from Ali Pearl hair um. These guys are my all-time favorites. They always know how to give quality on a budget, so really love alipo, and this is what came inside of the box. It'S. I got an edge comb like a wig cap melt band like just loads of little bits and Bobs that, like really help with your installs so shout out to them. It also came with a little satin storage bag for your wig when you're done, and these are the specks of the hair. I got 24 inch, 13x4 and 180 density and I think this texture is a deep wave um I'll need to double check but yeah. This is how it came packaged, and this is what the hair looks like um. It'S a very interesting texture like straight out the box. I think this is just like how it looks in the factory, but I did wash it so. The true true texture came out because it was kind of giving ramen noodles right now, so yeah experience a little bit of shedding. This is something I always expect with my curly hair anyway. Curly hair, naturally just sheds a lot more, and this is what the lace and the hairline looked like. I was ready to bleach this hair guys, as in the knots um, I had my equipment ready, but when I opened it, I realized that I didn't actually need to um, so that is an absolute plus literally. All I had to do was just wash it and just pluck it, and I was good to go um. Here'S just a close-up of what the wig looks like on a mannequin head just so you can see um like the hairline and everything a lot better. This is what the wig looked like before I plucked it, and this next clip is kind of what it looked like after plucking um like I said I did go ahead and wash it um I plucked and then washed it and then styled it um, but yeah. This is the texture of the hair, guys it's a very loose loose, deep wave. I love curl patterns like this they're, just really easy to manage um, especially for a wig. So what I did once I washed the hair is, I just grabbed my wax stick and I grabbed my hot comb and just combed the hairline back just to make installing the wig a lot easier for me and to help show you guys what the hairline actually Looked like when it was completely done um. This is the result. The wig plucked beautifully the hair pulled out really nicely didn't struggle. It took me about 15 minutes to pluck both sides, which is really really good um, especially since I didn't bleach the knots moving on to the install as you can see, here's the wig again it was starting to dry here a little bit more and I just Started things off by tinting the lace um I just use my old Foundation, don't be like me. I was using my brand new Foundation like for so long, but literally describe any cheap foundation. You have will do the job as long as it matches your skin tone. Um, don't waste your good stuff for this but yeah. I tinted the lace and I put the wig on. I did get a medium cup size, so it fit pretty pretty decently. On my head um, once I put the wig on because I couldn't decide on what part I wanted yeah um, I just grabbed my hot comb again and just combed it in literally any direction before grabbing my claw clips and just clipping the hair aside. So I can focus on cutting off the excess lace on the size of my ears and the little tabs that I'm going to use to glue down the hair. So, as you can see, I do one two three little cuts, which creates four little tabs once I've done that I'm grabbing my rubbing alcohol and a cotton pad and just cleaning off any makeup or Foundation. That'S on my forehead! This helps the installs last a hundred times longer so make sure you always do this once that is done for glue. As always, I use my better the Melt with glue and I just start laying the glue down. I'M just going to speed through this because you guys already know the drill just two to three layers: wait for each layer to dry completely clear, and that is pretty much all I do on the entire hairline. So I work section by section, which is why I did these little tabs and it just helps to ensure that that each and every section is focused on so you get the best possible melts ever once all the glue has been laid down, I'm just grabbing a Little bit of got to be hairspray just use any strong hold hairspray you have, and I'm just going to spray that on the side, air tabs, this is done, I'm just pressing everything down with a comb and then grabbing my alley. Pearl melt band um. This came in the box and tightly securing that around my hairline. I love these bands and I love one where Brands include these in the packaging because they are really essential on laying your wig as perfectly as possible, once that is on I'm just going in with my hot comb again and just re-wetting the hair a little bit At this point, I still didn't know how I wanted to style it, but I'm going to get the basics out of the way and just reactivating that curl um with some water and a hairbrush once I've done that to each section I'm taking off the wig band And you should have something like this um, I'm now gon na go ahead and start cutting the lace off with my eyebrow razors. You could also use scissors I've seen there's like zigzag scissors that you can use um to help cut the lace, but essentially you just want to cut the lace in a jagged line and yeah just do this on each and every section once that is done, I'm Grabbing my foundation brush again and I'm just going to go ahead and go over um, where I've just cut the lace just to help everything blend a little better. Now that that is done, I'm gon na do some baby hairs and I'm gon na section off where I want my baby hairs to be so, as you can see middle of my eyebrow and go all the way down to my ear and I'm going to do That on both sides of my head, once I've decided on how thick I want my baby has to be. I'M clipping the rest of my hair back and I'm gon na grab my eyebrow razor again. You can use scissors for this and just cut the baby hairs to my desired length. Cutting the baby has with my mini hair straighteners. These are literally they're from um Lula Bells. They have a detachable head, so I can swap this out for a curler or any sort of Detachment that they have so yeah. I'M just gon na do that and then I'm grabbing my hairspray use any hairspray. You have as long as it's not got to be. I can't stress this enough because you don't want crispy white, just flaky edges, just literally use any medium to like hold hairspray and use your finger and the edge brush to guide where you want them to lay. So I'm just going to do this until I'm happy with how my baby hairs look, keep burning with the hairspray, and you should have something like this. I'M now grabbing my melt band again and just holding down the baby hairs for about 10 minutes before taking it off again, and this is how I make sure that my baby hairs last as long as possible. Now that that is done. It'S time to decide on a hairstyle now I just wanted to show you guys what this hair looks like just in its natural state, so I'm gon na go ahead and just throw it in a side part like flipped over um, as you can see here. I love a good deep side part, especially with curly hair, because it makes it look so effortless and just like I didn't try. I just woke up like this guys so yeah. I love how it looks flipped over even the other side, it's just so cute and casual and yeah. This is the wig. Essentially, this is with no product guys. Let me just reiterate that there is no products in this hair apart from water, which is again why? I love loose deep, wave hair so much because it's just so like I did. I didn't have to do anything to this just water period. Here'S a little close-up of the lace as well. You can get a little look at the baby hairs because you can't really see them from far away added a very subtle um, just a subtle effect to the wig, and here is the length as well for reference. I'M five foot six and the hair touches just around where my waist is now that you've seen it in a side part. I wanted to show you guys how you can also style this hair, so I'm going to go ahead and throw it in the middle part and just hot comb. It and then section off two little sections about this big um from the middle clip that out of the way, and then I'm grabbing the sides of the hair, I'm throwing it in a ponytail. So it kind of it should look just like a half up. Half down, I'm tying that with a hair band as tightly as possible. You want this to be very Sleek, because this hairstyle is meant to be very sleek and neat. So do that and then take that middle section that you sectioned off again make sure it's in a perfect middle part and then re-awett the house on water grab your comb and start slicking it to the side of your hair. As you can see, I'm using a lot of tension here, because I want it to be as flat as possible. I'M securing those sides with some hairspray and some bobby pins, and I'm going to do that to either side, and that is essentially how the front should end up. Looking like I've seen this hairstyle so much on Tick, Tock and I've always wanted to try it. So this is my attempt at it, but I'm so obsessed with how it came out. It just looks so put together and it's just a very easy hairstyle that you can do in literally less than five minutes. Well, maybe not five, let's say ten anyway, once I've clipped either side of the hair, I'm grabbing a claw clip and twisting the base of that ponytail and then securing it with a clip, as you just saw that I did there once that is done, I'm grabbing Some Foundation powder and I'm just adding a little bit to the pot with a small detail brush I'm going to go over my baby hairs again and then call it a day, because this is the final look guys. This is what the hairstyle looks like. I'M so obsessed and honestly guys, I genuinely think I'm in my Ginger hair era, it just it just looks beautiful on my skin but yeah. I hope you enjoyed this video guys make sure you give me a like comment subscribe and I will see you in my next video bye, guys.


Comments
Ali Pearl Hair: Stunning! Thanks for trying our hair
Didiconteh: lovely