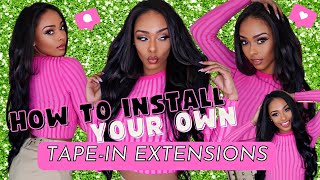
Diy At Home Tape Ins On Short Natural Hair | Ywigs
- Posted on 13 January, 2023
- HD Lace Wig
- By Anonymous
I did DIY at home tape in extensions on my short natural hair for the very first time. The tape in extensions that I used are from Ywigs. I used one and a half bundles to complete this style. Tape ins are very versatile, natural-looking, and cute.
#TapeIns #TapeInextensions #TapeInHairExtensions
▶ Direct link to the 22 inch Blow-out Kinky Straight Tape-in Hair Extensions:
▶ More Tape-in Hair Extensions:
https://www.ywigs.com/collections/tape...
▶ Ywigs Clip-ins Hair Extensions:
https://www.ywigs.com/collections/clip...
▶ Ywigs Micro Links Hair Extensions:
https://www.ywigs.com/collections/i-ti...
▶ Ywigs U-Part Wigs:
https://www.ywigs.com/collections/u-pa...
▶ Ywigs HD Clear Lace 13x6 Lace Front Wigs:
https://www.ywigs.com/collections/13x6...
▶ Ywigs official website: https://www.ywigs.com
0:00 Snippet of Final Results
0:15 Details About the Hair
0:34 Sectioning off my Leave Out
1:53 Tape In Extensions Installation (Back View)
4:36 Tape In Extensions Installation (Front View)
8:04 Putting the Tape Ins in a Ponytail
8:53 Half Up Half Down Tape Ins
11:26 Final Results
Shop My Store: https://www.amazon.com/shop/sashieetv
Items Used:
EBIN Edge Control - https://amzn.to/3iCugDx
Business Email: [email protected]
Follow me on all my social media accounts
Instagram: SashieE.TV
Twitter: SashieeTV
Facebook: https://www.facebook.com/SashieETV
Tik Tok: SashieE.TV
Send Me Mail
Email me at [email protected] if you'd like to send me mail.
SUBSCRIBE and turn on your NOTIFICATION BELL to help me achieve my goal!
http://youtube.com/sashieetv?sub_confi...
✨Current: 55002✨
✨New Goal: 100000✨
New videos multiple times per week at 12 (EST)!
Music: Epidemic Sound
Yeah You by King Sis
https://www.epidemicsound.com/referral...
Equipment Used:
Camera: Canon Powershot G7 X Mark II - https://amzn.to/3fF5rPW
Lighting: Neewer Ring Light 18" - https://amzn.to/2XAf4Jh
Computer: MacBook Pro - https://amzn.to/30ubHpc
Backdrop: https://amzn.to/33vLDMd
Editing Software: Final Cut Pro
Previous Video:
EASY INVISIBLE LOCS TUTORIAL | FEED IN AND RUBBER BAND CROCHET METHOD
https://studio.youtube.com/video/YNCdA...
DIY BRIDAL HAIRSTYLE | BIRTHDAY HAIRSTYLE | ELEGANT HAIRSTYLE | HIGH PONYTAIL WITH TWO BANGS
https://www.youtube.com/watch?v=wXNraC...
MY TOP 5 TIPS ON HOW TO GET RID OF FUNKY UNDERARM ODOR INSTANTLY
https://www.youtube.com/watch?v=XuYcMf...
COZY & PEACEFUL NIGHT ROUTINE | FALL NIGHT ROUTINE
https://www.youtube.com/watch?v=aqxdFE...
NEVER USING GEL AGAIN?! FOAM WASH N GO ON TYPE 4 NATURAL HAIR
https://www.youtube.com/watch?v=ycYAwY...
EXTREME BEDROOM MAKEOVER | AESTHETIC BEDROOM TRANSFORMATION ✨
QUICK AND EASY RUBBER BAND HAIRSTYLE WITH BRAIDING HAIR ON NATURAL HAIR
BOHO BRAIDS TUTORIAL ON NATURAL HAIR
https://studio.youtube.com/video/wlLr9...
GODDESS BOHO BRAIDS ON NATURAL HAIR TAKES TOO LONG TO DO?! TRY THESE INSTEAD! NO EXTENSIONS
https://www.youtube.com/watch?v=onVo3b...
DIY JAYDA WAYDA BRAIDS ON NATURAL HAIR | NO FEED IN
https://www.youtube.com/watch?v=3786jI...
Keywords: tape in extensions, tape ins, y wigs, y wigs hair, natural hair, tape in
FTC: Sashie E TV is a participant in affiliate marketing, including Amazon Services LLC Associate Program. This means that I may make a small commission if you purchase an item using some of the links listed above.
Hey y'all: what's up it's your girl, Sashi e, welcome back to my channel in today's video I am going to be trying and installing tapings for the very first time y'all. This is such a look like. Why am I just trying tapings you guys, but let's get into it, so the hair that I'll be using today is from why wigs? Why wigs.com? It came with three bundles 22 inches natural black, and it also came with that hair separator and also extra tapes. If you need it so for the style, I used a bundle and a half of tape ends. So, as you guys can see, my hair is already freshly washed and blow dried and the first step in this process. You guys is separating your hair. You have to make sure you leave enough hair out so that your hair can blend really nicely. So I pretty much left out the entire perimeter of my hair. You guys and it was the perfect amount of leave out to make sure that everything was covered. So I installed my tapings in a way where I can do a side part, a middle part and also a half up half down that was this really the style of choice. You guys, I wanted to make sure this was going to be half up half down. So, as you guys can see, I am separating my hair y'all. My parts for this were not perfect at all. I will say the installation process was not the neatest for me for one y'all. I did not have a mirror behind me, so I was using my sense of touch to feel where to put everything and where to part everything which is something I definitely don't recommend make sure when you're doing the style, you have a mirror in front of you And a mirror behind you so that you guys can see everything that you all are doing foreign s up close you guys they come with 40 tapings in a pack, so it's 40 individual tapings in the bundle you guys and as you know, you need two tapeans For each section, so ideally it's 20 pairs. So, as you guys can see right here, I'm just peeling off the tape. It'S super quick and easy, and then I am just um parting, my hair. So I did the first section and then what I like to do is I like to apply the tape in leave. Some hair out then apply the tape in again. So, as you guys can see, I did those tapings already and then I'm just going to leave some hair out to Blade on top of those tape ends and then I'm gon na part it again just so that I can start the taping process again. I like that, I did it this way, you guys so that I didn't have too many tapings in my hair because, as you guys can see by the end of this, like, I had so much hair on my head. So I just want to show you guys how I lay the tape ends. I did not lay them in any specific ways in the back I just applied. The tape ends to my head across that entire part. So I think, for this section I added maybe like five different tape, ins and I will say, like I do like to prep the tape inside removing the tape, so just so that I can move a lot faster. So that's a little tip for you guys. So, as you guys can see, it's so easy, I'm literally just applying the tapings to my hair. Try not to apply it too, too close to your scalp. You want to give your hair some breathing room so that when you flip your hair, there's no tension on your scalp or any irritations on your scalp. So once I laid the tape in you guys, I went ahead and I used my fingers. You can use a comb if you want to part, but for the section it was just easier for me to use my finger and I just parted it as thinly as possible. That is also another tip. You guys try not to make your parts um too big and make the hair too thick, because you do have to lay the tapings on the hair right, so you got to lay them on top of one another, and you don't want the hair. That'S in between the two tapings to be too thick, so I have a tape in on the underneath side. I have my hair in the middle and then I have a tape in on top to make kind of, like the perfect sandwich guys. So, as you can see, I am all done with the back section and y'all look how much hair this is. This is why I did not apply tapings to every single row. I pretty much did it every other row, because the hair was just so thick as you guys saw, I was combing it there's nothing sliding out. The tapings are super secure, all right y'all. So now we are moving on to the top section of my hair. So, as you guys can see, I am doing a part on the left side of my hair, because I do wear side Parts on the left and then I'm also going to go in with a middle part. Just so that, if I want to wear the style in the middle part side part up down like I have the versatility and the options to do so so now you guys I'm actually going to start applying the tape into this side. As you guys can see. I parted my hair at an angle because I wanted it to be super easy to put my hair up in a ponytail for that half up half down section. So I am applying the tape in, as you guys can see, and then I'm making sure that is nice and secure, as you guys can see it's not too close to my scalp. So I'm able to move it freely and then I am applying a tape in on top of that, just to make sure it is nice and secure you guys. So as you guys can see, it can move freely when I start to move it around like there's. No problems, no irritation, no tension on my scalp, and I also want to mention y'all. This hair is really lightweight like it feels like I'm wearing my own hair, like it, it's so lightweight, so I'm still being consistent with how I apply the tape ends. I'M doing the same thing I did for the back to the front. So, as you guys can see, I applied the previous tape ends. Then I'm leaving some hair out and then I'm going to apply tape into the additional row which you're going to see so y'all. I am applying the tape into one row skip in one row, adding tape into the next row skipping one row because, as you guys can see, this is so much hair, especially because it's in the kinky straight style. So it just looks so big. So if I were to apply tape into every single row, it would just be way too much hair on my head. Take it away, take it away, feeling too good to me and all day, all in your space is I've Been Thinking by myself asking for help, but nothing seems to work on you all right guys, so I am done installing the taping. So now I am taking down my leave out you guys and, as you can see like the blend, is there it's a pretty good match for my hair? So I'm very happy with that. I'M happy! I don't have to like flat iron it because most of the tapings that I see online is usually like straight hair but anyways you guys, as you can see the blend. Is there it's a really nice blend? It looks like my hair, like y'all. This looks like the Glam twins hair. You know when their hair is like blown out like I feel like this is how their hair looks, but anyways um, so yeah, I'm just combing it out, as you guys can see like my hair, is not coming out like the tapings are secure. They are there. You guys, and it Blends so well with my hair, there's no tapes peeking through or anything like that, so I'm very pleased with it. So I do want to show you guys me putting it in a little ponytail before I do the official style, which is the one curls which is coming later on in the video. So this was super easy to put in a ponytail. It Blended really nicely um. I will say after seeing this clip I was like. I definitely want to try to grow my hair out y'all. I really really want to try to do it, so I'm gon na see if I can make that commitment to grow my hair out this year and stop cutting my hair, you guys but anyways. So this is how it looks in a ponytail. So if you're wanting to wear your hair up to go to the gym or just to just, have it out your face, it's something that you definitely can do foreign portion of the video you guys. So, as I said for this tape in install, I really wanted to keep my hair half up half down, so I am going to do that style right now with the wand curls. So, as you guys can see, I am separating my hair just so that I can separate the back from the top portion because I'm going to do one curls in the back coming down and then for the top portion. I want it in a ponytail and I'm going to be doing one curls to that ponytail as well um for this section, you guys it's pretty self-explanatory. I'M gon na be using my even 24 Edge Tamer to just put around my edges so that I can have a sleeker look and then I'm just going to brush that in put my hair in a ponytail and get started on the wand curls. As far as the temperature of the wand, I kept it on 410 degrees and for each curl I kept the wand on my hair for between 10 to 15 seconds um. If you guys have any questions about anything pertaining this style just be sure to ask me down in the comment section, I'm pretty open with responding to my comments. All the time, especially on the newer videos, also check my description box for all the details on this hair. It is from y wigs.com. It is in a natural color, it's 22 inches, and this is kinky straight As far as the style. I just can't stop thinking about you. I just can't stop thinking about you. I just can't stop thinking about you. Stop thinking about you so now that I'm done with my wand, curls you guys, I'm just separating them just a little bit as the day progressed, the hair did fall just a little bit and the curls were so beautiful. They weren't as tight. They were like a nice loose wand, curl, which I absolutely love. I really like the hair so far, you guys it feels good, it's nice and lightweight the curls did hold throughout the day. I even went to the gym you guys with it and I walked out with curls from the gym you guys my hair didn't poof up or anything like that. So I really like it and just to give myself a more polished. Look you guys. I just went ahead and just fixed up my edges with that same Edge, Tamer that I used earlier on you guys but yeah. That'S it for today's tutorial. If you guys enjoyed pink be sure to give me a thumbs up, comment down below any questions that you guys may have, I also have additional videos like this that are similar. I will leave them in my end screen and also above in my I cards. Thank you guys so much for watching. As always, I love you guys and I'll see you guys in the next one bye,

Comments
Sashie E TV: Have you tried tape ins?
Ivy Merritt: This hair looks AMAZING!! It blends VERY well with your natural hair. I like how you don't have to straighten your hair to get it to blend! ♥️♥️♥️♥️♥️
A Young: This came out beautiful as always
Carla Campbell: Hi Sashie E, I have not tried tape-ins. Don't know if I have the patience. But yours came out beautiful But I do love to wear clip-in extensions.
Ivy Merritt: Wow!! I can't believe you tried tape ins on YOURSELF!!
Ivy Merritt: Whoa!! It DOES look like YOUR hair!!
Ivy Merritt: Congratulations on reaching 55K subscribers!!
GDaEssence: You say “You guys” A LOT!! Lol!
NeliaBedilia: Slaaaayed it