The Best Chocolate Brown Wig Reinstallation | Step By Step | Ft.Alipearl Hair
- Posted on 12 December, 2022
- HD Lace Wig
- By Anonymous
Shop Now➤https://bit.ly/3Rvc8Hx
Hair Info: 22inch chocolate brown straight 13*4 lace frontal wig 180%density
❤#AlipearlHair Official Store:➤https://bit.ly/3RacSlw
Up To 50% Off, Lace Frontal Wigs!➤https://bit.ly/3B7GzOC
In FB Group, EXCLUSIVE DISCOUNT! ➤https://bit.ly/3O1I8ku
1. 24h Flash Sale!
2. Free Hair and Cash Back!
3. Unlimited Coupons!
#alipearlhairwig #alipearlchocolatehair #alipearlhdlacewig
Instagram @alipearl_hair: https://bit.ly/34I3Oyd
Youtube @Ali Pearl Hair: http://bit.ly/2H0Gmmc
WhatsApp: +86 15890076489 E-mail: [email protected]
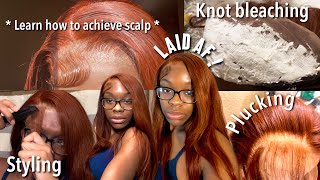
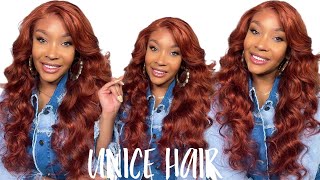
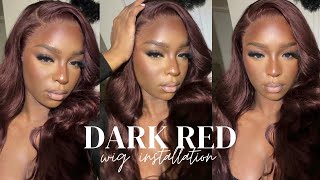
I'M gon na have to redo that I was a little bit off with the measurements. I'M like is this the piece that's supposed to be getting tight around my head yeah, I was real off. My name is Kennedy and welcome back to my YouTube channel. So for today's video we're gon na be doing a wig reinstall, and this is a question that I get a lot once I have a wig installed. Can I reinstall it or once the lace is cut? How do you reinstall it so for today's video, I'm gon na, be showing you guys how I do that step by step? Also, thank you Ally Pro for partnering with me in today's video. This hair is beautiful. It'S so thick y'all, gon na see, but yeah. I just really want this video to be very beginner friendly, so we're not gon na be using any harsh, wig, glues or any harsh lace Blues. I just really wanted it to be super straightforward, and this video is for anybody who want to do their own hair, but don't want to do a million steps. It'S just gon na be super easy, so let's just go ahead and get into it before we get started. Do me a favor and make sure to subscribe to my channel and then also give this video a like, but let's just go ahead and begin. So I just wanted to make this tutorial very beginner friendly and let's be real on a day where you're trying to do a lazy, quick, easy, install, you're, not gon na have time to braid your own hair. You might not even know how to braid your own hair, so we're gon na be keeping it super simple and just doing a Sleek bun to be 100 honest with y'all. I'Ve been wearing my hair like this for a week straight. So I'm like you know what I really need to film this lace. I mean this wig video because I've been really wanting to post it, and I really like the content that I made like surrounding it. But I've been so freaking busy with my move and I actually have been using mousse on my hair lately and I really really like how it makes my hair look nice and flexible. I feel like in the past. I would like style my hair with gels and gels only and my hair would be like really really crunchy, and it would be really hard to change it like once I had a style for a certain amount of time. I would literally have to like wash my hair and start from scratch, but now that I've been using mousse, it just makes my hair way more flexible and I'm also just going in with my Eco Styler gel for this step. But because I use the mousse, I don't have to use as much gel to Sleek it down. I'M just brushing this all the way back, I'm getting rid of all my baby hairs for this step. You want everything completely out the way and you just want to make sure the placement of the bun is extremely low. I used to make the mistake of putting my bun like right here in the middle of my head, thinking that I had it low enough, but then it would be like super bulky, the back, so you just want to make sure that you are creating the bun As low as possible, you're actually a ponytail because I'm just going to be creating a ponytail but I'll show you guys what I've been doing. So you just want to make sure that's super flat and I'm just taking my ponytail and I'm just going to be twisting it in the back and then after I twist it, I'm just going to go in and put a rubber band around it. And this is just basically how I get the start of my install okay. So now I'm just going in with my wig cap - and I usually go a little bit darker with my wig cap as y'all know that I usually get like the dark brown ones. But I just moved and I'm still trying to find like beauty, supply stores in my area, so this is like the only shade that they had at this particular beauty supply store that I went to so I'm, like, I guess I'll just like make it work. So the wig cap is on and I'll finally get to show you guys this wig. So I got this wig from Ali Pearl and I'm obsessed with it. The color is just so freaking cute, and this is something that's out of my comfort zone. But I made a post in my story and I took a poll and I asked y'all if y'all wanted to see like a bone straight bust down middle part. Look or like a chocolate, brown, deep side, part curls and y'all all voted for this. So I'm like all right, y'all have spoken. Let me create this video, so this is just what the wig looks like it's beautiful. It'S super super thick and I was surprised with like the density because, usually with longer hair, it thins out, but I feel like this hair is thick all the way down to the bottom. It also came in this cute bag with an edge control brush and a wig cap, and it also came with some lashes so now we can finally get into this install. So this is actually going to be a reinstall. So I tried to install this wig on camera once and I ended up basically like losing my footage, like something happened with my SD card, where the footage of me like cutting off the lace and everything is completely wiped out and had no idea where it is. Nothing about wigs is like once you cut the lace like you can't refilm that part, but I still really want to film this video. So I'm like you know what I'll just do like a reinstallation type of video, because I feel like I get that question a lot too like how do you reinstall wigs once the lace is already cut or like? How do you install wigs like for the second time, so I feel like this would be the perfect video to show you guys how I install a wig when the lace is already cut and when it's basically already customized. So with this wig. I'M also going to add, because it is brown I didn't even have to bleach the knots or anything, because the roots of this wig are already Brown so usually like when you bleach. The knots on a wig is because they're not for black, but the hair is already Brown and I feel like this is going to be a really really easy, simple way to install. So let's just go ahead and get into it. I actually like a little bit of hair left out around the perimeter notice that I'm not like completely covering my hairline. I only do this when I'm not using glue, and today I won't be using glue for my install. So I don't mind a little bit of my actual perimeter being out, so the first step that you want to do is just go in with the foundation and when I start going with the foundation, I'm not talking about grabbing expensive Foundation. Leave the Giorgio Armani out of this. No, we are now using our expensive Foundation, just go in with more of an affordable foundation, so I'm just using my Maybelline matte and poreless for this step, and I'm just taking this and I'm going to be applying this all along the front of this okay. So once we have the foundation applied all across the front, and I just want to go in with a small amount of alcohol and just basically wipe the perimeter right next to the hairline. Just to make sure that there's no excess oil so that these products can really stick to the skin. So next I'm just brushing out this wig and just making sure that I have all the hairs out of the way, because I'm just going to be turning the wig inside out and going in with that same foundation and just applying the foundation to the lace. So, like it says in the title, this is going to be a glueless install, so I'm not going to be using any glue to install this wig, so I'm just gon na be starting off with this olive oil, wheat Grip gel - and this is just basic. Oh, my God, at another list of this spill all over. If y'all could see this cap make sure you are closing it up. Look how messy it is. I don't even know if the camera is gon na focus on it all right. So I actually just like to take a pretty good amount of that and just apply it around the perimeter, and this is just what's going to prep us for the wig and that way when we put the wig on it has something to stick to now. Rather than like sliding around, the wig is actually going to stick to this, and it's extremely sticky so be careful. But I like it because it's not the type of sticky that's going to pull your hair out. It'S just more so like it. Has that like tackiness to it like listen, I don't know if y'all can hear that, but it's very tacky, so you just want to go in with this and make sure you don't miss out on any areas and just another tip go a little bit further. Think you feel like you need to go on the forehead, and this is just going to ensure that the lace is not lifting in any area even at the edges, and you can always go in and like wipe it. If you put too much. But I always like to put way more than I need, especially towards the front here so now we can move right into installing the wig a few things before you get started. You just want to always make sure that the wig band is as tight as possible. Just so that the wig doesn't move or shift throughout the day, so I just like to press down the front first and now I'm going in and I'm just laying down each side. The leg should be sticking to that lace, gel that we added. I feel like this is the best way to get a smooth application and I've tried to go in and just try to glue the entire wig down all across the front. But it really does make all the difference to take it side by side and just do each section. So I just do the middle part first and then I just go by and I just stick down each side and as I'm sticking it down, I'm kind of like pressing this with my finger and I'm combing the hairs back. So I'm pressing the front with my finger and I like to comb the hairs back once you have this all laid now, I'm just going in and brushing this bag. I feel like this hair has so much freaking volume to it. I look like a troll down like I just feel like it's just so big. Don'T worry, I'm gon na show you guys the end result pretty soon. Here. It'S not always going to look like this, but we're gon na trust the process. Okay - and I would rather have have a thick wig - that's full any day, then a wig, that's super super thin and stringy stuff alrighty. So once this has dried down for like five instruments now you want to go in with your elastic band, and I just got this from the beauty supply store and I'm just going to first of all, guesstimate how big my head is. I feel like this is one of those baby shower games where you got ta like guess how big the baby bump is. That'S what I'm doing with my hair right now so probably measure it like here, and you want to cut it like a little bit shorter than you actually measure so that this can have like a little bit of a stretch to it. Okay, so you're going to take your piece and actually before you do that before you do that you want to go in with a little bit of your mousse and just put this behind the hair, and you don't want to put it directly in the lace. I'M putting this mousse on my actual hair, don't put it on the lace because the lace will lift, but by putting it in the hair. You'Re, just basically training the hair to go in a backwards Direction and I'm putting a little bit here and just be very. Oh, be very gentle you're, very, very gentle. If you get it on the legs, it's fine, but the more mousse you get on the lace, the less that is going to stick and the more chance you have of it. Lifting so just be very careful. You just want to put it in like a loose Little ponytail. Don'T have to be perfect at all. This is just so that you can tie the lace around and I'm gon na put mine up in a little clippy too. Not me unraveling this entire thing. I am a mess okay, so you want to take the small portion. Is this what I put mine, I might have to redo that I was a little bit off with the measurements. I'M like is this the piece that's supposed to be getting tight around my head? Yeah I was real off okay, so this is a little bit better. I don't know what I was thinking with that first piece, so I'm just tying this down in the back and I'm not tying it in a knot or anything just because I hate knots - and I have this fear that I won't be able to get it undone. So I just tie everything like a shoelace and I'm just pulling this forward gently pulling this forward a little bit so that you can see like a little bit of where the lace starts. Okay, so now we can finally go in and start to style this now that we have the band on. We can comb this hair a little bit more aggressively. We can add a little bit more oomph to it. You know without the lace lifting so once you comb through this now you can finally figure out how we want to style it, how we want to part it all of that, and I don't know if y'all can tell, but when I wore this wig the first Time I had a deep side part, so I am just going to go in and part this to the side, so I'm just going in and just creating kind of, like a c shape here. Side boom boom boom boom. Okay. So now I'm just going in with my hard brush and I'm just brushing the top of this wig and I'm just parting everything where it needs to be parted and just making sure that everything is nice and sectioned off. And when it comes to this mousse. I'M not shy at all. I use so much of it, but I really like this brand specifically because I swear this mousse is so freaking soft like it leaves my hair, so soft, but all the frizz is always tamed like it, don't be, leaving my hair crunchy at all. So I definitely would recommend this mousse if you're a beginner, especially - and you don't want your hair to be too crunchy, but you want it to be like nice and Sleek. This is definitely a good mousse to use. So once you have it super flat now, I'm gon na be going in with the Hairspray. This is just the got to be insta High hole, hairspray and I'm just basically spraying that and then I'm just combing it with my hard brush, just really making sure that I have my part. The way that I want it. This is before I even go in with the hot comb, so just imagine like when I'm going with this hot comb, it's about to be flat, so I usually let this dry for, like a few minutes, probably like five minutes before I go directly in with the Hot comb just to reduce the sound of like the sizzling and the frying, so I'm gon na let this dry down for a second. You can even blast it with a blow dryer, but it should be dry within like five minutes and after that, I'm just going in with my hot comb and I'm just hitting the top of this using my hot comb. It'S really easy to get a flat install if you just follow those steps. So I'm just untying this and, as you can see, all that deal is just basically hold down the front of the wig and it gets a really pressed the lace down into my scalp. Essentially - and it just really gave it a seamless lift across the front and now we're gon na be going in with our olive oil wig spray and I'm just spraying the perimeter of my hair with this and I'm not spraying too much. But you really want to just get it in those areas where you can still see the lace, and you want to go in with the opposite side of the comb and just press down the very edge of the lace. And I really really love this spray. Specifically, because not only does it melt the lace, but it just like melts all of the residue, so like any white buildup that you have or you see this lace, I mean this spray really does just spray it completely away. Like anything that looks White, I'm obsessed with the spray okay she's cute, this looks so cute and I wasn't gon na wear the cerebellum straight. No, I'm not I'm not gon na wear it going straight, but looking at this, I'm like this will even be so cute bone straight, but I've been really wanted to play around with flexi rods and in the pose that I did on Instagram. You guys voted for the wine curl, so I'm really excited to play around with flexi rods, and I feel like this would be the perfect time because technically I'm not going anywhere tonight, but I do have plans tomorrow. So I plan on like putting the Plexi rods in going to sleep and then unraveling them tomorrow and then doing my makeup and everything just see what the final outcome is. So I'm just gon na go in and just curl my hair using my flat iron and then I'm gon na be taking each section that a curl and just kind of like wrapping it up in the flexi rod. So I'm gon na go ahead and just speed through these clips. You know that didn't work out. I mean it was supposed to let's try this again y'all the thing with long hair is because it's so freaking long. It'S hard to do this in a way. That'S not chaotic and I'm burning myself, okay and I just like to twist mine up to just a bit. It gets like a little bit more curl and I like to hold it for a second and watch this gon na be the one. This is the curl right here, if I can just feel it see that turned out way better. So now, for this last section I'll give myself a bang just something with like a little bit of Valium. So I'm just gon na be taking my scissors and holding this straight out and I'm just going to be cutting down at a diagonal. But I'm not going to be cutting with the scissors, I'm going to be using like the inside blade to kind of like let the scissors do the work basically, and now I'm just going to release it. I'M just gon na comb, it back and then kind of like just shift forward. Let'S just go fall super messy. So now we can go in and start to play around with our flexi wrap and actually keep mine in this off the bag super ghetto. But this just has like all my flexi rods in it. Okay, so all you want to do is take a piece of hair and I'll. Take a piece from this bag to show you guys and I'm just going to combine with the wide brush and then kind of like twist the ends and I'm just taking a Plexi rod. And I'm just putting this on the bottom of the hair. And I'm just going in and I'm just twisting this all the way up and it don't have to be perfect at all. Even if the hair is like intertwined and that's fine, you want to twist it all the way up and then I'm taking one end and I'm holding it. And then you want to take the other end and that's literally all you do stomach, go in and do this around my whole head foreign. So we are now on our last piece and I'm just taking it, and I don't know if y'all noticed, but I like to twirl it and then you can kind of see like the direction that the curl is going. So I kind of like to place mine at the bottom and then just twist it up at whatever Direction you curl the piece of hair and I'm just taking this and twisting it all the way up - and this is our last piece, so I'm just gon na Put all my Bonnet and then go to sleep and then I'll come back on tomorrow, once my makeup is done and under the curls and show you guys. The final reveal I feel like these did a really good job for the most part. So let me go ahead and just undo the bang, oh okay! So I'm just gon na go in with my flat iron and just curl these two pieces just to make the curls even more tight going in and I'm taking my mousse and I'm just combing that through just to get rid of any flyaways and I'm taking my Comb and I'm just combing the top down. So now, I'm just taking my hard brush and I'm just twirling the ends and, as you can see, the curls still have that bounce. So with my bang, I'm trying to figure out if I want like this type of vibe like the raised Vibe or if I want something that's going like be in my face kind of like this type of moment and honestly this gets irritating. So I'm kind of feeling more of like the lifted Vibe. So I'm just going in and add a mousse here and I'm just kind of like combing it in the direction that I want it to fall. So I'm kind of lifting it and then I'm bringing it down and yeah. I feel, like that's kind of more the vibe that I'm going for true it's going in and brushing that out and now for this side, just finishing this front section off a little bit more mousse and I might even do like a behind my ear type a Moment, oh, this is also a Vibe I feel like. I need to go put on some earrings. Give me one. Second, I'm telling y'all the earring is going to do it every single time I feel like just by like adding earrings. This look is just like. So much more sophisticated and it's just a vibe okay, so curl that piece trying to figure out what else needs to be cut off, Maybe like this little side, piece: acrylic, okay, perfect! So now I'm just going in with my mousse and I'm just taking this behind my ear and kind of like just like combing it down and I'm taking my comb perfect, see you okay, she's cute. I don't even want to touch it. I feel like this is just giving it's so freaking cute, I'm obsessed the curls are falling perfectly. The last thing that I just want to do is just hit my part with a little bit of concealer, so I'm just gon na be taking my Huda, Beauty concealer. You can literally use anything. This is just the only one that I can find right now, I'm just going in and just creating that shape here. I'M just blending that away and I'm also just applying a little concealer here and just any area, that's supposed to resemble scalp, and let me do one last thing, so I'm just going in with my owl spray just along the front. Oh this dry. So it's just basically going to get rid of any like residue or any type of like discoloration, and just really melt this wig into my skin. Okay I'll! Do this section too! I love it. I love it. The flexi rods turned out super cute, and can we just get into this hair like the thickness, the way that the curls still held the I mean with the way the hair held the curls, even though the hair is longer I'm just so impressed. So I hope you guys learned something if you did enjoy this video, then do me a favor and make sure you give it a thumbs up and then also make sure to subscribe to my channel. But that is all I have to say for this video and I will see you in the next one.

Comments
Ali Pearl Hair: Stunning! Thank you so much for trying Alipearl Hair.
Jennifer: Love it! <3
Marie Mariatou Mendy: Nice
Marie Mariatou Mendy: I need a wig as a Christmas gift