Bleaching, Plucking & Detailed Deep Side Part Reddish Brown Wig Install With Layers | Unice Hair
- Posted on 12 January, 2023
- T Part Wig
- By Anonymous
LIKE | COMMENT & SUBSCRIBE
Join the family
BUSINESS EMAIL : [email protected]
Any hair style suggestions ??
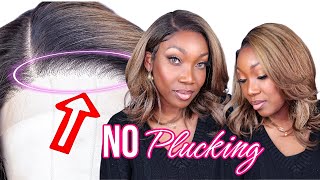
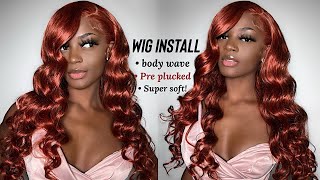
Hi guys in todays video I’ll be bleaching the knots on this lace front wig , plucking the wig , installing the lace front & finally layering & styling the wig . This is a 20inch reddish brown body wave ,13x4 lace front wig from Unice hair company . I’ll be showing yu guys how to pluck the hair without plucking too much or creating a bald spot . Also bleaching the lace front knots without bleaching the actual hair . I’m going to show y’all how I get my wig to lay super flat & give natural , I’ll be cutting the hair in layers & bumping it under for the curled look .
Thank y’all for watching my video , stay tuned for more .
Hair details :
- 20 inches
- Body wave
- Reddish brown color
- 13x4 lace front
- Direct link : https://amzn.to/3ZxEINm
The products I’m using :
Skinny flat iron : https://amzn.to/3CKoJ4J
Remington flat iron : https://amzn.to/3H1w56v
Spritz : https://amzn.to/3Qy4z3A
Lottabody Mousse : https://amzn.to/3vYPFtF
Foundation : https://amzn.to/3W8vV1p
Bald cap : local hair store
Ghost bond glue : https://amzn.to/3GFe4JA
Ebin adhesive spray/ glue : https://amzn.to/3W125vL
Hot comb : https://amzn.to/3Xvqk6t
. check out my HOW TO GROW YOUR HAIR VIDEO ⬇️⬇️⬇️
Check out my Barbie hairstyle tutorial:
Thank y’all so much for watching , pleas stay tuned for my upcoming videos and join the family .
Coming soon I’ll be posting a 2023 new year reset/vision board planning + setting goals + hygiene shopping , & a WHATS ON MY IPHONE 13 pro max & then a WHATS ON MY IPHONE 14 pro max so stay tuned for that !! Also you guys my birthday is coming up January 17th so I’ll be doing a lot of birthday planning & I may be looking into getting the cannon gx7 ii , so EXCITED !!
My Amazon store front :
Check out this page from Neoisha Bradshaw https://www.amazon.com/shop/neoishanes...
Stay tuned for the next upload , uploading 2-3 times a week
THANK YALL SM FOR SHOWING LOVE ❤️!! I DO NOT OWN RIGHTS TO THIS MUSIC , MUSIC BY LAKEY , GOOD TIMES .
Link to all socials are down below ⬇️
SOCIALS:
instagram : https://www.instagram.com/neoishanesha...
tik tok : https://vm.tiktok.com/TTPdrQaWXh/
sc : https://www.snapchat.com/add/neoisha12...
Apps used :
Phonto : https://apps.apple.com/us/app/phonto-t...
Picsart : https://apps.apple.com/us/app/picsart-...
Capcut : https://apps.apple.com/us/app/capcut-v...
Dafont : https://www.dafont.com/
Pinterest : https://apps.apple.com/us/app/pinteres...
#lacefrontwiginstall #reddishbrownwig #bleaching #plucking #styling #layered #tiktoktrend #unicehair #13x4lacefrontal #baldcapmethod
Is yeah, this color is very pretty. Let me show y'all the lace and it also comes with one of these bands in the inside, just like so that it's fitted real good um. This is a 20 inch and reddish brown, so yeah and look at the hairline. Okay y'all, so, if you haven't already like comment subscribe to, my family be a gang member and yes, I know I'm looking everybody here, but it's all good, because we're gon na change the game up real, quick, I'm telling you so anywho. We finished all this wig. Let'S get right into it, I almost forgot to show you how it was inside um. Here is the Box such a cute little box. Like anything, then they had this cute little bag and y'all. I already opened it used some of this stuff, but I still want to show y'all um. They give you wig caps, nails - and this is new for me, because I've never had a hair company send nails like so yeah they're doing their thing and also some lashes, and I definitely need to put these on because yeah I've been doing so much and then They send one of their little headbands and he's definitely come in handy when you're trying to keep that wig down and just apply the glue and y'all. This almost had me thinking it was like lipstick or like a mascara but yeah. This is a makeup brush and I find this pretty cool like how easy this is like yeah, Y'all Gon na See, I used it on my install but anyways y'all we're gon na go ahead and get straight into the video yeah. Okay, guys, let's go ahead and jump straight in the video I'm gon na, be using my bw2 lighting powder and my 30 developer um and you're, basically just gon na mix them together and you want it to be a like a pace like consistency, you don't want It to be like um too watery, because it can go through the lace and it will start to bleach your actual wig and you don't want your roots to be bleached, so you want it to be kind of thick enough to where it doesn't just run through. You know what I'm saying and don't mind my bw2 and my powder thing. They have white stuff on because I do dye my hair with this all the time so they're kind of a little rusty but anyways make sure it's kind of thick keep mixing it up. If you need to add in more powder - and I feel like mine's - was kind of loose, so I did add in more powder - okay, you guys so now what we're gon na do with that solution, that we just made flip that wig inside out and we're just Gon na basically apply it to the cap or right there, where the lace is so that the lace is tinted and it looks kind of more like a skin color. So yeah I'm just taking my knife and I'm fixing to start applying it onto the lace and you could really use like a wooden stick. I was looking for mine, but I couldn't find it so if you can't find one just use what you can use, but moral main thing, don't press too hard because again you don't want it to go through the neck. You want to be light with it, but not too light. It'S really a balanced thing, but it's kind of confusing it's a little hard, but you'll get it as you go just press it on there and try not to like Let it bleed through basically so yeah. After you get it all applied on there, take your foil and set the foil on it and flip it. The other way I'm going to show y'all y'all, so I'm putting the weave, I mean putting the foil in the wig and inside and I'm just gon na stuff, something in there just so that it can like hold the head shape. I guess to the face I'm putting my shower cap in it, but anyways okay, you guys, so what you want to do is leave it on for 10 minutes. Leave this thing sitting on here for 10 minutes and really and truly my 10 minutes is up um. You can see where it's like making the notch lighter, and I think that I'm gon na go ahead and wash it out, I'm just trying to make sure that it's all the way light. Okay, now that the knots are done bleaching and like y'all see where it's not really coming through onto the hair, that's what you want! You don't want it to be at the roots of the hair white right there, because then your wig is getting dyed with it. You know what I'm saying: okay, so anyways, now wash it out after it sit down, sat there for like 10 minutes. I let mine sit a little longer than 10 minutes, because I don't know anyways yeah we're gon na wash it out. So do that hey y'all! So now I'm about to blow dry it since I did wash the hair out and it's still wet okay, guys now we're gon na get straight into plucking the hair, the plucking process so y'all I parted down the middle and run my hot comb over it. You know back and forth over it again and again and again just so, I could get it real flat and when you get your hot comb, I started off brushing into the sock like combing it over to the side. But you really want to comb it straight back, so that you could like really see. You know what you're doing so just grow your high comb over it and push all the hair towards the back, because we're going to be plunking the front of the wig hey! You guys so, as you can see here, I'm brushing the hair straight back, getting ready to start plucking the wig just running a high comb over it repeatedly, so that the hairs are really going into the direction that I want them to go and yeah. Okay y'all and it's like different types of um tweezers that you could use and honestly I would recommend you to get one. That'S not too sharp. Like you see how these look real dull, now look at these they're really sharp. They will end up cutting a hole into the lace, so I don't be using these. I would definitely say get some dull ones with the slanted tip so yeah. We just fix it to go in and do that? Okay, you guys so now you just want to like part off a section like, I guess the a front row where it's more thinner already, so you want to kind of go into the hair. That'S a little bit more thicker, so we're gon na part that section off and we're gon na start plucking behind this section, foreign to the plucking thing you want to basically make gaps in the hair like you want to. Not you don't want to keep on plucking in the same spot because you're going to create a bald spot and we definitely don't want a bald spot. So, like space, I mean Gap, you know, oh my God. Okay, you want to pluck don't pluck plug, don't put like basically put gaps in the hair you're, going to kind of see what I'm doing here, but it's basically like skipping a space every time. So, as you can see, I'm not plugging in the same spot. Well, I am plugging in the same spot, but if you pluck in that spot, then you want to skip the spot. That'S on side of it so just continue to watch, because I really cannot explain it that well, just basically think of it as like making gaps in the hair rip flop out skip then real skip rip skip okay, okay, yeah yeah! I should get it okay, y'all and after that first time of plucking and doing the gaps just go over them same spots that you plucked and like scoot it back further in so that, like the plucking is going further back, so the layer, the flatter is gon Na lay yeah this is really hard to explain, but I hope that y'all are understanding what I'm saying just pluck it don't plug it, don't over. Pluck it it's the main thing: okay, y'all see how it's kind of like good and then, like eight out doing good doing it. I wouldn't let me not say: okay, let me bro, why is it not showing y'all the right way? Okay, so y'all see how it's plucked. It'S like gaps, it's basically skip spaces and I'm gon na go in a little bit deeper like push the spaces back. Some, like kind of you know, go in further back: okay, y'all, so anyways back to what I was seeing. Get your dull, tweezers and just Gap like make gaps, basically only pluck in the Gap that you are making. You want to do one right here then skip a space right here and y'all. See like what I mean by that skip a space. Please excuse the cartoons playing in the background. My son's room is literally like the next room over, so y'all probably hear that a little bit but anyways, we just gon na continue plucking this wig plugging this wig. So we got it looking real nice and natural because we don't want no helmet wigs. We don't want no big sitting about the forehead with you know what I'm saying like yeah. We want it to look like scalp and I'm giving y'all a tea, I'm giving y'all. Let'S see so stay tuned, okay, and now I just want to show y'all the difference like look how it's looking like. It'S definitely looking good. This is how you want it to be looking and I'm gon na show y'all the other side, because y'all need to see the difference in plucking your wigs and not plucking your wigs, because once before I didn't plug my wigs because it was it's kind of a Difficult task honestly, but you're going to get better as you learn to do it and if you do this little method, where you're just you know skipping you shouldn't mess that up and as long as you're, not using those tweezers that have the sharp ending on them. Then you should be perfectly fine, you know, don't just be ripping out too much hair, but whenever you do it, you do want to yank it so that you can really yank it out the lace. You don't want to leave the knot in it like okay, there's, a knot at the beginning of the hair strand and that's what's connected to the lace. So you want to kind of snatch that out as well, so that it's no longer there, because that's the whole point in this okay and then let me get you out front of you so y'all see now, let's see the difference like look, how full that side Looks and look how much better this one is so now, I'm gon na pull these other hairs back and I'm gon na do the same things to these, but we're not gon na be like we're not not too much, not too much, because okay y'all see that Please - and it's definitely giving yes, okay, now we're gon na go over with our hot comb, just to get that bad boy real flat and nice guys never be scared to use that high cone. You got to continue to go over this hair. You want it to be laying so flat, so so selfless. So I use the hot comb over and over and over and over just to get that flat, look and that's very much how you're going to achieve the look, because it's just no other way. Okay, y'all, and so I'm fixing to put a little bit of loose on it. Just to like, really, you know, bring this baby to life and then we're gon na run a high comb over it and when I get done, y'all gon na see how flat it's laying now, let's get into. Yes, you see where it's been put like don't mind. My mannequin head y'all, it is a tad bit. You know, got a few things going on, but anyways, that's just because I'll be dying here on here and the dog be getting left on it, but anyways y'all see where I plugged um. It'S looking pretty good to me, so, let's get ready for the install, so I just take a little Edge controller toothbrush brush my edges back, so I don't be without them. Hey you guys go ahead and put your ball cap on get them braids put down and yeah. Let'S get straight into the video got my ghostbond glue, working and yeah y'all can find this at your local hair store they're about like twenty dollars. You could really get them on Amazon too, but um yeah go ahead and put that on the lace. Just like put it right, where your hairline would be or a little bit in front of your hairline. So you don't be ball edged, but just go ahead and put that on there and I feel, like I really didn't put enough. So I'm gon na go in with it again, but just go ahead and blend it like, and I try to blend it widely so that the wig has a lot to like stick to and not just like one little thin line. If you get what I'm seeing you see how wide the glue is going back, yeah, that's key! Now we're gon na go ahead and cut the wig cap and get it out the way you want to make sure that you cut back as far as you can like try to make it start right before your hairline or like right at your hairline, pretty much Because you don't want it to be, you know coming from up under the wig, since your lace from the wig needs to be sitting as far back as possible, so just cut as much of this wig cap off as you can. Okay. So once you get all the excess cap cut off, you want to go in with your glove spawn glue or whatever glue you're using and basically just go online go along the lines of the wig cap because, like since you just cut it it's kind of raised. You know a little bit so I like to make sure that mines is extremely flat as it can be, so I put glue on where it ends at or where it was cut, and I just try to press it into my skin to basically help it lay Flatter so that it's not, you know, messing with the wig in any type of way. Let'S get into it, though, so now that you got the wig on just see how you want to place it go ahead, you can start cutting the extra lace off by your ear. I always get that out the way first, just so that it can. You gon na know how it fits exactly so I'll just go ahead and cut that off. Oh, I can already see it now. Okay, be my color, like oh look at look at how it's hidden the skin. Oh my God, like we ain't, even finished with the install okay y'all. So I have this elf deep cinnamon. This is a liquid one, and then I have I have this other one, but I'm using a little thing that they gave me the Little Brush and the way that it works is literally so cool like it. Looked like a lip gloss or like a mascara but yeah, it's a makeup brush, so we're gon na use this to blend in the um makeup onto the lace. You know: okay, I'm just taking the powder and the brush that they gave me and just basically like tinting the lace putting some on it on the back side, foreign, the makeup on the lace you want to go in with your glue again, and I kind of Like to do two circles, well, two dots, because it makes it wider for the wigs to have more space to lay or like stick to basically, okay anyway. So now you're just gon na smear that in and just rub it rub it rub it so that you could get that glue good and dry foreign that in go ahead and press the lace into your scalp the length on this hair. I haven't even done nothing to it yet, besides one of my fingers through the hair and like this is a 20 inch. Okay. So let's talk about it. This is a 20 inch. This this 20 inch is like literally dang near butt length on me y'all and I left the band on for about a good 10 minutes. After that, you can go ahead and take the band off, so you can start doing what you need to do to the wig, but just leave it on for about a good 10 minutes. So it can start to stick okay and now we're just gon na take out a little razor and go ahead and cut the lace. Um cut it to where, as far back as you can, you know, but don't rip the lace up, because it's glued down already. So just cut cut as much as you can of the lace off foreign after you get done, cutting the lace. Now you can see the little white cast right there. So what we're gon na do is take our um, basically the same the glue, but it's in a spray and it's a liquid form, so we're just gon na spray that uh adhesive lace glue on the part where it kind of looks a little white or kind Of bright or whatever, we're going to take this blue and take this glue, we're going to take this spray, I'm sorry take this spray and spray it on the lace right there and just like you, know, kind of rub it in and that's gon na really help The wig to lay because we did just cut it, so it's kind of coming up a little bit and it's not fully. You know flat and laid so just go ahead and spray. Rub your finger across stick and just mash it in there. You know what I'm saying: you're gon na do that across the whole thing, just to get it flat flat flat, guys and now we're going to take our blow dryer in the end of our comb and just smash it into our skin, so that it's you know, It'S really laying like it's no way that it's not lean. It'S melted! You know, okay, so I'm gon na let this sit on there again for another 10 minutes and we'll be back okay, y'all! So now, I'm Gon na Take It Off okay. So this next step is really optional. You can add makeup to it if you feel like it's still, not just like blending as much as you want to and honestly. I think that the makeup that I had was a little bit too bright, so I had to go through a few more different processes, but yeah. If you have your skin tone and stuff like that, putting the makeup right there on your legs would be a good idea just to help it blend more and I'm taking my Spritz now and just doing the same thing. We did with the lace, glue and just spraying it on the lace to you know, really make it tinted who are escorting everywhere. I'M like scared, guys and now I'm just taking my comb and like pressing the lace into my skin combing, the hair back, so that it looks really natural and combed, and you know just flat like take your comb and push in and calm back, but don't rip. The lace up, because you can definitely do that - I did just do that and I'm going in one more time with my Spritz, but this time I'm putting it on a Q-tip and I'm just like barely dabbing it across the line. Just to get that real, real Blended, you know, because I still seeing Parts where I was like uh come on Q-tip and just get any of the excess like Express from right there, okay, yeah and so now I'm fixing to start styling it. I think I decided that I'm gon na do a deep side part. So you know. Middle parts is not really my thing, but I might try one soon anyways yeah, so I'm gon na do a side part really deep. So you know you have to really go in with it and try to make it curved, not just like a straight line. So that's what I'm doing, basically perfecting my part right now and just parting it off trying to get that part straight foreign key to making this part real deep. You want to try to make it look like a c, so you definitely want to go far back into the tracks well like where the tracks is fixes to start and like brush the hair. That'S at the front upwards towards your face and then brush the wrist going backwards so that it can really know where it's like. You know position to go. Okay, you guys! So now you want to get your hot comb and really help it flatten and like train it to go the way that you want it to go pretty much so front part of the hair you want to comb forward and then the back just comb backwards, which That'S pretty obvious, but yeah just do what I'm doing here, because it's pretty self-explanatory. Okay, you guys so now, basically you're just gon na pick out where you want your edges to be and since you're doing a deep part, you want the edges to kind of be deep off in there so that they can kind of swoop forward. That'S how I like mines, I like mines, to be swooped more in and forward which I'm going to show y'all what I'm talking about, but y'all can also get your high comb and run it across the edge just so that the edge is like trying to come. The way that you want it to go and I'm getting my wax stick, I'm just going in with the wax stick and I also did mousse. I don't know how I didn't get that in this video, but I definitely put mousse. You know parted off each section and put mousse in ran my hot comb across it. So you could definitely do that as well and then go in with your wax stick and run the hot comb over it and through each section of the hair, because that's really really gon na get your hair flat. Like that's the flatness that you want for sure and when you put that wax stick on top, it really gives it like that. Shine. Look that, like I don't know but y'all, could see exactly where I put the wax at so you should get what I'm seeing pretty much great whenever you're going over the hair, it's definitely going to seep through and probably burn. You not technically burn you, but it is going to be hot because it was definitely burning me like the heat is coming through the wig, but you, if you want that wig flat you're, just gon na, have to you're gon na have to do it so anyways. I'M just taking my mousse now and putting it in a few different spots, brushing it in, and I'm gon na get my hot comb and now run over that side of the hair. Just you know: get it flat and train the hair to go the way that I wanted to go so make sure you're running your hot comb over the back of the hair, the sides and just training the hair to go the direction that you wanted to. Thank you, hey you guys and when it comes to these wigs, it's never too much of the it's. Never too much of this. What is oh, my God. I can't remember the name: it's never too much of the flat iron comb, no, not just the hot comb. Oh, my God, okay, so you can never use that too much because the more you use it the flatter it's gon na get okay. So I'm just kept steadily going in with my um glue, I mean my glue yeah. I don't have it together, I'm steadily going in with my wax stick just running a hot comb over it really getting it to lay lay lay and y'all. Now I'm gon na brush this side back because I wanted to have that effect like to where it's going backwards, but it's poking off the head kind of. I really don't know how to explain it, but y'all are gon na see what I mean. Okay, you guys - and I had my headband thing on just to like - have the edges out of the way. While I basically tried to flatten the wig, you don't necessarily have to do that, but I did it just to have the edges out the way. So they don't mix in with the hair, but now I'm going in with my mini flat iron and just you know, curling my edges downward. So we can have that real fluffy. Look, you know the pretty edges. We don't want the stiff little hard, barely wanting to go edges so yeah. We definitely just making them curl and I forgot to cut the cap off. So I'm doing that now and we're just gon na go in and flat iron edges, we'll curl the edges who's on our comb and rub it down on the edges. I feel like mousse just helps them look more fluffy, because when you put something heavy on it, they kind of get hard and don't really want to move. So we're just going to use the mousse to Slick them down. Because you see how easy it is like how easy it's just swooping definitely recommend moose. So get you some of that. Stop using that got to be glued yeah, and I'm just going to sit here and continue to perfect my edges. To get that, you know, I don't know how to what to call it, but, like I like, I feel like it's an inward swoop, because you see how it's kind of going in a little bit before it swoops. I don't know, but y'all see how I'm doing it and sadly my phone started to run out of storage, but here I am flat ironing my hair, I'm just going to straighten it out, because I did want to layer it. So I went ahead and flat ironed piece by piece. I didn't get all that on camera, but y'all get into it for 20 years like come on, yeah, okay, you guys, and so now I'm just gon na flat iron it so that I can really like layer. It really good, and it's all straight and even and I'm just taking my little razor and going down the side of it so that it gets that, like around the face. Look like yeah. I really do not know how to explain this stuff that great, but I hope y'all can understand it, and I hope that y'all can see it visually from what I'm doing. Okay y'all, so the little razor really wasn't getting it like. It wasn't cutting the hair good enough, so I just went in with my Scissors because it was not cutting it. The way I wanted to it was kind of making it look a little raggy. So just went in with the scissors and cut downward, but like not too too much in you know what I'm saying and excuse my baby in the background he decides that he wants. He has something to say: okay, anyways, I'm curling the hair inward, like towards my face to give it that layered. Look. You know what I'm saying like. I love that look, so I just had to try it on this hair and I love this color of this hair. Y'All, like I feel like this, is my color and shout out to Eunice hair you nice hair for sending me this wig y'all because, like get into it, okay, y'all and my song was playing in the background, but I can't let it play because you know I Might get copyrighted but anyways get into this hair, because this hair is really pretty hair and I definitely love this hair like no, I'm not just saying this for real. I definitely love this hair, like I know, y'all let his hair just from seeing his hair on me get into it. If you haven't already like comment, subscribe, join the game. Y'All see the floor of the week. Okay, stop playing with me. This is so cute, like I feel like a pretty bright yeah y'all stay tuned for more vegan stuff, of course. Of course,


Comments
Sade' Beal: You ateeeee this wig up sis‼️And the color fits you so well
Sade' Beal: You are so prettyNew sub!!
Keondra Wildin’ N Stylin’: Hey so u help other upcoming YouTubers grow