Y2K Hair Styling & Tutorial | Water Wave Wig Ft @Yolissahair9001
- Posted on 18 January, 2023
- HD Lace Wig
- By Anonymous
YK2 HAIR TUTORIAL FT @yolissahair9001 WATER WAVE WIG
●▬▬▬▬▬▬▬▬▬♛Yolissa Hair♛▬▬▬▬▬▬▬▬●
Video Wig Shop Now➤https://bit.ly/3BGZy2t
Hair Info:#yolissawaterwave 13x4 HD Lace Frontal Wig 24inches 180% density
❤ #yolissahair Official Website:➤https://bit.ly/3hsXxzS
Yolissa Hair New Comer? Look Here!
Get ❗️$100 Coupon Package❗️Join in Yolissa group:➤https://bit.ly/3momOuu
Classic Wavy Curls #yolissabodywave:➤https://bit.ly/3BGcNAo
Follow Yolissa Hair On Social Media
Instagram: https://www.instagram.com/yolissa_hair...
Facebook: https://www.facebook.com/yolissa_hair/...
✔Wholesale Contact +86 15803834514
For bookings ,collaborations ,sponsorships & business email me : [email protected]
FOLLOW ME ON MY SOCIAL MEDIA:
IG..https://www.instagram.com/p/CAxp4WmFOm...
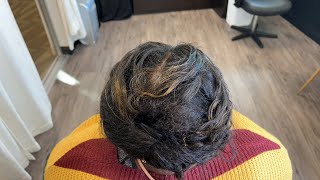
Welcome back to my channel tell me I don't look like a little doll. It'S literally giving away K2 it's giving childhood memories, it's giving everything that I needed this hair to give, and I am obsessed wow. It didn't take a lot for the styling, literally, it's just the laying process, and then you just apply some mousse. I literally only used water mousse and we got to be to let the wig and style it like this, and I am in love, as you guys can see, the look is giving everything it needs to be giving, and I am obsessed so if you want to See how I came up with this look, if you want to see how I did it, please make sure you keep on watching. So this hair is from your Lisa here, as you guys can see the details here. Everything will be down in the description, including everywhere, that you can reach them, including the direct link of this wig. So I'm very very excited because the Waterway it's gon na give 24 inches 180 density. Thirteen by far place so meaning the lace is going to be here too yeah. This is perfect for all hairstyles, like literally it's a HD lace. So it's undetectable lace like it's literally so good, I'm about to show you how it came by the way it came in this cute black bag and this inside this bag too so 24 inches. It'S long guys! It'S very long! Let me remove this net. It even has some baby clothes on it's a little bit. I don't know if the look that I'm doing, I will like ensure, I have full on baby hairs, but we will see. This is how long it is. The quality is amazing. It'S a human hair, 100. Human hair, so impeccable quality, absolutely love it. Here'S the lace HD! I can't wait to like put it on. It also comes with some adjustables at the back, so that you can ensure that your wig is super super held and tight. It'S not going to go anywhere. I can't wait to activate all these cars because they already look good now. I can only imagine how they will look with like water, oh they're, gon na look so good, so let's install or inside the bag. They also had this band. You know for the back of your hair in case you want like an extra hold in case. Your hair is smaller than the wig cap. You can add this band if you want it to tighten it. If you want it to be bigger, you can also add that it also came with this packet of first lashes and also some with cards two of them so shout out to them. I'M going to apply some Foundation all over the lace and add more on my wig cap and then we're going to install I'm super excited shout out to your Lisa hair because the quality, the texture of this hair, it's so light too. It'S not heavy at all. Basically, I just did what I told you guys applied Foundation all through the lace and also I added a bit more on my wig cap. This is a three by four, so it's ear to ear, so the lace is kinda long but make sure you apply everywhere. So that when you're melting, the lace will be perfect, like it will melt so well when you're laying it down like it, won't have any issues. So after doing all that, I just put the wig on and then I pushed back the wig cap so that it can't be seen through the glass and then I held the hair back and it was time to cut the excess um lace around the ear. Just a little bit before I go in with the glue, so after doing that, I went in with the glue and I just glued everywhere. If you know about ear to ear laces, sometimes it can be challenging to make sure that the ear part of the lace, the lace has fully laid down, but you just need, because sometimes the lace can be a bit big on the ear. So that's what I'm doing here right now, I'm just ensuring that I'm cutting the excess lace around the ear, so that I can make sure it has fully fully fully fully laid down and I'll be doing the same on this other side and then just go in With my second round of glue, then, once the glue has become tacky and it's drying make sure you go in now with your head band like for the lace and make sure you tie it tight, so that the wig can melt properly to your scalp. And then I just took my small scissors and went ahead and started cutting the excess lace. A lot of blue had like dropped down my face, so I had to clean up later, but don't worry you can just use that with our towel with water and just wipe yourself off and it's going to come off anyway. This is the patch where I was talking about how sometimes around the ear, because you have excess hair. Your natural hair can come through and be stubborn for the week to lay so just make sure you pull the wig in front to wear this bad skin. Give the glue some time to dry down. That'S what I did there and then now you can press the wig in. So I'm going to show you exactly how it did it. So you see, I made sure the glue had dried down and then I pulled the wig forward and laid it and it laid perfectly as you guys can see there once I was done. I just put the headband back on and it literally just stayed there until. I did my makeup so that it could fully melt my lace to the scalp there's, not that my hair is currently like just melting I've put on a big bun so that it can mend everything. I don't want to remove it right now, because right now I want to just spray some water to cannot shrink the whole hair. It'S gon na shrink and it's gon na look so good because I'm going for a wet hair. Look of course, if you like your hair, to be like this, you like the volume, I'm pretty sure you can leave it like this, because it still looks really good, but let's go ahead and just drench the hair in water, I'm gon na start applying the water From the top, because the look that I'm going for huh, they look, it's gon na, be so good. It'S going to give that wet here. Look you guys can see once you spray the hair, the curls and the waves they shrink down compared to this other side. So it depends with the type of volume that you want so I'll just keep spraying and running my fingers through it to make sure every patch has water. I'M doing this before my makeup, so that the hair can be drying. While I'm doing my makeup, so you guys see it looks so cute and then on top I'm going to apply my mousse. I know that is definitely going to help. You see how Tango free this hair is, and it's long I'll show you once I am done with the full look. It doesn't have a tangling problem at all, so cute, so guys. This is the how the hair looks after I have added the water. The colors are super defined, as you guys can see. Look so I'm just going to let it dry a bit and then I'm going to add the mousse. So this is how I did The Styling um. I first made sure that I had combed the hair. A little bit back just on the front, because I wanted all the hair to be back and then I would have some hair fall on the side, so I combed it to the back, and then I took my got to be glue. I just sprayed it on top, where I want the hair to lay down like that, and then I went back in with a comb just on the top, I'm not taking the comb all through down to the hair. Just that specific part, and then I just added an extra cloth to make sure that that part fully lays down. Then I took my mousse and went into the curls to make sure that they are held tight so that once they fully dried down, they won't the cuts will be intact, so they wouldn't have a problem or like Get Loose. They'Ll be fully be intact. So I just applied the most to them and I was pushing also the hair upwards to make sure that the curls remain very tight by the time it's drained down. So after that I added my headband and I went and did my makeup and everything looked amazing. Guys, I'm done with my makeup and it looks so cute I'm going to remove these bands. They have been here for a minute and I'm going to hope that the state I'm going for is giving oh period. So now what you're going to do is, like you see the parts of the laces that are still showing I'm going to put some makeup over those parts like here: white lace, child and then bronzer on top area of the face is bronzed. I'M going to take my bronzer brush and just fully melt it in look at that. Look at that guys. Look at that, I'm not going to add any extra baby hairs. The hair will kinda also come like this. I don't know whether I want it all on the back. No I'll bring some on the sides. You see what it is fully melted, I'm going to take this white cake white cake too stuff that I got recently and I'm going to attach them to my hair. You guys will see how it look. It will be so beautiful. I can't wait to show you, so let's do that. It was challenging to put this stuff on, especially like kinda with my nails, but right now it's perfect. So this is the final look on the HD water wave wig from your Lisa. Here you can see guys it's melted and it looks so amazing. That'S the length of the hair, I'm literally so obsessed with these. Please let me know what you think down in the comment section and also make sure you click the link down below so that you can see how much the hair is when you're buying it and, like you can plan yourself out, I'm absolutely in love. I highly recommend it right now: the cars are already fully dried up and you can see it still maintains the volume of the hair. You can see it's so perfect and easy to style. The quality is amazing, too. So please check out your Lisa hair and all the other wigs. Thank you so much to your Lisa here for this week, I'm in love, I'm obsessed everything is coming together. The way it's supposed to be and shout out to them. That'S the end of today's video. Please let me know what you think about it down in the description box and I'll see you guys in my next video bye,
Comments
Yolissa Hair: This is GIVVVVIINNNGGGGG!!!! You made a really pretty hairstyle
Patience Mburu: Y2k hun☺️. You looked beautiful ❤️❤️❤️
ari_kim_jane💞💞: everyday i see your wig videos I'm like one day lawwddd❤️❤️
CAROLINE VUSHA: You motivate me alot ...umetoka mbali sana...ningependa sana uni advice kuhusu biashara
Aishah Kessy: Stunning baby gal
janty❤: Mashallah