Just Gorgeous | 30'' Inch Lace Frontal Wig Install | Aliexpress
- Posted on 24 January, 2023
- HD Lace Wig
- By Anonymous
Hey Ya'll,
In today's video were installing this Gorgeous wig that I got from aliexpress. Although I promised myself I'd stop purchasing from there because I've had some disappointments, I had to share this one with y'all.
WIG LINK :
https://www.aliexpress.us/item/3256803...
Stay Connected with me :
If you want more delicious food content follow my food page ❦
https://www.instagram.com/mealsbymicha...
FAQ:
Age: 32
Location: Atlanta, GA
Camera: Sony ZV1
Editing Software: CapCut
#HairTutorial#HairReview #aliexpresswig
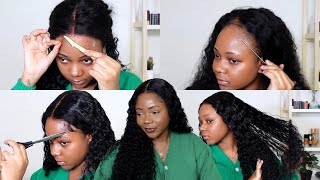
Foreign, hey guys, welcome and welcome back to my channel. My name is Amisha, for those of you who are new, welcome, welcome back, as you guys can tell by the titles, is going to be a wigging star, and you guys I am so feeling this hair, I'm so feeling it. I'M gon na jump straight into the video, don't forget to like comment and subscribe now. This is the packaging that the hair came in and the wig was secured with the net in which I really really love about now this week, out of the package was extremely gorgeous. The hair was super soft. The hair was definitely 30 inches, but I feel like the density could have been a little bit more thicker compared to what I had paid for. As you guys can see, the lace looks so good. It comes with three Clips in the front one in the back and one adjustable strap in the back and it's perfect, especially if you have a big head. Like me, I went ahead and bleached the knots and I left the bleach on for about 20 to 30 minutes, and then I proceeded to watercolor the wig jet black. So this is what the hair looks like when it's completely wet and you guys can see exactly what I mean regarding the density. So I went ahead and plugged one side of the wig and I also wanted to show you what it looked like before and after - and this is the tweezers. These are the tweezers that I absolutely love, love love using you guys so fast and so efficient, and this is all of the hair that I lost during the tweezing, which wasn't much so now, I'm just showing you what she looks like dry. I didn't flat iron. Her anything I just blow dried, her no products and she looks really really good. So I went ahead and flat ironed her off the camera, and this is what she looks like still no product just a little bit of wax at the top just to get it flattened and now it's time for the install. So I went ahead and cut off the Combs. I made a mistake and cut off the back comb in which oh, but you know, like always we're gon na make this work. So here I am just fitting on the wig and then I proceed to cut off the air tabs and then I cut the lace into two because I like to work in sections y'all. I am using this lace adhesive for the first time, and I am so in love now. My go-to is got to be Goose spray and that is literally my Holy Grail but y'all. I really love the hold of this spray. I cannot use regular glue because my skin is extremely sensitive, so this is the only way that I secure my wigs now once I'm done spraying each section, I blow dry it on cool and I wait until it gets tacky now, once all of the lace is On I take a fine comb and I just press the lace in I wrap it and leave it on for about another good 20 to 30 minutes foreign. Now, once my wig is secured to my liking, I go ahead and remove my wig band and I proceed to cut the lace off now. This is not what I usually use to cut off my lace, but that didn't have the razor that I used. So I just went ahead and used this during this process. I realized that my wig was pushed back and I could have pulled the lace up a little further but nonetheless to me it still looked so good. I know it may look crazy right now, but this is definitely a trust. The process. So once I'm done fully cutting the lace I go in with my shears and just cut off the extra excess lace. That'S there and then I go in with my Spritz and spray the ends just to give it an extra melt. I tie it up, leave it on for about another 20 minutes or pretty much to your desired timing. You can also blow dry in the process to make it faster foreign. So this is what she looks like with the band off, and I didn't really care too much about the air test because they weren't gon na show. I went in with some makeup just to blend it in a little bit more. I also concealed the part, and I went in with some mascara just to make it look a little bit more realistic ain't. No one else, and there you have it you guys. That is pretty much it for this install. I hope you guys enjoyed this video, don't forget to like comment and subscribe. Let me know what you guys think down below and I will see you guys in my next video. I love you guys so much and once again thank you guys for watching. You want me


Comments
Jenny T: love it looks so natural omg yess sis