Cranberry Hair Deep Wave Wig | Hd Lace Frontal | Blonde Wig | Curly Wig
- Posted on 29 January, 2023
- HD Lace Wig
- By Anonymous
#amazonwig #amazonfinds #wiginstall
Hi and welcome (or welcome back) to my channel!
In this video I unbox and install a 26 inch blonde ombre deep wave curly wig from Cranberry Hair!
●▬▬▬▬▬♛CranberryHair♛▬▬▬▬▬●
Big Discounts:Extra 27% off Exclusive Code :YT27
Product : 4/27 Deep wave glueless Wig :26 inches
Web link for the same wig: https://bit.ly/3klIk4U
Link to all HD wigs collection:https://bit.ly/3Qhh96i
Cranberry Hair Website:https://cranberryhair.com/
※ Buy Now, Pay Later with Klarna, 4 Interest-Free payment
Cranberry Hair YouTube @Cranberry Hair
Cranberry Hair Instagram: https://www.instagram.com/cranberryhai...
Cranberry Hair Facebook: https://www.facebook.com/Canberryhair
***Buy now pay later details available on website
Style Factor Edge Booster: https://amzn.to/3hZzCrz
*As an Amazon Associate, I may earn a commission from qualifying purchases made through the above links.
[00:00-00:03]- Intro
[00:03-01:16]- Unboxing
[01:17-06:45]- Applying The Wig
[06:46-07:50]- Baby Hairs/Finishing Touches
[07:51-08:25]- Final Look
[08:26-08:34]- Outro
Follow me on Instagram: https://instagram.com/tinaware
Visit my Amazon Storefront: https://www.amazon.com/shop/custom2fly...
For Business inquiries: [email protected]
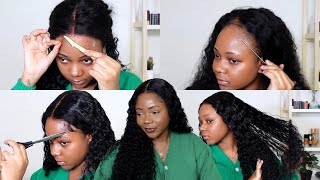
Hi and welcome, or welcome back to my channel in this video I am reviewing from cranberry hair. So before I get to the wig in this package, came some lashes and some wig caps and the wig itself. Oh okay, not a surprise. It'S a curly wig, and this is a long one. It is 26 inches. I don't think I've done 26 inches yet so this is definitely lengthwise outside of my comfort zone and I'm excited it's. It'S colored! I'M trying to step out my comfort zone. What colors too so - and you know I just got ta zoom in and see the lace okay. So actually this lace is really good. Oh, it's really good! Okay! All right do I mean to bleach these knots. I don't think I do. I don't think I will. Let'S see how it looks without the knots bleached and then I'll go back and bleach it if I have to, but it looks pretty good to me. So, let's see how it looks, let's see how it looks installed. The first thing to do is to put on wig cap, so I've gone ahead and put the wig cap on and tinted that with just some makeup to match my skin complexion and use some got to be glue along with some lace, adhesive spray along the hairline To get the wig to stick and don't do what I did and use the bag of the blade always use a comb to push the wick down onto the hairline. I just couldn't mind my comb. It wasn't Within Reach and then tie it down with the Melt pad and once the Melt band comes off, then you'll cut the lace, and this is always the most difficult part. I went ahead and added just one more layer of the spray before cutting the lace, because, as you can see, the sides were lifting. I recommend using a blow dryer to get the adhesive to stick. My baby was sleeping nearby, so I could not use the dryer at the time and that's why I went over with an additional layer. But if you use the heat, it will work and then you once the Melt band, is off you'll cut the lace and you'll see even at this point that the hairline is starting to look good. What I will say about this wig is that this lace was perfect. I have not worked with lace this thin, yet it was amazing and the thinner the lace, the easier it is to melt. So the lace on this is perfect. It is the best it is thin lace, and that is the goal to have thin lace. So it's easier to melt and here's where you can really see how thin the lace is, because, as soon as I spray on the adhesive, the hairline, the lace basically disappears before I've even tied it down attempted to melt. So this is some really quality: lace, real high quality lace and, as I mentioned during the unboxing, I was not going to bleach the knots on this because it looked good enough already and, as you can see, the lace on this is super thin. So I just was going to use some tinting mousse and if I needed to go back and bleach it, I would so. This part is just me using the mousse and wear gloves, because you don't want to stain your fingers and your nails and then also when tying it down, you're going to want to use a strip first strip of wax paper first, so that it doesn't tint your Melt band, unless you don't mind your melt band being tinted, and this moves also the specific brand of mousse also hardens, so you can use it to sculpt and Scott style, your hairline, if you wanted to, and while I was waiting for the mousse to dry, I Just went through with some curl cream to just give the curl some life to eliminate some of the frizz and to have it look less fake. If that makes sense, I'm adding some type of Conditioner helps the curls feel and look just a little bit more natural and it doesn't look overly curled. So I went through and did that and I like the Talia widget curl cream, because it's not greasy and it smells great foreign. This is the look after the application has been completed and prior to any styling and fixing of the hairline. So because I use the mousse tin, there's kind of a clean, a clear line of demarcification, so I had to go and clean that up and have to fix that up. So it just doesn't the hairline doesn't look so straight and add some baby hairs just to kind of help with the the look of the hairline as well. So this is, after some manipulation, but prior to the baby hairs again, it doesn't look too bad, but it still needed some work for me and some people are okay with this look, and this is where you would also pluck. If you wanted the hairline to look even more natural, because plucking produces some of the density along the hairline, and it also helps to make the baby hairs look more natural when you do go to style them, and here I decided just to cut some baby hairs And just try something out so cut the baby. Hairs went through and curled it and styled it just to see how it would look and see if it would look a little bit more natural and if would help with the hairline. Looking so straight because the lace is so thin and I don't mean that in a bad way, because thin lace is good, it's just I haven't worked with at least this thin before, so it caught me a little off guard, and this is the final look after The baby hair, so the sides look good. I personally probably wouldn't wear the front that high comb it that high I'd probably have it fall across the front of my face a little. I just want to show that this lace is thin and it's the real deal. So yeah - and here it is after I put on some lashes again just look at the front. Look at the sides. This lace is amazing. I am in love and here it is in some natural light. Just to show you there's no filters. This is the lace. This is the wig thanks for watching, don't forget to like comment and subscribe.


Comments
Wavy Ay: Every time I see your hair tutorials, I’m always adding something to my Amazon list
Shekeyla Mandigo: I like the color on this one. Really cute
Inspirational sxm: Really cute you are getting better and better ✨
Natasha Ifeoma: Came out nice!
Patrice Marjorie: So cute!!
Shekeyla Mandigo: The curl pattern is cute too
Texas Girl Travel: Super Cute!!!