Straight Middle Part Wig Install (Bald Cap Method) - Ariluvsfrenchfries
- Posted on 03 February, 2023
- HD Lace Wig
- By Anonymous
#amazonwig #amazonwigreview #transparentlace #4chair #wiginstall #wigology #ariluvsfrenchfries #howtomeltlace #hdlace #amazonwigs #bussdown #straighthair #flatironnaturalhair #softglammakeuplook #blackgirlmakeupvideos #blackhair #darkskinmakeup #baldcapmethod #baldcap #middlepart #1bhair #wigtutorials #wigtutorial #wigginshair #amazonhumanhair #amazonhairreview #meltedlace #darkskinmakeup #gluelesswigs #gluelesswigcap #gluelesswigcap #amazonwig #amazonwigreview #transparentlace #4chair #wiginstall #wigology #ariluvsfrenchfries #howtomeltlace #hdlace #amazonwigs #bussdown #straighthair #flatironnaturalhair #softglammakeuplook #blackgirlmakeupvideos #blackhair #darkskinmakeup #baldcapmethod #baldcap #middlepart #1bhair #wigtutorials #wigtutorial #wigginshair #amazonhumanhair #amazonhairreview #meltedlace #darkskinmakeup #gluelesswigs #gluelesswigcap #gluelesswigcap #baldcapmethod
FIRST AND FOREMOST THANK YOU FOR 469 subscribers it means the world to me tysm!!❤️
thank you so much for watching my video !!!
DONT FORGET TO SUBSCRIBE AND SHARE!
Click to see more:)
MUSIC USED :
Email:
TY FOR WATCHING ILY ALL SM!
FOLLOW ME ON TIK TOK!
ariluvsfrenchfries
FOLLOW ME ON INSTA!
@ariluvsfrenchfries
FAQ:
* age: 17:
grade: 11th
" editing software: capcut
* subscriber count: 469
"subscriber goal: 1000!
*current subscriber goal: 500
middle part bussdown,pinterest inspired hair,glueless wig install,wig install no glue,amazon wig,amazon wig review,isee hair review,wigs for black women,human hair amazon wig,preplucked amazon wig,bald cap method,how to glueless wig install,glueless amazon wig,glueless amazon human wig,human hair wig install,black girl wig,black girl wig install,wig tutorial black girl,how to lay edges wig,how to melt lace,no glue
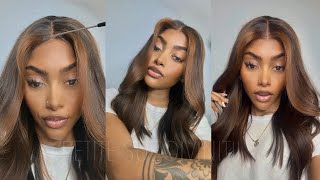
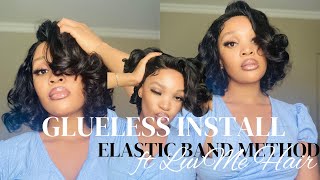
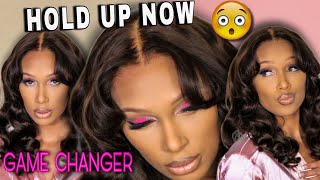
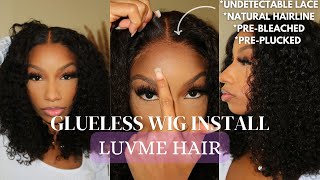
Hello, you guys and welcome back to my YouTube channel. My name is Arya. If you know, if you're not really welcome back to my YouTube, today's video, I'm going to be installing this 26 inch Middle Park wig. I really hope you guys enjoyed today's video and stay tuned for the next one, okay guys, so I'm starting off with my ball cap already on and I'm just gon na go in with some got to be spray and I'm just gon na spray. My first thin layer of spray around the cap and I'm just gon na spread it out with my fingers. Afterwards, I'm just going to go on my blow dryer and I'm just going to spray the perimeter of the wig cap to make sure that the spray is dry. I'M gon na say you guys take your time with this stuff, because I feel like the wig cap is probably the most important part. It really lays the foundation for your wig installation after that layer of spray has dried. I'M just gon na go on my scissors and I'm just going to cut some small air tabs on both sides. Afterwards, I'm just going to go in with some got to be sprayed, I'm just going to spray a little bit more spray around the air tile. So the wig cap is fully on the sides of my ears and not lifted after that, step is complete. I'M going to go in with some more of the got to be spray and I'm just going to spray one last layer around my wig cap and then I'm gon na blow dry foreign, I'm just going to tint my wig cap a little bit more once. I finish tinting my wig cap, I'm just going to go on my scissors and I'm going to trim the cap. You want to make sure when you cut your wig cap that you're pulling on it as well as cutting, so it cuts as close to your skin as possible. As you can see here, you know I'm pulling on it as well as cutting it, so it cuts very close to my skin. Now I'm going to apply my first thin layer of glue making sure to spread it out very thin and then I'm gon na blow dry foreign, I'm just gon na go on my second layer of glue, I'm gon na add those tops around the perimeter and then I'M going to make sure to spread the glue up very thin and then, as always, I'm gon na blow dry until clear wow. That glue is still drying. I'M just gon na go in I'm just going to tip my wig with the same illegal Pro concealer so that it looks like this now for the wig placement, I'm just going to start off by gluing the middle first, that's the most important part, and then I'm Going to go ahead and glue the sides as well afterwards, I'm just going to go in with the comb and then brush all it back to make sure that the lace is fully stuck on my head. Next, I'm going to go on with some Spritz and I'm going to spray it on my finger to help with product distribution, and I'm just going to apply it all around the lace and then making sure to put my wig band on afterwards. Next, I'm just going to go in and start blow drying my hair on the high hot setting. I'M doing this just to get my hair as straight as possible before I flat iron. This is another step again. You want to take your time with, and this is what the hair looked like after blow drying. Next, I'm going to section off the front part of my hair, which I'm gon na hop home, just creating a small section, not too big, and then I'm gon na go in with the edge rooster, wax stick and I'm just gon na apply it and then begin Hot combing y'all: this is how you get your middle part bust down flat you're, just going to want to work in small sections, making sure to add wax thick to every single section. Literally, every don't skip no section. Do not skip no section. In addition, when you're hot coming, you want to make sure you're not really using the teeth. I know I know it's a comb, but you want to make sure that you're using the flat part of the hot comb, because that's what's pressing your hair down to make it flat. We keep so I'm just gon na go ahead and how come the rest of my hair and I'll come back when it's completed foreign, I'm gon na start on my edges, I'm just gon na go ahead and comb them out and then I'm gon na take this Mini flat iron and curl them upward, and I'm curling it upward because it helps the hair lay into One Direction. So I'm not fighting with the edges to lay in One Direction after curling, I'm just gon na go in with a tad bit of edge booster and then I'm going to begin swooping. My edges y'all see how it's automatically forming make sure the curiotic is upward. It helps save so much so much time after I'm gon na go in with this kiss powder foundation, and I'm just gon na apply it all around my lace. This you guys you want to make sure you're not rubbing it in you're patting it in. So it doesn't lift up your lace. Next, I'm just going to apply it around my edges as well, so it creates the illusion. That'S coming out of my scalp afterwards, I'm just gon na apply my wig band. Next, you guys I'm gon na begin flat. Ironing my hair and I'm going to be using the tracking method, as I calm to ensure that it's straight again, I'm gon na make a small section, and then I'm just going to use the comb along with the flat iron, to make sure that the hair is Straight now that I've done it a few times, I'm just going to flatten the rest of my hair and I'll come back. When I'm done. Don'T call me - and this is what my hair looks like when I flat iron one half you guys. I just went ahead and put under the other side off camera, so this is the final result. I really loved how it turned out. Usually I don't do straight hair and I don't do middle parts, but they turned out super cute. You guys get into the lace. Come on come on, I really hope you guys enjoyed today's video and I hope you guys stay tuned for the next one. Bye
Comments
heaven was here: So pretty
Tania: WAKE UP ARI POSTED!!!!
heaven was here:
Brilliant Christina Nation: ❤❤❤❤