Beginners Glueless Wig Install | Luvme Hair
- Posted on 29 January, 2023
- HD Lace Wig
- By Anonymous
Road to 3k subs ✨
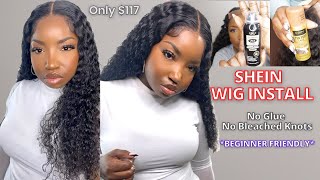
Welcome back Babe beauties , let get into this wig from LuvMe hair , easiest install , glueless wig + my honest review on this hair you need for a go to look
Direct link of the wig: https://bit.ly/3WDXPm8
Length: 14inch
Check luvmehair website: https://bit.ly/3Taa609
Instagram: https://bit.ly/3SQdI7L
Facebook: https://bit.ly/3VlGvTE
YouTube: https://bit.ly/3TdaQlq
Use discount code to get 23% OFF: BJ23
Like this video & Comment ⌨️down below for questions & more videos
Subscribe & Turn on post notifications to be notified of my new uploads !
| SOCIAL MEDIA | ⬇️⬇️
| INSTAGRAM : @ib.Janel |
https://www.instagram.com › ibWeb resultsI B. J A N E L (@ib.janel) • Instagram photos and videos
“Music by Southstreet24-Media”
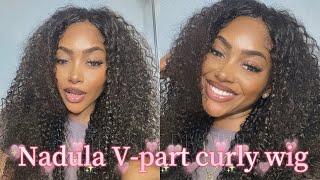
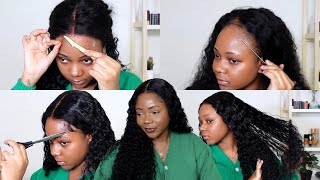
Hello babes and welcome back to my channel in today's video. I will be showing you all how I got this glueless wig installed featuring love me hair. This is their gorgeous curly units, so we're about to jump straight into the unboxing of this unit. This is their 14 inch Kinky Curly, necklint 5x5, undetectable lace wig with a natural hairline y'all, I'm so impressed with this unit, like it's literally Straight Out of the Box, pre-plug already pre-bleached and it comes with a elastic band. I already attached to it for the glueless install. So basically, I didn't really have to do much with this unit. Y'All, besides install it and cut lace, so here they did provide two wig caps and what I'm going to do is take this Tresemme holding spray and spray down my flyaways. I do like to leave my braid down up for like a couple months. I don't like touching my braid down um. This actually makes my hair grow when I leave my hair alone, so this has been probably like a month and what I do is just spray down my flyaways and I'm going to do my ball cap method. Um inside this lovely package they sent uh elastic band, which I thought was really cute is cheetah print and I did not see it at first but y'all. This is absolutely adorable and of course I had to try it on, because I am going to be using this to keep my hair intact. So yes, but let's get into the install. So what I'm doing here is taking my Edge brush and brushing back my edges and my hairline to make sure my hair is nice and smooth underneath the cap, because you don't want that to show outside of the wig so yeah, then I'm going to apply my Cap and I'm going to take my ebbing lace, glue spray and I'm going to spray down just the front area where the 5x5 lace is going to be, I'm not going to do the entire front part of the hairline. If that makes sense, but before I do that, I try to wig on and I kind of determined how far I want to spray and just to get an idea where my hairline is going to be for the cap foreign. The wig itself is going to be glueless, but me personally, I like to secure my cap underneath because I don't really like the thick band the front. Some people do just put the cap on and pull it back a little bit and do it through their glue. This week, but I still like to do kind of like a bobcat method thing and leave the actual wig without any glue, and the wig is not going to stick to this in no type of way. This is just to give my wig more of a seamless look. So what I'm going to do here is take my Foundation, shade and color that cap just to make sure everything is nice and Blended. You don't want that really pale. Look up under your wig, so um add your foundation, shade foundation powder, whatever you prefer and as you can see, it's helping it blend a lot more. But what I'm going to do is I'm going to add some to the inside of the lace as well. Once my cap is secured, I go in with my scissors and I began cutting off the extra cap um according to my hairline and the lace hairline. So what you're going to see me do is cut and Pull It Forward. Just make sure I cut back far enough, but not cutting too too much foreign. If I put it down down as I was cutting the cap, some of the cap did roll backwards, but what you want to do is take some more of that spray and basically lay those edges that rolled up lay them back down using a blow dryer and Either at the end of your toothbrush, but here I'm using my Scissors, because that was the only thing close to me but yeah make sure you just lay those back down foreign here I did go back in with the foundation. Add a little bit more make sure you move the cap back, because the hairline does go down the middle, so you want to get to the back of the cap as well and as you can see it is blending absolutely well. You can barely see the cap. I love how this unit came pre-plucked and pre-bleached. I really did not have to do nothing y'all, like literally so once I secure the wig with the wig um Combs. I take my clamp, secure the hair, so I don't cut any of the hair because for now I'm going to cut my lace and what I do when I'm cutting my lace is, of course, cutting zigzag motions. Taking my time and just making sure I cut the lace to where it blends with my hairline foreign, so now we're gon na get the hot comb and make sure the front is nice and Sleek. But before I do that, of course, I'm gon na go back in with what's left on my brush and blend in those edges of the lace to make sure everything is nice and Blended and look out that is so seamless. I love it. So I'm gon na take my hot comb and basically just smooth out those flyaways. I am going to go back in and use my wax stick, because this wasn't getting it. So I'm using my wax stick here. Just apply just a little bit because I don't want it too, too sleek or too shiny, but yeah. So here I'm taking my continuous misting spray bottle. You can find this at your local Beauty. Supply Store, probably like two three dollars, not not too much, but it is absolutely convenient. You just push it and the water sprays out for like a good little minute just continuously, instead of having a spray spray. I love this spray bottle, but inside this bottle I just have just a little bit of Moroccan um, conditioner and water, and I'm just going to mix just a little bit all over the week, just to give it a little more sugar to find the curls. And I'm going to go in, of course, with my curl sculpt by Garnier Fructis. Of course you can't go wrong with this with some curly hair like this stuff is the best thing you could put on your hair. You guys go get it any snails like bubble gum, but yeah applied it all through the hair. But when you are applying it make sure you start from the roots all the way to the ends and you're going to take the hair and twist it around your finger to actually Define the curls. That is going to give you the most bounciest gorgeous curls. Ever foreign, so once I'm done applying it throughout the hair, I take a little bit and just scrunch my hair up. I do not have a diffuser, but this method works just as good when you use a blow dryer and scrunch it and blow dry upwards. This is going to give it that body and makes it look really really bouncy and full so yeah. This is the finished. Look y'all. This wig is everything like look at this. It is so flowy so bouncy. The curls are super soft and it's just so convenient look at these. The girls be like. Is this your hair like girl? No, this is a glueless wig and I'll pull it back and I'll put it back on. I'M like okay, yeah upgrade but yeah get into it. This is love me hair. I will leave the link in the description box for you all so yeah leave a comment down below what you think of this week like comment and share and don't forget to subscribe. Thank you all for watching, and I will see you in my next video babes and baby dolls. Foreign

Comments
Urban Vector 256:
Urban Vector 256: