Headband Wig! How To Diy Headband Box Braids Using A Glue Gun
- Posted on 02 October, 2020
- Headband Wig
- By Anonymous
#noglue #headbandwig
Hey Guys, Toady video, we are going to be making a Headband wig using the box braids with a glue gun. Headband wigs are a beginner friendly wig for those that are not use to wearing wigs. its very quick and easy to put on. hope you enjoy watching and dont for the like, comment and subscribe.
If you would like to learn how to make wigs on a sewing machine, click the link below for my online wig course.
https://www.uwazhair.com/collections/o...
If you have your hair bundles and you would like me to make into headband wig for you, click the link to me website to book the service
https://www.uwazhair.com/products/wig-...
To get headband human Hair wig, click the link
https://www.uwazhair.com/products/sara...
here is the link to the wig cap,
https://www.uwazhair.com/products/wig-...
To shop this wig and bundles
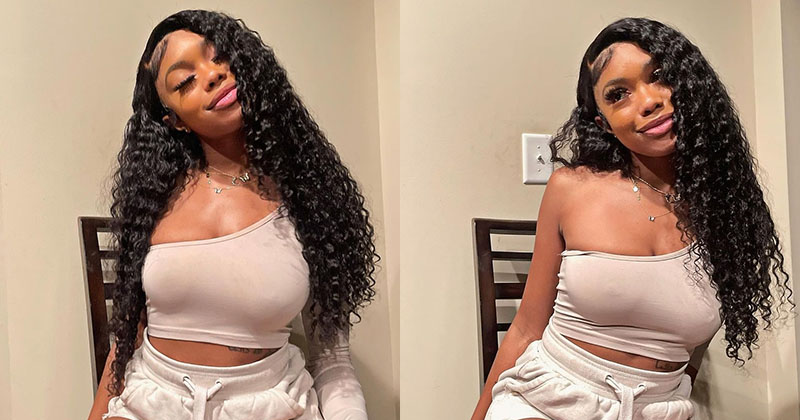
This curly headband wig is available on my website (www.uwazhair.com)
C O N N E C T W I T H M E
•| IG @uwazmakeup @ https://www.instagram.com/uwazmakeup
•| IG (Hair Page) @ https://www.instagram.com/uwazhairz
•|FB @ https://www.facebook.com/uwaz hair and makeup
•|Twitter @ https://www.twitter.com/uwazmakeup
•|Tiktik @ https://www.tiktok.com/uwazhairs
B U S I N E S S:
For Business Enquiries / Makeup Bookings
•| Email: [email protected]
•| DM: @uwazmakeup on IG
Filming & Editing
•Canon 750D
•1 Neewer Ring Light
~Final Cut Pro
Hello, everyone welcome back to my youtube channel if you're new here my name is uh if you've been here before. Welcome back. Yes, don't ask me why i have this makeup on. I don't don't want to explain, but today we are all about this hair box braid using a glue gun, guys just a glue gun. This process took like 30 minutes. This week was ready 30 minutes. So today, i'm gon na show you how i created this unit from start to finish, meaning every single thing: i'm not skipping, no step skip okay. So if you want to know how to create this unit - and you like it and you love it stay tuned so guys before we jump into the video just hit that subscribe button. So you get notified whenever i upload new videos and also don't forget to click the bell notification, so you are notified whenever new video goes up so without further delay, let's dive into the video so guys before we start. These are the list of things. You will need okay, first we're going to need a canvas head today, i'm using a 22 inch, because i want it to be big and also you're going to need a dumb cap. I decided to use it don't cut because we are going to be gluing it down. I don't know if you remember my first one. I use a match cap, but this one i decided to use a dumb cup, also you're, going to be needing a glue gun and some glue sticks. I use in total about three glue, sticks and you're also going to be needing some box braid. These are crochet box braid and i got mine in 20 inch and the color i got was about, i think, was called t1b30. That'S the color and kind of like this color. So i decided to just try that this is a trial guys. I'Ve never done this before this is the first time i'm doing it. So we see the turnout. It'S going to be late, also you're going to be needing some hair bands. This one i got from super drugs. It'S the same one i use for my last video. If you haven't seen that video i'm going to link it link it here, where i use the sewing machine to make a hairband wig, so this is very stretchy. That'S one thing i like about this um headband. That'S why i'm using this also you're going to be needing some velcro sport, the hard and the soft side. Now, let's get started we're going to place the cap, the dunk cap on our canvas head just make sure you align the the way you want it to sit on your head. So if you see what i'm doing that right now, i'm putting that cap on the lines on the place, i want it to reflect so and also at the back. I'M stretching it out, because i want it to be big. So i'm taking my t-pin and just pinning it down on both sides just to make sure that it stick it stays down before going into and start my gluing today i didn't do any adjustment. I just went in because i wanted this wig to be a little bit loose and have some head rooms in terms of the cap and also i'm placing the the band now just to understand where i want to place or where i want to stitch the band And i'm literally just putting it along the the lines of the band on the dumb cap, so all here with one hair, so um yeah. So first i put the glue on the cap. Then i place the the braid on top of it. I press it down for like five seconds before removing my hand, but, however, this was a bit messy. I wasn't prepared for this mess, but it was good. It turned out. Well, so i'm just going to continue doing this randomly i didn't. There was no format to where i placed the um, the um, the box braid or the crochet braid. I just go, went ahead and started doing it randomly placing it and making sure that i'm covering every gap. However, i noticed something because the braids initially i got five packs of them - this bus box braid, but i noticed after doing one box, i want a pack, i've not even gone in like a quarter. It was like wow, it finished so quick. So i decided you know what i'm going to have to space this out. If this 5 pack is going to be enough, but it still was not enough. So now just watch what i'm doing i put the glue first and then i stick this down and press it and press it for like hold it down for like five seconds and take my hands off. Look how neat that pressing was, after a couple of and after doing fuel and try. I got it right how to press it down to make sure that it's not as messy as it was at the beginning. So i'm going to continue doing that, see how i'm doing it and then i press it down for like five seconds and take my hands off and press it down again, because this is hot guys, it's a hot glue gun. So you have to be very careful as well. I'M just going to continue doing that. I decided in this video i'm not going to skip anything rather i'm just going to fast forward it so that the video is not too long. So i'm going to let it play so you can see what i'm doing on the screen and just watch and enjoy. So i've moved up onto the front because i believe this is my third pack i'm using. So i just wanted to show you how i do it in front as well. I press it down and put it in upwards position so that it's kind of falling back when i pack it up or do anything with it, i'm not just gluing it anyhow. When it comes to the front, i glue it upwards, like it's kind of. I don't know how to explain it. You know what you can see, what i'm doing, i'm putting it backwards like so that it falls back. It doesn't fall forward. So if you see what that's, basically, what i'm doing in front here now, i have moved on to the middle. I am trying my best to see if i can use five pack, your girl was trying to use all the five pack. I didn't want to go back to go, get more and packs, but i had to turn my. I have to tell myself the cold truth. Five pack was not enough. Maybe if i started from the front it probably would have been enough. I don't know, and then i would just space it out and then don't put anything in the middle. So this is the end of the five packs, but you can see some space. But, however, i'm going to attach the band and i'll go back the next day, because this is in the evening we're doing this at night now so the next day, i would go back and get two more packs just to complete those space you can see, but Today i decided not to use a sewing machine. I could have used a sewing machine, but i decided not to use i'm going to be stitching this down with a needle i'm using a curved needle. So basically, i take a bit of the band and also take some bits from the cap that from the dumb cap and loop, the needle through the thread in the middle of the thread from the beginning. And i am going to be doing like a a blanket stitch all the way. So if you see what i'm doing, i take the the cap a little bit from the cap and also a bit from the edge of the band. That'S basically what i'm going to do all throughout and i'm going to use the blanket stitch method, just watch what i'm doing, and you see what i mean, i'm trying so hard to explain it. But you know when you do these things, naturally, so you you don't think of explaining it. So that's, basically what i'm doing i'm just doing a looping through the band the cap, then loop band, cap and loop. Yes, i'll just let you watch and see what i'm doing now we are getting to the end, and this part i felt like it would have been better if i have stitched the band first before gluing down and just to avoid all this overlap. However, i was able to go around it, so it was not a big deal, but if you're gon na do it, i think it will be best to stitch the band first, okay, so now to to knot my thread at the end, i loop the thread through The needle like couple of time like four times then just pull it down and that is it or not, and then now i am going to have to cut it off with the scissors. Okay. Now, if you notice it's all stitched down and if you notice the thread is not on top of the band. That is simply because of the way i did my blanket stitch, so it's always advisable not to put the thread on top okay now. This is all five pack people your girl was trying to do the most to make sure that this works, but i notice this was not working. I need to get extra parts, but, however, this is how it looks in the inside when i'm taking it off. So it's also a good idea to have your clean frame on the dome cap, so it's not stitching to it, so you notice it i'm taking all this off. So that was very good that i had that on as well. So this is how it looks on the inside okay. Now this is almost to the end. I'Ve gone ahead and got another pack, two packs, and in total i used seven packs. So i'm just covering all the space that i can see see when i pack it up, so i'm just going ahead and filling in the gap so that i will ensure that there are no space in it. I can't completely cover every single thing, but i think seven pack is more than enough. To be honest, five would have been good if i started from the front. However, if you haven't seen the video where i did, the hairband wig with the sewing machine, i'm going to leave the link here and also the link will be in the description, so make sure you check that out. This is the final look. Look at how this looks. Oh my gosh, the braids look so neat, obviously because it's machine made so the braids are looking so fantastic. It looks very neat and it looks flawless. I'M going to style it with a different hair band, not the one that comes with it, and you see how nice it look. Even with the video you saw initially, i was wearing a white hairband because it was nigerian independence, so i did a makeup for nigerian independence. So that's why i have my green white green as you all probably noticed by now. I am nigerian by bed: okay, okay, guys. This is the end of the video i hope you've enjoyed watching this video. I hope you've learned some few tricks and, if you're gon na try this out, hit me up in the comment section and i hope you've enjoyed this video. And if you have don't forget to give this video a thumbs up and also if you have not hit that subscribe button, don't forget to do that on your way out and click the bell notification as well. So you don't you get notified whenever new video goes up. Thank you all for watching, and i will see you in my next one bye. You


Comments
Tomika: Thank you for making this video. I love love the wig and the method. Omg! I wouldn’t have thought of this method. Great job.
Seddiesnowz: Absolutely beautiful. I love how full the braids look
Mz. B: Looks awesome! I’m definitely going to do this!!
Hannah Sutherland: It was lovely
Stephanie Renee'🌹: Giving thanks for you/tutorial tonight! Thank you!
PjSaid's Lifestyle Channel: 1st of......the eye makeup the wig turned out really nice. Well done!
Florence Amaraegbu: This is beautiful. Thanks for sharing. Am new here
Carla Carter: Nice work. I'm going to try that. I have the braids.
Gloria Osagie: My mentor love your detailed tutorial
Lekesha Millsap: This was very helpful thank u
Dfiant: Yesssssssss the easiest one I saw
Sagittarius Queen: Also how long does the glue keep the wig together?
Official Sarah Wonders: This looks I love! You are so gifted. Do you do one on one sewing machine classes?
summkitchenandlifestyle: Wowww sis thanks for sharing happy to watch
summkitchenandlifestyle: It’s turn out so wellllllll wow
TAM_LEO: if you wanted to do a half up half down with this unit, is the glue strong enough?
Jacqueline's Own: Thank you great video
ENIOLA OBA: Your make up is beautiful sooo is your hair
Sagittarius Queen: Cant these wigs be made to sell also? With the glue sticks?
D O L L Y A: What gel did you use on your edges?
Madalyn Johnson: Thank you got to do this
OnlyTruthMatters onlytruthmatters: Nice work! Could you please tell me where did you put the velcro? I must've missed that I watched the video twice, yet I've still missed that step.
Rose Aiko: Lovely hair, beautiful makeup....happy celebrations
Roberta Ferreira: ❤️
Official Sarah Wonders: Oh yeah and that Nigerian independence eye make up was Hope you enjoyed your celebrations
God's Love for the Grieving Widow: Thank you for sharing beautiful jobs. I recently lost my husband and he was from Nigeria I happened to run across your video this morning maybe thinking it's a sign from him when you mentioned that you were Nigerian bless you thanks for sharing again
Purple Flower: will the braids fall off or will they stick for a year.
Tiffany Haynes: What did you use over the dome so that it would stick ?
Mary CJones: That's the bomb and you are very beautiful
Nneka Trotman: How picks did you used ?
Aku Gold: Can I used bonding glue as well
Karen LeSane: Nice video but where does the velcro come in and did u cut the headb to sew it around the edges?
Magdline Nuom: is very nice
prettybaby80: Where did you purchase the headband with Velcro? Ty
Carolyn Smith: That was nice
JadeOsaGist: I loveeeee the makeup! Love it!
Blessing Obaje: Thanks alot
Saint Harry: Lovely hair and good looking Nigerian Independence Day celebrations makeup.
PjSaid's Lifestyle Channel: With 7 packs, was it heavy?
Chinwe Nwokolo: Is the glue strong enough to hold it for a long timeeeeee?
Isha hawa Kamara: Please what is the name of the glue
KAY MICHELLE: Beautiful work.btw you sound like Naimo Campbell
Nyamminz Foodie Corner: Hey Lovely❤
Ndagire Jacquelynruthie: What if I don't have dat glue