How To Diy Headband Wig: Goddess Boho Box Braid Headband Wig | Xtrend Hair | Missuniquebeautii
- Posted on 17 February, 2021
- Headband Wig
- By Anonymous
#headbandwig #boxbraidheadbandwig #diyheadbandwigs
How To DIY Headband Wig: Goddess Boho Box Braid Headband Wig | Xtrend Hair | MissUniqueBeautii
In this video, I show you guys how to create your own Goddess Box Braid headband wig from scratch! Very simple and easy to do. This Goddess Box Braid headband wig definitely cuts down the amount of time you would actually be spending getting your hair box braided in the hair salon. Let not forget you can also take it off at night! No painful braids! I love this easy and convenient Goddess Box Braid Headband Wig. Like this video, share it with your friends and family, and don't forget to subscribe to my channel to be notified of my future uploads.
Follow Me On Instagram@: https://www.instagram.com/missuniquebe...
Follow My Business Instagram@: https://www.instagram.com/missuniquebe...
Shop My Website https://pressedbymissuniquebeautii.com...
Discount Code: YouTube25 for 25% off the Entire Website!
Shop for your favorite beauty essentials! Press-on Nails, Lip Gloss, Mink Eyelashes & MORE!
I also make and sell Headband Wigs, Half Wigs (without the headband) Lace Closure Wigs, Frontal Wigs, & Drawstring Ponytails. If you are interested in having me make a wig or drawstring ponytail for you, please send me an email at [email protected]. SERIOUS INQUIRIES ONLY!
20Inch Goddess Box Braids Hair link:
Xtrend hair official store's link:
Xtrend Hot Sale Hair:
Faux Locs Crochet Hair link:
Xtrend Butterfly Locs crochet hair link:
(Follow Us To Win Free Hair)
Instagram:@xtrendhair
TikTok:@xtrendhair
Facebook:@xtrendhair
Products Used:
22-inch Mannequin Head
https://www.amazon.com/gp/product/B071...
Crochet Wig Cap (Shake & Go)
https://www.amazon.com/gp/product/B01J...
Black Head Band https://www.amazon.com/gp/product/B07C...
Needle & Thread
Scissors
T-pins https://www.amazon.com/gp/product/B07F...
Crochet Needle https://www.amazon.com/gp/product/B075...=
Cute Headbands That I Purchased!
https://www.amazon.com/gp/product/B08H...
https://www.amazon.com/gp/product/B01F...
https://www.amazon.com/gp/product/B07S...
https://www.amazon.com/gp/product/B07Q...
https://www.amazon.com/gp/product/B07W...
https://www.amazon.com/gp/product/B081...
Equipment Used:
Cannon SL2 https://www.amazon.com/gp/product/B071...
Neewer Back Drop Kit https://www.amazon.com/gp/product/B07P...
Ring Light https://www.amazon.com/gp/product/B08D...
Rose Gold Backdrop https://www.amazon.com/gp/product/B01C...
Instagram: @MissUniqueBeautiiLLC, @MissUniqueBeautii
Facebook: @pressedbymissuniquebeautii
Website: pressedbymissuniquebeautii.com
E-mail: [email protected]
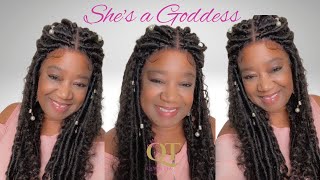
So so, hey my beauties. It'S miss unique beauty in the building and i'm back with another video. If you are new to my channel tap that subscribe button so that you won't miss out on any of my new uploads and if you have already subscribed what's good. What'S poppin welcome back to my channel the cap that i'll be using in today's video? Is the shake n go crochet wig cap with cones? I will also be using this black headband that i received in a pack of 12 from amazon. I will also be using t pins, a pair of scissors and a clip. The hair that i'll be using in today's video was sent to me by a company called x trend hair and they were kind enough to send me their 20 inch goddess box braids in the color t30. Now they did send me six packs of hair, which worked out perfect for this wig. If you guys want to use more hair, you can, if you want to use less hair, you can as well. It is all up to you the amount of density that you want your hair to be. I also received a crochet needle and a few little black rubber bands, along with this hair as well. If you guys do go ahead and purchase this hair, you can purchase either a three pack, a six pack, a eight pack or a ten pack. So there is definitely variety in the amount of hair that you can get and they also have an array of colors. As well, if you guys are interested in this hair, i will leave the link and everything about this hair in the description box below so that you guys can go ahead and check them out. This crochet wig cap that i am using for this wig is my absolute favorite crochet wig cap to use because it already comes with combs and combs is very important when it comes to the installation process of your wigs. So that is why i love using this cap, and i will not stop using this cap for that reason. So what i'm going to do now is just apply the cap to the mannequin head and i'm going to secure it down with some sea pins. So the cap will just stay in place and it will not move. Now. I'M going to go ahead and apply my black headband and i am flipping my headband inside out, because i want to make sure that the seams of this headband will remain on the inside of this cap. Once i am done making the wig cap now, i'm going to go ahead and begin sewing the headband onto the wig cap with some needle and thread, and i like to sew my headband on one side at a time. Because i want to make sure that my headband will be evenly sewn on both sides, and i do want to make sure to mention to you guys that when you are sewing this cap down, you do not want your stitches to be too close together. Because you will lose the elasticity in the band on your wig cap, so do not sew your stitches too close together on the wig cap. Now, once i'm done sewing the headband on the wig cap, i'm gon na go ahead and flip the headband up, so that you guys can see exactly what it looks like once. It'S all sewn all around the cap, as you guys can see. The headband looks nice and seamless and flawless along the edges of this wig cap. I just want to say that i'm absolutely in love with the design of the loop of these crochet box braids. They start off with a twist at the top, which gives you enough slack to hook the braid onto the hook and use your fingers to pass the end of the box braid through the loop. So i love that they definitely give you enough space at the top to get that done. Another way that i found that was super easy with attaching these box braids as well, is once i hook the box braid to the hook. I keep my hook in the hole still and i attach the hook onto the end of the box braid and i pull the entire braid, that's hooked onto the hook through the loop. I really hope that i explained that pretty well, but, as you guys can see how i'm installing them, it actually was a lot faster doing that process installing them. In that way, i do want to also mention doing. The staggering method is 100 beneficial when it comes to the coverage in the back section of your wig. So you want to make sure that as you're installing these box braids, you are staggering them in the back section, especially because these box braids are a little on the smaller side. This is what one pack of box braids look like now, i'm gon na go ahead and install a second pack in the back, and all i'm doing with the second pack is filling in the spaces. Now the box braids that i have done already is just the foundation of the staggering method and these specific box braids will conceal and give you the coverage that you need now. The box braid that i am adding now as the fillers will be the box raised. That will give you the fullness that you will need in the back section of your wig now, because i knew i was going to have more than enough hair to complete this wig. I told myself that my goal was to put two packs of this hair in the back section of the wig one pack on both sides of the wig and two packs in the front and top section of the wig. Now, if i did have extra hair left over, i was going to use the extra hair to fill in the rest of the wig, wherever i felt it needed. So six packs was definitely more than enough hair for me to use to complete this wig. This is what this back section is looking like after i installed two entire packages of the goddess box braids in this back section now for the side section of this wig. The first thing that i'm going to do is lay my foundation of the staggered box. Braids down first, just like i did in the back section of this wig then with whatever box braids, that i have left over from the one pack that i said i was going to use on this side. I am going to go ahead and install and fill those box braids in and those box braids will be the filler box braids. That will give you the added volume that you need on the side section of this wig. So just keep that in mind. You guys want to go ahead and lay down your foundation with the staggered box braids. Then you want to go ahead and use whatever extra box way that you have left over from this pack as filler box braids. That will give you the added volume that you need to this side section. I do also want to mention that each pack of hair does have 22 strands in it. So with me having six packs of hair, that is 132 strands that i do have to install on this wig. This is what the side section and the back section of this wig is looking like after i went ahead and installed three entire packs of this hair onto this wig. Now i'm going to go ahead and finish the next side section and i'll be back to show you guys how to install the front section of this wig for the front section of this wig. I am installing these box braids a lot closer together in the front, and the reason why i'm doing this in the front section is because you want to make sure that you do not see any spaces or gaps in the front, because that was what will be Seen the most, this is where you will be doing most of the styling, so you want to make sure that you don't see any major gaps in the front section of your wig. So for the front section of the wig, i am installing these box braids a lot closer together, just to conceal any spaces whatsoever. I do want to mention that this video is strictly a wig construction video, so i will not be trying on this wig in this video, but i will be doing a brand new headband wig installation video next week, so make sure that you guys are subscribed to My channel so that you guys do not miss out on the wig installation of all the new headband wigs that i created myself on my channel. This is what the completed wig is looking like now, this is six entire packs of these goddess box, braids in a length 20 inches in the color t30. This is my slo-mo, for you guys. I want you guys to go ahead and check out the gorgeous color. The beautiful intricate details and the movement of this box, braid wig now i'm gon na go ahead and flip up the black headband along the edges of this wig, so that you guys can see what that looks like in the front section and, as you guys can See it looks absolutely flawless and it came out so perfect. Now i'm going to go ahead and style, this wig in a half up, half down hairstyle so that you guys can go ahead and see what that looks like in this video. I was able to show you guys exactly how to create a goddess box, braid headband wig, using hair from extrend hair. I will leave the link to this hair in the description box below so that you guys can go ahead and check them out now, if you guys are interested in me making any kind of wig for you just go ahead and send me an email to miss Unique beauty, yt gmail.com and i also will be having a very huge wig sale, either at the end of this month or the beginning of next month, so stay tuned for that as well. I really hope that you guys enjoyed this video comment down below any questions that you may have like this video and don't forget to subscribe bye. My beauties you


Comments
Stacey Allen: I have been looking for this hair in a longer length (thank you) and I love your technique as always.
sothatschy: Wow you explain so well & clear you make me want to make one ❤
Hot Mama Brown: So beautiful ❤️❤️❤️
Heather Moody: I am slowly in the process of making one of these I'm obsessed I'm hoping to have it done by thanksgiving love this ...I'm white but I absolutely love this hair style so obsessed with it I dream of it and decided I have such an appreciation for the braids that I can't take it anymore I have to give it a go and yer video helps a lot
L’ Dougoux: Another Beautiful Wig!
Virgil Lopez: I love how youexplain everything in detail
Patreece Holcomb: I have Areata Alopecia and for the longest been wearing head wraps. Haven't been the same since my hair has been gone. I have been studying your video and said time to get back into the groove. Instead of me paying someone to do it I got the head and hair and cap. Now I cannot wait to do another one for me. Thank you for the details and great videos
Trigo Alline: Love the effort!
Tara Snipes: So pretty!
Chrissy Chatz: Love your headband wigs
Phyllistine Tinker: I love love the way you teach, that you so much
Gordon Harper: needed this tutorial
David Hopkins: this helped me a lot
mary lum: Very beautiful thank you so much god blesse you ❤
Joe Murray: amazing work
Positive Mind, Positive Vibe, Positive Life: So does the cap show when you're wearing the wig?
Melinda Richardson: this is very good
Chrissy Chatz: This hair is nice
Barry Wells: where did you learn all that
Mattie Sanders: you got some skills I see
Hilda Shaw: like the video
Denicia Mulkey: How much are your wigs
Darrell Russell: so that's how you do it
Jesse Cook: not bad at all