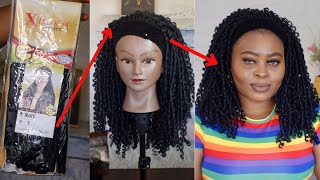
How To : Cheap Crochet Headband Wig With X-Pression Hair + Diy Headband Wig Cap
- Posted on 14 June, 2021
- Headband Wig
- By Anonymous
Hello lovelies! I hope yhu are doing greattt! It's been a minute since I uploaded a video and now I'm back with this bomb DIY CROCHET HEADBAND WIG that I'm sure you'll love! I'll be showing yhu how to make a DIY headband wig cap and also how to create the complete crochet headband wig! I hope yhu learn from it as well as enjoy it, if yhu do, please SUBSCRIBE to my channel, LIKE the video , leave a COMMENT and share it! xoxo
#crochetheadbandwig #headbandwigdiy #protectivestyles #$5crochetheadbandwig
#cheapcrochetheadbandwig #affordableheadbandwigunder$5 #headbandwigforcheap
TIME STAMPS FOR THIS VIDEO :
0:00 - INTRO
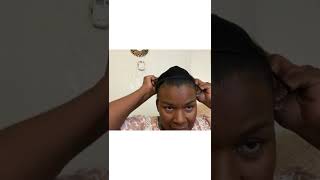
0:50 - MAKING THE HEADBAND WIG CAP (DIY HEADBAND WIG CAP)
5:17 - MAKING THE CROCHET HEADBAND WIG (DIY CROCHET HEADBAND WIG)
Let's connect, follow me on IG : @first_leidy
Are you caught up on my latest videos? Here yhu go
FROM BOX BRASIDS TO BUTTERFLY LOCS --- https://youtu.be/ecr-L6QgZDA
EASY BOX BRAIDS (HOW TO GRIP & NEATLY FEED IN HAIR -- https://youtu.be/ZHkrUJ13BAg
HOW TO: Individual Crochet Faux Locs with no loop --- https://youtu.be/Tjgv5gwbHS8
Hello, everyone welcome and welcome back to my channel. If today is your first time here, thank you so much for stopping by. I hope you come back again and again and again. If today is not your first time, then you must be a returning viewer or a returning subscriber. I love you for always coming back, so let us get right into this video guys. I made this gorgeous looking get affordable at band week. It was it's a crochet headband wig, so i want to show you how i did it if you're interested in that kind of content, then you want to stick around and keep on watching. Okay, after placing the um recap over the a mannequin head. Now i placed the headband across it on top of the wig cap. Yes, up to the extent where i'm going to be cutting the um wii cap off, so this headband is sort of going to serve as your frontal. Yes, this is substituting or taking the place of your frontal line when you're doing making your wrist you'll be pinning the headband wig down in three places, one in the middle of the mannequin head and the two on either side of the mannequin ear. That is below the mannequin ears. That is what i did to just have that secured down. While i um sew the headband onto the recap. Okay, so after pinning those down, i just started off sewing the headband onto the wig cap. I started from the center of the mannequin head to the right hand, side and then, after finishing off that side, i went ahead and sewed also again from the center of it. To the other side, you can start from ear to ear. It doesn't matter where you start from it doesn't matter if it's true i've and if it's not enough, i wan na see the stuff the world has got in store. I wan na take it on it. I'M falling the cityscape by night wan na catch. My photos. Oh uh, your picture's gon na bring it home to me again. The world is waiting up. The world is waiting, half a step beyond catch. My photos where you go every corner twice is bright, they'll, be my treasures forever. When i can't hold you tight i'll, see the stockholm lights lights, the stack online there that i used for this crochet wig is um the expression collection, crochet braids. I already showed you the pack at the beginning of the video um. I got it for 1100 naira at that time. That was like last year before around lockdown period. Last year i got it from an instagram page sucks beauty. At that time i was looking for some way to buy air because all the non-essential stores were locked. So i was just looking for an online store to be able to buy something to be able to create different style looks because that was around the time. I started my youtube channel. Yes, i've been here for like a year now you guys you guys it's so amazing, so i got it from saks beauty supply store. You can go check her out you're, going to see her name right here. She'S awesome a page helps you to stay on a budget which is what this video is actually about. Look at you guys for this total look. I spent calculating it now. It costs me about 2 300 now in total, including the cost of the recap and the cost of the headband just three hundred narrow. Well, let's just see it's 2500. If the prices of these things have gone up, you guys that is it still now, i'm going to use this week for a couple of times, and i've used this already for a week and maybe i'll just take a break from it and walk some other weeks. But guys i'm going to have this for as long as i come in, since that is a steal, okay, so yeah, by the way, guys, if you're here to subscribe. Please kindly do me the favor and either subscribe button, while you're watching this video give give me a thumbs up. Please do not forget to give me a thumbs up it matters and it helps my video a lot. It helps my video to be shared to more people, so always remember to leave the feedback leave me a comment hit the subscribe button and yeah keep on watching you guys after i filmed installing the nape area, the air into the nape area. I thought i was. I was still filming and look at me. I don't have footages from that point up to here. Like the devil tried me, you guys, but we're going to work with what we have okay. So the only difference between what i had been doing before we got to this point is that i was leaving about an inch and a half space between each crocheted air. But now, since we're getting closer to the top of the head to the crown of the air, i decided to for it to be more concealed and to give more volume and just to hide the nets. I decided to do them a lot closer to get that to each other, so i started install installing the air closer to each other. As you can see - and i even did a lot looser when it got to the very edge of the headband as you're going to see here right now, what i'm just doing is just i'm trying to fill out this past area between the weak top and the Headband just to prevent any occurrence of any net visuals by the time you work in the airstyle, so that is what you'll see me do here so yeah. That'S it guys. I hope you enjoyed watching this video. You guys, you guys. Do you feel this look? Can you see this, it would know that this air only cost me two thousand three hundred naira to do like ooh. No, well, you guys know now, so i think i deserve a huge thumbs up for this. Please do not forget to leave me one hit. The comment section and let me know, let me know what you think about this wig and yeah subscribe if you are yet to do so and i'm gon na catch you on my very very next one stay tuned, bye,


Comments
TosTos TV: Hey y'all! i hope you find thius video helpful. Pls be sure to leave a , a comment and SUBSCRIBE if you are yet to! Also, there are time stamps to help yhu go straight to the part of the video yhu want to watch, just tap on your screen to see the chapters.
houseofchyda: So beautiful! Thanks for sharing this! Loved watching it
Adesuwa: So beautiful, love the results.
babygirlsomto: Baabe! Who would believe it’s xpression curly Thank you for the shoutout, you’ve been a babygirl from day one and I really appreciate you. Wahlai
LuvlyGift: I bet this is not as easy as you made it look Well done babe
Toluwalase Oluwaseun: Beautiful ❤️
oluwakemi falooto: So beautiful
Bloom With Oge: Well done girl
Anita Chinyere: I love the outcome.
oluwatobi Akonu: Definably making mine o, can we use the normal head band
madonna kelechi: Really fine!
GBENGA ELUYEFA: Confirm... Nice one there TostosTv