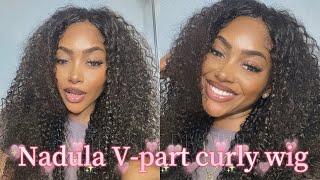
Diy Kinky Afro Wig| Detailed Hairband Wig | South African Youtuber
- Posted on 11 November, 2022
- Headband Wig
- By Anonymous
Heya
Watch how I achieve this Kinky Afro Wig ❤️
Please do engage below in my comment section let me know what kind of tutorials you would like for me to try out.
Thank you
Guys welcome back to my channel and welcome back to a new DIY tutorial today, I'll be showing you guys how I achieve this look. Well, not the one on my head, but obviously the one in the picture above because unfortunately I forgot to shoot my introduction for this video and I did a kinky afro hairstyle as you can see, so I really hope you will enjoy this video, please. Let me know what you think about it. Please, like comment below, don't forget to like subscribe hit that notification button shout out, and thank you. Thank you so much for all your support and yeah. I hope you enjoy it. This is I've already stretched out my hair. Now, I'm just going to grab a brush and start brushing my hair so that it's nice and smooth, so basically, what I will be doing is, I will be creating spring twist and just the difference is that I'm taking bigger portions of hair. If you want a detailed video on how I achieve my spring twist, please go ahead and check out my YouTube videos and it will show right. There. You'Ll have a detailed video on how to achieve spring test foreign foreign foreign twist, I'm going to add some conditioner to hot boiling water and throw my sprinkles into that water and leave it there for like a minute. Now I'm just going to fit on my wig cap onto my wig head and I'm just going to use um. I think it's drawing pins to ensure that my work head, my wig cap doesn't move around much. I purchased my wig cap for my local shop. It was about 10 grand, as well as the headband I will be using in this. Video is about 10 Rand yeah, so both items were 10 Rand. Now I'm just going to take out my hairband and I'm going to attach this to my wig cap and I'm going to sew it on you'll, see how I do it right now. Thank you. So basically, I'm just going to sew on my headbands with this wig cap um all around. So, basically, from the this one side to the next side, foreign foreign, I'm just going to cut off the ends of my spring twist hair and then I'm just going to start separating the hair so that I can begin crocheting it into the wig cap. Thank you, foreign, excess hair that you just don't need, and it's just really just making it hard to use the hair just cut off any of those pieces. Oh so, as you can see, I'm going to start crocheting from the back of my wig cap and I'm going to take my spring twist here and just put it through my wig cap and then like. I don't know how to describe it, but I'm just going to pull the hair through the loop I've made and then pull it to ensure that it's nicely and secure, and I'm just going to continue this process until I'm completely done creating this hair foreign foreign. Creating this week, I'm going to show you guys how I install it and put it on my head. As you can see, I've laid down my head and I have like a another recap - the plane away, kept late yeah on my head and I've laid it down with some gel. I use isoblast shell yeah, and this is this - is the end result guys? I hope you like it. Let me know what you think don't forget to like subscribe and hit that notification button and thank you for watching and tuning in bye foreign. Thank you.


Comments
Nomfundo Mthethwa: Love it
Nomfundo Mthethwa: We here waiting for 2pm