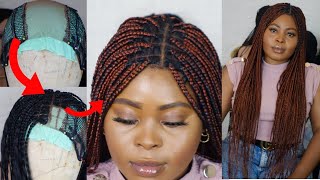
Diy Crochet Knotless Closure Braided Wig | How To Diy Your Own Closure
- Posted on 20 July, 2022
- Headband Wig
- By Anonymous
Hey Lovelies, this week's video is a DIY ventilating 5x5 crochet closure knotless braided wig in a peekaboo black and pink braids.I also went ahead to show how to make your own closure in whatever size you need it to be. I’m also going to be showing how to easily install the wig in a quick and easy method. Let me be if you have any question in the comment section. Love you
#diybraidedwig #noclosurebraidedwig
INTRO (WHAT TO EXPECT): 00:00 - 01:09
WIG CAP PREP: 01:10 - 03:19
MAKING OF THE 5x5 CLOSURE: 03:20 - 08:22
PLACING OF LACE CLOSURE: 08:23 - 09:37
VENTILATING THE LACE CLOSURE: 09:38 - 13:49
BRAIDING OF THE WIG: 13:50 - 19:12
WIG CARE: 19:12 - 19:55
INSTALLING THE BRAIDED WIG: 19:56 - 24:05
OUTRO: 24:06 - 26:03
Order to watch previous videos for better understanding;
HOW TO PREP YOUR WIG CAP FOR A WELL FITTED BRAIDED WIG (CLOSURE &FRONTAL):
DIY CROCHET CLOSURE BRAIDED WIG USING EXPRESSION ATTACHMENT:
DIY CROCHET KNOTLESS FRONTAL BRAIDED WIG USING EXPRESSION ATTACHMENT:
DIY CROCHET KNOTLESS FULL LACE BRAIDED WIG - HOW TO DIY A BRAIDED WIG;
+ FILMING EQUIPMENT
- Canon 750D
- Ringlight
- 2 LED LIGHTS
_______________
+ PLACES TO FIND ME
INSTAGRAM: https://www.instagram.com/the_basil_me...
EMAIL: [email protected]
Hey lovelies welcome back to my channel. I am the basil mercy, incase, you don't already know and in today's video we're going to be doing a diy, braided closure wig all right. So this is a closure wig. It'S a 5x5 closure braided wig and i'm super excited for this tutorial. So this is like an updated one from my previous closure wig and in today's video we're also going to be you know, ventilating the closure, i'm going to show you how to simply make your own closure at home, how to make it to whatever size and whatever, Like whatever size you want is a 5x5 a 4x4 or 5x6 whatever you want, i'm going to show you how to do that in this video, i'm going to show you how i constructed this wig to come out, looking this beautiful. So this is what it's looking like. I'M super impressed with how it came out if this, after something interested in so make sure to keep on watching, love you so lovelies we're going to be starting with our wig cap prep prepping. Your wig is very important for your braided wig, so it sits perfectly on your head. So for your braided wig, i always advise you use a dome cap very important. You don't go ahead to use the mesh done cap like i'm, showing you or you use a spandex dome cap all right, so i'm just going to go ahead to show you the canvas head, the back and the front. I showed this because someone asked in the previous video: how do you kind of differentiate them? It'S very differentiative all right, so i'm just going to go ahead to get the wig cap on the canvas head and then i'm going to take it back from the bottom of the canvas head upwards. I'M going to take the wig cap to eight inches like you. Can see, then i'm just going to use these very little pins to pin them down or pin the wig cap down, so you can sit so now, i'm just going to go ahead to prep my wig. This is very explanatory, or if it's not explanatory, i do have a video, a very in-depth video, where i show how i prep my wig cap. It'S very important. You should know how to prep it with every measurement and everything. So now i'm just taking in the excess wig cap all right, because i've gone ahead to kind of measure it to my head shape and i'm just seeing the excess. One thing i want to mention is that once you're doing this make sure to kind of still leave a little bit of room so that the hair is not like really tight. Also, the wig cap is not so tight, make sure to leave a bit of room. All right, so i'm just going to go ahead with my tread and needle and just kind of sew that down and that's basically it so once i'm done sewing down the wig cap. The next thing i'm going to do is kind of mark where i'm gon na place my braids right, i'm just gon na go ahead to mark one inch, every one inch on my tape, that's just what i'm doing so now we're gon na get into a very Important aspect of this video, the making of the closure guys this process might be a bit tricky, but just stay with me. So i'm showing you two different nets, i'm showing you the swiss lace and the hd lace. I'M gon na go ahead to use the hd list in this video you're to need your measuring tape, a chalk, preferably a chocolate, a pencil and then you're going to need ruler optional. So i'm just going to show you right now that you're not meant to place your net like this. If you're prepping, it make sure it's in a straight line like i'm, showing you make sure to place it, i think horizontally and not no make sure to place this vertically and not horizontally. So we're doing a five by five closure today. So i'm just going to go ahead and mark seven inches, because i'm going to leave one inch for the folding and i'm also going to leave one extra inch for the net that is going to be in front. If you get what i mean, i'm going to go ahead to mark for the vertical, i think i don't know for the straight line too. I'M going to go ahead smack for the other side and then i'm just going to mark you know it's we're doing. Five. All right we're going to be doing five by five, so i'm just going to mark five and then mark an extra an inch for if you're, starting to advise you to leave like two inch because you're going to fold one inch one inch at the side, mostly If you're not an expert at folding already, because even me i did make a mistake - i left one and a quarter inch, but i could have left more actually because when i was folding it kind of gave me issues. So i'm just going to go ahead to kind of draw that map that shape out that we've measured out. I hope the video is very explanatory, but yeah i'm just going to go ahead to kind of draw that out and then i'm just going to go ahead to make sure to check your measurement back check that everything is intact. What you're doing is well like you're, making sure you're cutting exactly and then i'm just going to cut with my scissors and then you should have a box like this kind of a rectangle or is square depending on how you cut it right. So i'm just going to go ahead to take one inch off the back or the edges of the back of the listener. All right! This is what kind of forms that curve when you're, when you're folding your lace closure. So i'm just going to go ahead to use these very small small pins, i'm going to go ahead to use them to kind of like fold and then pin all right. So i'm folding and pinning just kind of get that very neat. Um kind of knit ends. Basically, so you want to go ahead to fold and make sure you, whenever you're done folding you want to make sure you measure again to make sure that the inches that you want. That'S what you fold it to, because if you fold it too small you can have excess measurement and if you fold it too small you can have. If you put it too big, you might then have like it won't be so accurate. I don't know if you get what i mean, but i've just gone ahead to fold it both sides and fold it at the back. Also and you're gon na see what it looks like afterwards. So this is what it should look like once you're done folding. I hope you're seeing what i did so i'm just going to go ahead with my invisible thread and then i'm just going to go ahead to sew this for sewing this. You actually need a very small needle, but i didn't have so. I just used my curved needle, but i was very gentle. While i was doing this, i was really gentle. While i was sewing this. I just made sure to take my time, drag it out very slowly and yeah, that's basically it so yeah. This is how i make my closure, so this is what i mean by taking your tip and checking. That is so. You see because i didn't leave like i didn't - leave seven inch on the other side. My net is a bit smaller. Why, after folding, it's not giving me exactly five inch, all right so but that's fine, so why i have six inch and the longer sizes, because i'm leaving one inch room when i'm done. You know when i'm ventilating, you need an excess lace in front. So that's why? So now, i'm just going to go ahead to kind of form how i'm going to ventilate. I don't really need these boxes. To be honest, i just kind of wanted to make sure is very explanatory for someone, because i really want this to be as detailed as possible. But honestly, if you do this once or twice once you finish, making these boxes like once you've actually done a lace closure once or twice you figure out. You only need your fixed boss. Actually, you only need the first box and once you get the first boss, you're actually good to go. You do not need to draw lines like this, but this is just so. It helps you once you're starting out and, like i said i don't advise you using a pencil advice using a chalkboard with a chalk is easily removable right for me. I'M doing this for myself nobody's going to hold me if i have less pencil or if i have pencil eyeliner fancy on my net. No one is going to hold me to it and i'm dark skinned. So once i put my foundation on it, it's just going to get lost you're, not going to see the lines that i'm putting in so now we're going to go into place in our lace closure. This is very easy. I'M just going to go ahead to place the middle of the net on the middle of my canvas head. It'S going to show the line, i'm just going to place it and then i'm going to try and make sure i laid the closure. At least i'm going to make sure i lay it flat and then go ahead to sew it down. So now we're gon na go into another important aspect of this video, which is the ventilating of the lace closure. So i've gone ahead to do the back of the lace closure. As you can see, i took some of the um ventilation. I ventilated it backwards, so you kind of kind of cover the nets all right. I hope you get what i mean, so i'm just showing you what i'm going to have to do so now, i'm just going to go ahead to ventilate the side part and show you as i do that, so what i'm doing is i'm just making sure i Have all the hair away from the you know away from where i'm going to walk and i'm just pinning them down? That'S a very good way to take it out of your way, because you don't want that, bothering you, while you're ventilating, all right so once you're done with a section, pin it back and then continue in your other section. So now i'm just going to go ahead to ventilate, i'm just going to put the ventilation. Pin i'm using i'm going to put a picture of that at the side, and this is what it looks like. He has three parts. It has three pins that comes with it, the big, the small and the medium all right lots of people have. You guys have seen that a lot of times on this channel, so i'm just going to go ahead and start ventilating. Ventilating is very easy. It'S a very easy process. You just have to kind of follow the hand movement. That'S what's really important the hand movement is what's really important, even when you're ventilating, with a needle or a lash hook like i'm using. So i'm just going to go ahead to explain my own technique. Why you kind of watch the videos it's very explanatory, so for technique wise. I give three spacing three line spacing for the center part, it's kind of a bit too much. Sometimes i give two, but if i really want the spacing and the media to be very obvious, i give a three spacing, so i give three spacing in the middle two spacing when i'm starting a new box. All right, then, i give one spacing in between a box. I really hope. That'S explanatory, so three spacing in the middle two when i'm starting a new box and one in the middle, i'm actually going to have a very detailed ventilation, video coming up soon, all right. I really hope you like this angle. Let me know what you think about showing it through this angle or if you want me to show it in another angle, but i'm gon na have a very in-depth video coming up very soon so watch out for that. So i've just gone ahead to ventilate the rest of the wig off camera and then the only part is remaining. Is the front left side, i'm just showing you guys every pattern, how i ventilated it and what i did so, i'm just going to go ahead and start ventilating the front of the wig for front lifting the front of the wig. I'M actually very careful. I actually go in with just like i go in with two strands of hair when i'm ventilating no more than two, because you want that knot to be as thin as possible, because the bigger the the bigger the strands of hair, the bigger the knots so the Smaller, the strand of hair, the smaller the nose you can see how small that knot is looking like. I just went ahead to show you guys, so i'm just going to go ahead and ventilate it into a box and then i'm just going to go ahead and braid it. Basically. So so lovelies we're going to get into the braiding of the wig. I'M going to be using this crochet hook all right, it's kind of a bit big and it's. If you're, not careful, you can rip your wig cap, so advice is to take it easy. You don't have to be very pushy with it. Just take your time, we go through the recap and then you use it to pull out your attachments and that's it's very easy. If you take it very gently, i some people complain about it's ripping the rib and the wig cap, but if you're actually going very gently and just kind of wiggle it through it's going to come out very smoothly, so i'm just going to go ahead and put A bigger piece of attachment, depending on the size you're actually going for if you're going for a smaller um, you know size of braids. It doesn't really matter, it depends on the size of braids, so the size of braid would determine the type of attachment the size of attachments you put in between the braid or the type of the size of attachments you kind of draw in so your size of Attachment determines what you're going to do all right, so i'm just going to go ahead to braid it. So basically, this is the pink part of the hair because, like i said before, i went, i had to do a pink peekaboo and then i'm just going to go ahead to put the black on top. So i went ahead to break the black, and one thing you want to take note is how i arrange this: the back of the wig doesn't have to be um. What'S it called the back of the wig doesn't have to be so full honestly, it's the front that really should be full, because if the back is full, it's going to be pulling you all right, but if it's in the front, it's not going to be so Heavy, if you have most of the braids in the front so just make sure you know how to distribute it, because it's not just about braiding it. If you don't distribute it well, your head is going to be heavy. The wig is going to be heavy. It'S going to be dragging your back, so make sure you concentrate more of your braids in the front. So now i'm just going to go ahead to cover the net and kind of join the next to the wig cap. In a way, i don't know how to explain it, but it's very understandable to what i'm doing so. I'M going to go ahead to braid the same white braid, but the only difference is i'm taking that my ventilation hook. My crochet hook right, i'm just using the bigger pin of it because it comes with three pin, like i said earlier, i'm using using the bigger pin and then i'm just going to go ahead to use that to draw it into the net and weak up. And then i'm just going to go ahead, separate it normally like i would so. This is what it looks like you just want to make sure you do them as close as possible, and this is what it will look like when you're done. You can see it's already kind of covering the wig up a lot, and this is where most of the braid is concentrated on this surrounding that's where most of the braid is concentrated on, like i said so, you just make sure they are very close to each Other, so that's it and i just went ahead to braid my frontal, like i would normally do. I braid my eye in a knotless way. In a way, i don't know i just really like it that way. Kind of just gives a a very clean vibe. When i do it that way, so so so so once i'm done braiding the front out, this is what the wig is. Looking like like this wig is actually so beautiful, i'm actually in love with how the black looks. It just looks very elegant in some way. So i'm just going to go ahead to trim. You want to go ahead and trim your wig, it's very important for you to trim your wig. I don't care how you think you braid so neat trim. It go ahead to trim it put in the wok and then i'm just going to go ahead and put the hair nut in hot water. I find out doing my hot water method. This way is actually more. I don't know it's more nice doing it. This way than dipping the whole hair in hot water, because this kind of straightens, the straightens, the attachments that down that kind of um you know coily once you pour the water this way, it kind of does everything for you. So i'm just going to go ahead and apply my mousse once i'm done applying the hot water you have to allow it dry a little bit before you apply your mousse, not so much. It should still be wet, but just a little bit, then you apply your mousse. So that's really it lovely. That'S really it for the making of the hair. I'M just going to go ahead to start installing this wig and yeah, hey lovelies, so we're done with the making of the wig and i'm just going to do a very quick insole. As you saw previously, i have no wig cap on it's just going to be a very quick, install nuts and series, but this is how the wig is looking on the head. It'S actually really pretty right, it's so lovely, and this color i mean i mean i look just black, but it's still giving it that last and then we have the pink at the back, which is just kind of poking out a little bit. So i'm really excited about this install. So, let's you know get through this and let's see how it goes first step is always take the hair away from your face always is literally a moss. It just helps you do better, then, because this is a five by five cruiser. I'M just going to go ahead and take my scissors and cut off this like this join in here. So i'm just going to take my ebbing wonderland spray. You can go ahead and use got to be. You can go ahead to use them any adhesive. You have. You could even use glue your choice, your preference, anything that works for you. Whatever works for, you works for you, i'm just going to use my elastic bun and just kind of wrap that around it. I'M literally just going to wait for that to dry and then i'm just going to cut off the lace. That'S basically, all i have to do left another. I really like closure, wigs, because it's just really simple. Your install is super fast on, like your last week that you have to like take time but yeah. That'S really it so now we're done waiting, i'm just going to take that off and then cut our lace. So lovelies we're done okay, so i'm just going to go ahead and take this off and yeah. I'M not really happy with this side. Just lifting! Oh, i mean that easy, so i'm going to take this off and yeah yeah we're done so i'm just gon na stand up and show you the length this one is kind of really long yeah. It'S really long! It'S really long! I can't even show you why it's standing, so this is what it looks like it's really long, i'm going to try and put a clip of me showing this while the camera is slanted so for you to see how long it is. But this is the final look. This is how it's looking like. I really hope you like it. What is looking like, i really love this braid and yeah. I really love how it came out. The pink is actually really visible. I guess that's why it's called peekaboo. Maybe if you just do like this, you just bring out a bit of pink, but the thing is is hidden, it's just hidden inside. So let me know what you think about this style. Let me know your thoughts, your comments. If you have any questions, let me know down below in the comment section down below. If i forget to mention so i have some taco for champions. I was thinking about doing a giveaway with them just a little bit, because i know a lot of people have been looking for where to get and they've not found. So i don't know how to give it yet, but look out for that in future videos, i'm planning to do that. Okay, just look out for that! This is for my real mvps for people that stayed to the end of this video. So look out in future. Video, i think, two to three videos from now: i'm going to be giving them out. I think they have 15 but yeah. That'S really it so lovely. Thank you so much for watching to the end of this video. If you're watching the end of this video, you already know you're the what yeah you're the real mvp, if you like this video, make sure to check out my other content, i have a lot of content. I say a brighter series: i'm just gon na leave that up here and also, if you love my videos, i'm gon na leave a hair playlist. You can go ahead to kind of check through and see whichever videos you like and just keep on watching. Thank you. So much for watching and love you


Comments
The Basil Mercy: Hey Lovelies, to learn more, check out these previous videos; HOW TO PREP YOUR WIG CAP FOR A WELL FITTED BRAIDED WIG (CLOSURE &FRONTAL): https://youtu.be/Uw7bB_rAyRc DIY CROCHET CLOSURE BRAIDED WIG USING EXPRESSION ATTACHMENT: https://youtu.be/bgQBH1Etlms DIY CROCHET KNOTLESS FRONTAL BRAIDED WIG USING EXPRESSION ATTACHMENT: https://youtu.be/nDCICaiGFoA DIY CROCHET KNOTLESS FULL LACE BRAIDED WIG - HOW TO DIY A BRAIDED WIG; https://youtu.be/i32FFS3-nso
Princess Bravo: The wig is definitely giving..♥️ thank you for sharing, will definitely recreate this look, absolutely stunning
Glory Peters: Made one already And it turn out to be amazing You inspire me alot
Tubu Agnes: I love how you do these I'm making one now...I hope it turns out great..
Benita Iwobho: Inspiring, I'm definitely trying it
Scohair: Amazing job
Ijeoma Janny: So beautiful. Your works inspire me a whole lot
Ogochukwu monique: Nice sis. Well done very beautiful i look forward to getting one of the crochet pins.
d' f&f hairs🥰: Very beautiful
Ifunanya Immaculate: Thanks for this video ❤️
Grace Meniru: Giving u ur flowers hun You are so freaking talented❤❤
Temi Kojo: I love the color combo..and thanks for the detailed explanation..... I want crochet needle pleaseooo remember me
Amarachi Michael: So beautiful thank u
Omowunmi Arole: Loveeeee it, you are gingering me of make one
OG Lisa: This is so beautiful thanks for sharing Please where can I get the HD lace from
Wanda Harrilson: Beautiful exactly how many braids is needed to fill the back of the wig so it won't be to heavy thank you
Amrasa Jennifer: Nice one, really helpful
Duke Ifeoma: This is nice, I really want to learn the ventilating part. And yes giveaway should get to me, lol
Chiamaka Geraldine: Your videos are always very educating. Thank you Mercy. I need the pin oo
GinabeautyExpress: I'm going to try this for sure
Eyum Adode: This is really nice Mercy
VaLeRiE: Pls do a tutorial on a full lace jumbo knotless box braid
Sunmisola Balogun: Please did you use an attachment for the ventilation ? It looks really nice
DaniRose: You’re amazing darling ♥️
Ronda Lomax: Can you do a video on the different types of laces there are, and how to use them. Which one don’t you like? Which one would you recommend for long time wig use ?
Aderonke Funmilayo: Nice one❤️
Kachi Egeonu: This is so beautiful. I literally learnt how to make braided wigs just by watching 2 of your videos,now I make money from it. Please your real MVP is interested in the ventilating needle,I really need the bigger size to help cover my lace,thank you.
Ronda Lomax: Do you sell the HD & SWISS LACE? Can I purchase from you?
Ukachukwu Judith: Beautiful
Verona James: Loveeeeeeeeeeeeeeee it
oluchi iloduba: You've done it again
DaniRose: Hope I got one of those pin
Sunmisola Balogun: So beautiful
Florence Kock: Thanks For the tutorial
Azih preshy: I will really love to get the ventilating pin ma
Verona James: Very nice am going to try it
Oluwabunmi Enoma: You are a good teacher ❤️ you But the ventilating pin I got is not like yours and it's given me problem.
d' f&f hairs🥰: Pls I will really need the ventilating pin I can't find it here
Verona James: Whats the difference between two lace please
d' f&f hairs🥰: Pls what the difference between hd lace and swiss lace
Ladega Aliyah: Is this closure or a transparent hd lace
Dawny Jay: Please I'm here oooo I need a crochet pin