New! Freetress Headband Crochet Cap| Tutorial And Wig Install| Crochet Wig|Lynnskinkykreations
- Posted on 11 April, 2021
- Headband Wig
- By Anonymous
#headbandwig #crochetwig #freetressheadbandcrochetcap
*Video is not sponsored all items purchased on my own
Link to headband wigs :
Link to freetress headband crochet cap:
Link to freetress ringlet wand curl:
Link to grey headband:
Where my handmade wigs can be purchased :
http://www.lynnskinkykreations.com
Link to video discussing crochet and weaving caps:
https://is.gd/aWhHSe
*Follow me on instagram
https://is.gd/4Wz8fq
Email: [email protected] for business inquiries•
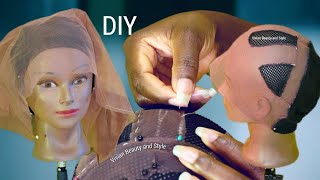
Hello austin from this kinky creations and in today's video i'm going to be making a headband, crochet wig today now the interesting thing that is, i'm going to be using a different crochet cap that recently came out. So this new cap that i'm going to be using is from freetress and they now have come out with a heavy crochet cap. They'Ve also come out with a headband crochet dome cap as well, but i'll probably do a video on that at another time. But today i'm going to be doing a crochet wig cap and i'm actually going to be making this heavy wig for myself so um. I know. Sometimes i make wigs on camera and you are like. Oh, i wish i had to see what it looked like. If somebody had it on so guess what this time, i'm actually making a wig for myself and you guys will get to see what it looks like on me and in that way, i'll also be able to provide how it feels and my thoughts are and what My opinions are on the actual crochet, the headband crochet wig cap, so i'm going to go ahead and show you what the packaging looks like. So this is what the packaging looks like, and this is what the back of it looks like now. I also have my canvas blackhead here, so i am going to be putting the cap on the canvas blockhead once i you know start to make the wig, so i'm going to go ahead and open the um packaging all right. So this is what the wig cap looks like. This is the actual netting part, and this here is the headband part. Now the interesting thing about this is that the fabric is very soft in the front, and it also says on the packaging that it has a cooling headband. So i'm assuming that means that the headband's supposed to be like um, you know. So i guess you won't get hot or whatever, so maybe it's made out of particular material. That is a breathable material that allows it to. You know be comfortable as you're wearing it. So this is the the headband part here and, as you know, with a headband, you normally fold it over so that it covers the crochet knots that are in the front, which is what you can do here and aside from that in the back, it has the Velcro - and it also has three combs on the inside, so it's just like your regular crochet cap that they have. Let me see if i could just kind of show you all what i'm talking about. So it's like this crap here that has the three comb so, but i'm sure a lot of you have used this cap. You know it has the three combs, so it's pretty much that cap, but with a headband sewn onto it. So you have your combs on either side and then you have a comb that is in the back, so um yeah. So that's what it looks like now. This cap is actually pretty convenient if you're someone that wants to make a headband wig, but you don't want to go through. You know it's a little bit time consuming to make your own headband wig, especially if you want a band on it. So normally you would have to put the cap the regular crochet cap onto the mannequin head and get like some sort of heaven or something and sew it on. For me i mean i could make a headband wig. I have made heavy wigs and the method. I would use is, i would use this same kind of cap and i would buy like a headband and then i would cut it in half and then sew velcro on either side. That'S another alternative. If you don't want to buy a canvas already made, or if you just you know, you can make it yourself, but this is convenient for someone who wants a headband weight but maybe doesn't know how to necessarily go about making one or just want something that is Easily available and convenient for them so um the campus is nice. So far it looks like it's very stretchy and roomy like it's not like super tight or anything like that, and of course you have the elastic, not the elastic you have the velcro. Excuse me in order to tighten it for adjustability now, while i like the construction of the cap, and i think it's a great idea, i do feel like it's a little bit on the pricey side, so this cap was about, i would say, about eight dollars, so I'Ve seen on another website where i believe it was seven, so i would say you're going to pay probably between seven and eight dollars for this cap. So you know this really depends on if you feel like you're doing it yourself or if you want to just go with something that is already easily available. So you know, but anyway, i'm going to go ahead and show you all how to make this wig and the hair i'm going to be using. Is the freetress ringlet wine curl? Now i've had this hair for some time and at first i was going to just crochet it onto my hair and just make like like a braidless crochet, but i see that now. Heavenways are trending, and you know if you make a wig with something you'll get long. You know you'll get longevity out of it as opposed to crocheting it onto your hair and then taking it down, and then that's that so i'm going to be using this hair and i purchased this hair in the color number two, because when i ordered it at The time they didn't have a 1b, so i just went ahead with the color number two and i have two packs of this hair. So that's what i'm going to be using. So now i'm going to go ahead and just show you all how the cap actually fits onto the canvas blackhead. So this is how it fits and i have to admit it fits really nice. It'S really comfortable. I would definitely say this is a big head friendly cap, it's not too snug. So this is how it looks on a mannequin. Okay, it's blackhead and my mannequin blackhead is 23.5 inches. So i would say, if you know, if you feel you have a bigger size head, i would say this is definitely big head friendly, so yeah. So what i'm going to do is i'm going to go ahead and start to crochet it here onto the cap? I am going to secure it down with pins, so i'm just going to do like this. Keep it out the way, so i am going to go ahead and start in the back, and i am probably like i'm going for more of a natural density. Look. So, just so you won't know, but if you want, you know your wigs to be full, you could definitely use more than two packs. If you, you know, feel like you want it, fuller look. So this is the hair, and this is what it looks like now. I'Ve tried the jumpy one curl. I have a video showing how to do that using the braidless, crochet method and i'll link that video in the description box. So i decided to try this one, since i did enjoy the jumpy one curl as well, and this hair is very nice. It'S soft um. The reason why i chose this here is because it has a nice natural, looking texture and feel so yeah. So i am going to go ahead and separate the hair in half and if you want the curls to stay intact, you can definitely leave it intact, because when you separate it does cause a bit of frizz, but i want it to look natural. So i'm going to go ahead and separate it, so i looked at about twice so so i separated this strand into about four pieces. No excuse me three. So that's what it's looking for. Looking like so far so i'm gon na go ahead and continue to crochet, and once i get probably towards the middle i'll, come back and show you what how the progress is looking. So it's just like making a regular crochet wig just that this one has a band already attached to it. So this is how much i did so far using one pack of hair. So now i'm going to go ahead and use the second pack of hair. So i would say you probably need either a pack and a half or two packs, and this is with me separating it. So if you don't separate it, you might want to get. I don't know three packs, but i don't really think you need three packs because you get a lot of hair in this pack, so yeah, but just like. I said this is what it looks like with one pack being used so far and the hair being separated. So, as you can see, i am almost finished, so i'm going to go ahead and continue and then i'll come back and show you all how the wig looks. So i'm just going to continue the same way, i'm doing angling, my crochet hook in a downward motion. So that it can lay flat so um, i'm not gon na. When i get to the front, i'm not gon na angle it down, because i don't i don't think i need to. But if you want more volume you can angle your crochet hook. Let me show you: if you want more volume, you can angle your crochet hook in a downward motion so that when you flip the band over it'll be more volume here. If you want, but if you don't want too much volume, you can just angle it going back all the way up, so you get to the front so yeah. So maybe, when i get to the front i'll, do a few going angling it down and a few going up so i'll see. But this is what it's looking like so far, so here i'm showing you all how to angle the crochet hook in the downward motion, which will allow you to be able to create more volume. If you would like to have more volume in the front area of the wig, as you can see, this is the side where i did the crochet hook in the front going down and, as you can see, when you pull it back, it creates some volume here. Hope you all can see that when you push it back, you see it creates some sort of volume and when i pull this back as you can see it's pretty flat here, so that's what i mean like. If you want to be more volume in the front, you want to angle your crochet hook in a downward motion, so i don't know i like the way it looks with the volume. So i think i'm going to angle it in a diamond motion in the front. So that's just a little bit of tip a little tip there. If you want to achieve volume in the front of your crochet wig all right, so i'm back and i finally have finishes wig it took me about. I would say 45 minutes the most to do it, maybe a little less um. I actually use a pack and a half, so i think two packs is definitely enough and, like i was telling you guys earlier, like i was telling you earlier. I angled the crochet hook going down in the front to create volume, so that's how it turned out. So what i'm going to do now is i'm going to go ahead and style it and then i'll, come and show you all how it looks once i finish. Styling and shaping it and i'm just going to be using some water, and this is what i use on synthetic hair. So that's what i'm going to be using and i'm going to go ahead and shape it and then i'll come back and show you how it looks on and give you my thoughts and opinions on the cap and everything. If you want to make it look more natural here, you could definitely tease the hair a little bit. This is actually a teasing comb that i'm using and just kind of, and it kind of makes it look more natural see, could also use a fine toothed comb. See this look more natural in the front area. You'Ll also use a brush. If you want as well to you, know, tease it further and make it look really really natural, but i'm not going to do that right now, all right, i'm back so i went ahead and just kind of just took a rubber band and just pulled my hair. All the way back and put put it in a rubber band, a ponytail whatever have you twisted it up and just kind of tucked it under so that i can go ahead and put the headband wig on. So i'm going to be using this i'm using a wig cap, i'm just going to put a wig cap on and then i do have some style factor edge control here, i'm not showing it right. Okay, this is the one that is for thick and coarse hair. Just in case you were wondering which one this is so i'm going to go ahead and just put this recap on and smooth my edges down. So, as you can see, has slicked down the edges. I just use a little bit of water and then the style factor edge booster and a little edge brush, and i just first i put the cap on then i smooth the edges down and i just take a rat tail comb and just kind of like you Know once i brush it up, i just tuck it underneath the cap using the tail part of the comb. So that's pretty much what i did so now, i'm going to go ahead and take this off the mannequin head. So, as you can see sorry for the noise kids in the background um, as you can see, i have styled and cut it. So this is what it looks like and now i'm gon na go ahead and put it on all right. I'M trying to be quick. Y'All because my camera battery is almost empty, so all right, i'm gon na go ahead and put the wig on so okay, so i got the wig on now i'm going to go ahead and use the adjustable straps. So, just for the record, this is my first time putting on a headband wig. So forgive me if i look like i'm struggling to put it on, but i'm not okay, so i believe i've got it on wait. Y'All got ta. Bury me all right. Let me see how to do this. Okay, all right! I got ta, give me one. Second, all right, let me try this again. Okay, so i put the combs in and the only thing with a headband wig is the velcro often gets stuck on the hair. A lot of times so if you can try to push the hair out of the way or maybe have something that you can kind of hold it up with, that would be one of my suggestions. I can't say i know where clip is right now, so i'm just trying to tuck the hair the best i can all right, y'all all right. Let me see okay, so for this one i don't think you're supposed to fold the headband back. So the way it looks like it's designed is that you just put it on i'm just going to use these combs for now and then you fasten it with the elastic, and i will admit this feels like it's very big head friendly. So you know okay, so i fastened it down with the elastic okay all right, so i think i got it on securely and nicely and for me, i'm probably going to cut this wig down a little bit more. I just wanted to include that. Actually, i would cap for quite some hours after i put it on, and the only issue that i felt like i had was that the combs were actually pressing on my head. So they were a bit uncomfortable, but you can't put the headband wig on without using the combs, because the material in the front is a bit on the slippery side. So you actually do need to use the combs. So that's just something to kind of keep in mind, but if your person doesn't mind combs on a wig and you feel like they're comfortable for you, then i would definitely suggest that this is a great option for someone who wants to make their own headband wig. Using this crochet cap, i have a gray one here and i also have this leopard print, one which i think i want to use because i actually like this one. So i'm going to use the leopard print one and i'll definitely put a link in the description box. That'S why i purchase everything, including the cap, the um um, oh wow, okay, i guess it's kind of fits like i don't know a turban style cat. Maybe i'm not really sure now, oh, my goodness, y'all, i'm so sorry, i'm probably looking ridiculous on camera right now. All right! Maybe i'm use this one here. The gray one seems a little more straightforward yeah. This one looks a bit more straightforward, so it has like little jewels on it all right. I finally got it on. This is what it's looking like so overall, i think it looks really nice i like to wear my part on the left side, all right. So this is how it looks obviously, like i said, i'm going to probably cut it down. It'S a little bit shorter, but i like it looks nice, so this was a very quick and easy and believe it or not an affordable hairstyle. So let me just show you all the back, so i think this is a great option so, like i said, the cap was about eight dollars, um the hair - i don't know if it's like six or seven dollars, i'm not really sure but i'll put a link In the description box as to where i purchased it and also um, i'm sure a lot of you have seen headbands online that you can buy so whether it's in your beauty supply store or offline, so yeah. So let me know what you guys think of this video. I really like the crochet cap. I felt like it was very convenient and it does cut down on time of having to sew the band on yourself and then sew the velcro on. So you know if you want something, that's quick and easy, and you want to make it yourself. I think this is definitely a great option, so um yeah, so i like it and um. You know, let me know what you all think and i do have some new headbands that i recently made so definitely check out my website, this kinky creations.com and um yeah. So thank you all for watching. I hope you will enjoy this video and see you all in the next one.
Comments
ShayShante’: This is really cute. I’m so glad you did this , I’m definitely gonna do this
Cejay5: Wow, I’m def going to be looking for the new cap , Thanks for showing all the updates!
Yvonne Binford: Thank you for your video! I saw the cap and wondered how it looked. ❤️❤️
Lou Wren: Yay for Lynn!!! The wig is beautiful and I will be checking for the new wig cap.
mayose omosa: Absolutely beautiful. Thanks for this video
Dorrett Clarke: You've done a great job.
Darnella Johnson: Cute!!! Only two packs of hair!! I think I can do this one and it won’t take up too much time. Great job!!!
Becky Akpomiemie: I love the messy part of the video ..... it's what we go through in reality ....lol.....you did a great job
Gloria kitty: Wow you do such good work on the wig. I really appreciate how you take your time example hair. Thank you so much.
Daze wit Debbie: You did an amazing job with wig.. it helps me alot.
Ronni j: Love this i just got some of these soo convenient
Yolanda Stanford: Beautiful job!!!!
Purplebutterfly: Lovely job! Really appreciate you sharing this. ♥
Cheryl Stewart: This hair is lovely. New subscriber here. Love your videos.
Crissy Values: How long did it take you to do ? It looks nice
Katoya Winston: Hi Lynn! You did a great job on this wig! I just subscribed to your channel. What crochet wig cap would you suggest if I want to make a butterfly loc wig?
Bee Victorious: Awesome!
Tonya Morrison LadyBugTLuv: Very good job and it looks good short too
Kyla G: The beauty supply store be hip to what we doing. great video btw.
Tashae Clarke-Williams: This is beautiful
Natalya Gabay: This was very educational for me.
Dani Tureud: Hey Lynn ooo I can't wait to see it! It's beautiful It looks good on you guuurrrrl, the struggle gurl. Do you have a wig grip? That would help hold it in place without having to use the combs. I like how you cut it to fit your face. And I lved that you put it on! I would love to see more videos of your wearing your wigs or styling your hair!!!! Thanks for your vid!
Angella Reittie: Beautiful
Latoya King: Hi lynn am loving this hair how much pck of hair you use for this style
Laura Baillum: very nice
Chioma Nwanwuna: Hair so nice Where can I get the hair and how much
ladynefertitibk: Pretty
alex parry: What was the name of the foam in the yellow bottle I couldn't see it thanks.
virtuousmama: And i just bought a wig for $150
alex parry: I clicked so fast.
Dimples Johnson: Your hair is really thick so you need to plot them in
Vanessa Trotter:
Mimi Keel: The link to your website does not work.
eyesee you: Everything is sold out.