How I Cut & Style My Synthetic Lace Front Wig! (Foxwigs)
- Posted on 02 July, 2019
- Lace Front Wig
- By Anonymous
Please subscribe and turn that post notification bell on so you don’t miss out on any of my next videos!
Also follow me on
IG: @cfandino
Twitter: @fandinocynthia
Deets:
Wig by IG: @foxwigs
Discount code “CYNTHIA” for 30% off store wide
Products used:
Got2B styling spiking glue
Got2b styling gel.
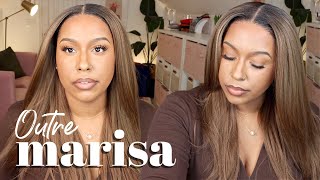
Hi guys welcome back to my channel so for today's video, I'm gon na be showing you guys how I cut style and lay my edges till you guys can see if you guys want to see how I did that just keep on watching and I'm also gon Na be giving you guys a tip on how I remove any shine from the synthetic wigs, because, as synthetic wigs usually come with a shine to it, and it look just looks like very fake plastic and super shiny. And if you guys want to know where I got, my wig from this wig was actually sent to me from a brand called foxy wigs and I will leave it in the description below and I also have a discount code. If you guys are interested in it and purchasing but yeah, so that's about it and I'm just gon na jump right into it. If you guys would like to see how I didn't just keep on watching, so this is how the packaging looks. This is how they send it to me, and it comes to this little pretty gold bag, so you guys can get kind of an idea of how it looks. This is how the we take. It'S not really quick, just put this aside, so this is how the wig looks super beautiful, very orange, orange in red. I guess you could say, and so for today's video, what we're gon na be doing is we're actually gon na be cutting all along this area. Just to get rid of all of this excess lace right here, so to begin, you want to grab a pair of scissors this. These are my pair of scissors that I'm going to be working with today. All you want to do is cut right down the middle. Just like that, okay guys, so I decided not to use those scissors that I had before, because the scissors weren't cutting and those were the only scissors I had so I'm just gon na - have to go ahead and use these little eyebrows scissors that I have. This is what I just used to cut my eyebrows, but um yeah, so just bear with me. So what I'm gon na do is go ahead and just cut right down the middle. Just like that, and as you can see, I don't know if you can tell, but you want to cut as close as you can to the line. But you don't want to get to the hairs, and this is a little bit difficult because there are little like single hairs right along this hairline area right here. So you just want to be careful. You don't cut those and after you've cut down in the middle. You want to just turn it to the side, and then you want to go ahead and cut very close to that line. Just like that. For this part, I really don't mind cutting the hairs off a little bit, because this is the part that lays right behind my ear area, and this wig is actually a little bit big and it kind of goes over my ears. So I'm gon na go back and customize this and end up cutting off like a lot of hair here, just so that my ear can kind of go around the hair. We really want my ear to kind of just pop out to make this look as natural as possible. So for this part I'm not really worrying about being too careful you all right. It looks very choppy here in this side, so I'm just gon na go ahead and fix that really quick and make it look clean, I'm just using the scissors and kind of just chopping away, just like that. Okay guys, so I'm done cutting the way. Now I'm just gon na go right ahead and apply the wig on my head, so I can show you guys how I customized my little baby hairs. Okay, so my hair is a hot mess right now, but who cares? Because I'm gon na be applying this bald cap, it is called a wig cap that also came with a package as well. Now, after you've applied the wig cap, you want to go in with some glue. I'M gon na be using. They got to be glued styling spiking glue, which is this glue right here and I'm just gon na just add a little bit of my finger not too much. This little bit goes a long way. You don't want it to be too wet, because you wanted to kind of just be tackled and dry quickly. I'M just going to apply that all around all right and now after I've applied the glue just to help dry it up a little quicker. I'M gon na go in with a blow dryer. Okay, after you're done drying the cap. You want to go ahead and apply the way, and then you just want to put it on from the back to the front, make sure it's centered and then you want to drag the back down there. You go now it's in its place and then you can go ahead and adjust the front by pulling it a little bit more forward. You want to kind of get the hairs out, so you want to get your finger and just take all the hairs out. That kind of got in there - okay, and I personally like to censor mine to the side, so it can look like it has kind of like the hair coming from this from this side. So I'm just kind of dragging it to that one side, just like that and then just laid out alright. Now, as you can see, the wig here is kind of a little bit big and kind of goes over my ear. So if this happens to you as well, you want to go ahead and cut around the ear part. So it's okay! If you cut the hairs, I'm just gon na go ahead, and just so, as you can see, I kind of like cut it right around the ear, because I want the ear to come out there. You go so now that piece is gone. So that's! Okay! If this happens, that's totally okay, you want to be able to have that space for your ear to kind of just come out. You want this to be as natural as possible wait, so this side is actually good yeah. This is actually good. I don't need to do that on that side. The way, actually it's pretty good. It fits good. It'S pretty good now that I kind of have that hairline. That looks like my skin tone, I'm going to just drag it and then what we want to do now is we want to glue the wig and make sure it's secured, so we're gon na do is we're gon na go on back in with you got to Beat spiking glue and we're just going to apply a little bit of that underneath, along underneath of the wig, so we're going to just kind of just lift it and just apply again over that area and I'm gon na go in with the blow-dryer once again. Just to make sure I can get a little bit dry before sticking it on alright guys. So now that I'm done applying the wig and really sticking the wig on there. Now I'm gon na go right ahead and show you guys how I customized my little baby hairs and how I lay my edges. So to begin, I'm going to be using this brush, you can get on Amazon and it's too late, your edges. So it comes with a little comb here, so you can kind of pull back a little baby air and it comes with a little tube brush and to just brush the hairs out. So to begin, I'm just gon na go ahead and just pull back a little bit of my hair, just like this and just kind of take out as much as I want. I'M gon na take a little bit of it here so now. For this side, this is about all the hair that I'm going to be using as like my baby hair. So it looks a little bit like that, as you can see. So when I'm cutting these little baby hairs, I like to just cut directly across like that, because it's going to be too perfect. So what I like to do is I kind of like to go like this and make it kind of rugged. So I just kind of go up and down up and down up and down just so that it doesn't give too much of a perfect cut up and down up and down up and down up and down up and down. Just like that. So, as you can see, it's not like this perfect, like line and that's what I don't want that I wanted to look just like if it wasn't baby hairs. I want to look as legit as possible and now after you're done with that, you want to go in with the ultra glued invisible, styling gel, which is this one right here and this one's more of like a gel formula, the other ones. More of like a glue formula, so I'm just getting a little bit of that in my hand, and then I'm just gon na apply it on top of the baby ears. Just like that, and then going back in with the brush, I'm just going to just comb them out, and then you want to use this end to just drag it alright, guys! So now that I'm done with that, I want to go ahead and do this side now. I'M just gon na go ahead and flip the hair to this side. So now that I've got the hairs that I want to come, I'm going to be cutting these hairs right here and right now, I'm just gon na go ahead and apply the glue right on the baby hairs. Just like that good I'm going with the toothbrush. Should I get downward and then goes to the side, pull it to the side, just like that, and then you can go ahead and use the comb side to just kind of like edge it up right, like you know how you can kind of get like that. Edgy effect at the very end using the comb, okay guys. So this is a final look and before I finish, I just want to show you guys how I remove this shine, because you guys can't see there's a lot of like shine here. They kind of make the wig look unreal. So what I like to do to kind of just get rid of that shine. Am I use a powder. You can use a baby powder, but at the moment I don't have baby powder, so I'm gon na go ahead and use my chest since setting powder, which is like for my makeup and I'm just gon na go ahead and use a little bit of that. Setting powder I get a little brush and then I'm just gon na go and just tap it all along the area's worth, where it's like shiny, alright guys. So that is about it for this video. Thank you guys so much for watching and don't forget to Like subscribe hit that notification bow. So you guys don't miss my next videos and I'll see you guys next time bye, guys
Comments
Paris Dixon: This is the exact wig I was wanting to buy so glad I found a tutorial on it
foxwigs: Thanks for your amazing video, love it so much!!! you're so gorgeous in this wig.:)
Gabriela Castro: this is the best wig video ive ever watched
vampvixen420: This videos is so underrated
Lioness Beauty: I want you to do my wigs for me. They look perfect.