*Must Have* Wet N Wavy Install For The Winter Ft Tinashe Hair
- Posted on 26 December, 2022
- Lace Front Wig
- By Anonymous
Hi loves! I hope everyone had a Merry Christmas. I'm grateful for each and every one of you! xo
●▬▬▬▬▬▬※ Tinashe Hair ※▬▬▬▬▬▬●
Hair info: HD 5x5 Deep Wave Closure Wig 24 Inch
The Same Hair in The Video:http://bit.ly/3GPA6eo
※ Tinashe Hair Website➤http://bit.ly/3EJ2Nab
※ Coupon Code"TS" to Save extra 18% Off
※ Buy Now, Pay Later with PayPal & Klarna.
Join in FB Group, Win Free Hair➤ https://bit.ly/3cZdiMD
Invisible HD Lace Wigs➤http://bit.ly/3u6FkLi
Summer Friendly Glueless Lace Wig➤http://bit.ly/3gGC8mp
2022 Trendy Colorful Wigs➤http://bit.ly/3F8xyXy
#Tinashehair #undetectablelace #lacefrontwig
Instagram @tinashehair: http://bit.ly/2Isud9X
Facebook @Tinashe Hair: http://bit.ly/34FxUAm
Tiktok @Tinashe_Hair: https://bit.ly/3zeeRPs
WhatsApp: +86 16649781957 Wholesale: +86 17537405381
Email: [email protected]
_ _ _ _ _ _ _ _ _ _ _ _ _ _ _ _ _ _ _ _ _ _ _ _ _
B U S I N E S S I N Q U I R I E S
For product review or business opportunities, please email → [email protected]
_ _ _ _ _ _ _ _ _ _ _ _ _ _ _ _ _ _ _ _ _ _ _ _ _
S O C I A L M E D I A
► Facebook http://www.facebook.com/makeupd0ll
► Instagram http://instagram.com/makeupd0ll
► Twitter http://twitter.com/makeupd0ll
► Tik Tok https://www.tiktok.com/@makeupd0ll
_ _ _ _ _ _ _ _ _ _ _ _ _ _ _ _ _ _ _ _ _ _ _ _ _
Intro 0:00 - 0:49
Wig Details 0:50 - 1:19
Wig Install 1:20 - 3:55
Wig Styling 3:56 - 8:38
Final Look + Outro 8:39 - 9:14
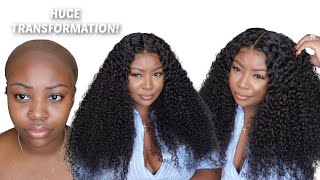
Even if you're asking cause, I do what I do and it's time for something new yeah, hi dolls and gents, I'm back with a new video on this gorgeous hair right here I want to give a big thank you to Tanashi here for sponsoring today's video. This is their deep wave. 24 inch, 5x5 HD lace, closure, wig she's super gorgeous y'all. I cannot wait to share how I installed this wig, but if you have not already subscribed to my YouTube channel, go ahead and click that subscribe button down below thumbs up this video, if you haven't done so already and let's get into this wig install so the Wig arrived in this gorgeous light pink satin bag. It also came with bobby pins, a headband straw, comb, wig cap satin cap wig clips Edge brush and mink. Eyelashes here is the natural texture of the hair after co-washing without any product and here's the inside of the cap. It comes with three wig Combs adjustable straps and it has HD lace and let's go ahead and throw the wig on our head. I'M going to make sure it's situated in the middle of my head so that that lace lines up perfectly next, I'm going to go ahead and clip away the hair so that when I lay the lace, it's not in the way. Next, I'm going to use an eyebrow razor to cut the lace off of this wig, and this is just to ensure that it gives a jagged edge. You can also use scissors, but when I use scissors I do a back and forth motion. So this kind of eliminates it because it creates that natural jacket lace for the hairline, so it doesn't look straight across and unnatural. Next, I'm going to use the Ben Wonder, lace, spray and the red can today, and this is a little bit more hold than the yellow can that I typically use - and I am just gon na - do one line across it gives me great hold. So I don't have to do several layers, but I only wear my wigs for like two to three days max a lot of the times I do like to take it off overnight. That'S just what works for me, but this could definitely get you a couple days where, if you don't sweat a lot next, I'm going to pull down the lace and make sure it's lined up perfectly with the spray and then I'm gon na push it in with My fingers first, this is just to make sure that there's no extra spray anywhere on my forehead, I'm just filling for that lace, and now I'm gon na take the back of a rat tail comb and I'm gon na push down the lace right where it meets. My forehead so that it looks nice and flush, so I typically do not do this. I normally tint my lace, but I need to order some more so we're gon na fake it. We'Re gon na take a little bit of powder and apply it to the lace, and this is just so it Blends in more seamlessly with my skin tone. So now it's time for that final melt. This is how I get all of my lace to melt into my skin flawlessly. I am going to pin up my hair and get it out the way and then I'm going to take my elastic band and apply it as tight as I can without giving me a headache - and I only wear this for about 10 to 15 minutes and it Literally melts the lace into my skin every time you can do this with a blow dryer or sit underneath the dryer, but I don't think it's necessary. So it's been about 15 minutes. Let'S go ahead and take the elastic band off. Your lace should be nice and melted. Oh looks so much better. I love it y'all! Yes, whoever came up with this method is literally a freaking genius like who would have thought anyways. Let'S go ahead and do a middle parting. I'Ve been a sucker for a middle parting lately, so this is a 5x5 HD closure, so you can go pretty far back, so I'm going as far back as I can before. I see tracks and I definitely wanted to do a little bit of baby hairs with this look just light baby hairs, so I'm pulling out a little bit of hairs in the front, not as many as I usually do just a little bit uh. I don't think that baby hairs are super necessary with this particular wig, but I'm just twisting the hair to get it out the way I just like the way that it looks especially with like wavy and curly textured hair. I love baby hairs with it. I don't care if baby hairs go out of style, but I think it's also good for you to have options. So, if you don't like baby hairs, you could definitely wrap this wig without it. So now that the baby hairs are out the way I'm gon na use a little bit of water mixed with leave-in conditioner. This is my Kinky Curly knot. Today I use this on my natural hair, as well as any wavy or curly texture, wigs that I have, and this really helps to refresh the curls and pop in and it leaves a light light hold. It doesn't leave the hair, crunchy or anything. It just defines the hair and kind of gives it that wet and wavy look. So you have to be a little careful with deep wave textures, because if you've just used a brush literally all the curls are going to Clump together. I'M not sure why that is, but I like to go in with the brush first and then I will finger comb later, and that is key if you do not want your deep wave curls to end up clumping on top of one another, because I don't like That look some of you may like that. Look, but I like a more defined curl like wet and wavy Vibe when I wear this kind of texture. So I'm using a little bit of mousse right now and I'm running it over the top of my hair. Just to make it more flat and seamless and then now I'm going through my hair raking the product through and I'm finger combing the curls just to give it that nice defined texture that I was talking about and I'm doing the exact same thing. On the other side of my head, I sped it up just because you don't need to see me doing the same thing like twice in a row, but just so you could get the whole vibe I'm going in with my brush. Then I finger comb and then I use the mousse and I always use the water mixture with leave-in. It gives me a really nice definition to literally any wavy or curly texture that I wear and then the mousse just adds to defining that texture, as well as laying the top of my wig down, because I typically use a hot comb. But I don't do that. On my wavy or curly textured wigs, so now it's time to get those baby hairs in order, I'm going to go ahead and take my eyebrow razor again and I'm just going to jaggedly cut these baby hairs. That way, I get a really nice texture and I, like them kind of short and wispy, like I feel like it, gives a more natural look. I mean baby hair is like this. Don'T look natural, but I just like the way that it looks to be honest. So, yes, I am using a toothbrush. I really like the way that I soft toothbrush does the baby hairs as opposed to an actual Edge brush, because the bristles on the brush are a little bit more hard, and I don't like that. I, like my brush to be soft. When I do the baby hairs, I don't know, maybe that's just me if you're the same way, let me know in the comments down below if you don't like baby hairs, you're, probably like what the hell are you talking about girl, this isn't necessary either, but I Wanted to run a little bit of concealer down my parting, just to accentuate that area, a little bit more and give me a more defined parting. So here is the finished. Look after allowing the wig to air dry for about an hour, it's about 80 percent dry right now, y'all, so I am loving how fluffy be and Define these curls are. If you enjoyed this video, please share it with all your friends that help so much and be sure to like this video I've been going for consistency lately. So if you missed any of my latest videos, definitely click the box right here and I will catch y'all in my next one. Bye,

Comments
Riceebear: GORG per usual, Keisha!
Tia Hardy: You Look" Gorgeous!! Merry Christmas" Good Work" on the Styling" Luv IT!
Denise Carter: Gorgeous wig, it looks really nice on you!!
Felita Dexter: Beautiful beautiful as always thank you for this tutorial
Youngblood Gang: I need this wig for my birthday coming up soon. Yaasss the curls are giving natural mixed hottie❤️☺️
Jumoke A: Beautiful as usual ❤️
The Makeup Muva: Looks so good!
Trimatize Beauty: Such a beauty
Rhonda Baker: I’m lovin the consistency!!!
MyFelicia1999: Looks really good
kimmy1984: Cute!!!
Linda Kitson: Love it
music& makeuplover: Super cute
Shaynaj4: Did you post this make up look??? ❤
HouseofHenley: