Detailed Install For Beginners ! Ft Premium Lace Wigs ❣️
- Posted on 12 June, 2020
- Lace Front Wig
- By Anonymous
How to install lace front wig, super detailed ! If you have any questions or suggestions on what I do next, comment below !!
HAIR DETAILS:
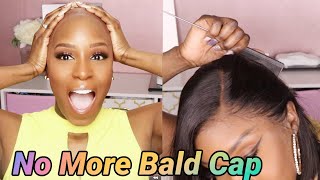
I’m wearing Brazilian loose wave 13x6 pre-plucked
Length: 20 inch
Lace: light brown
Link to hair: https://www.premiumlacewig.com/Brazili...
SOCIAL MEDIA:
follow me on Instagram
@ivmray
BUSINESS INQUIRES:
Hello, welcome to my channel. My name is raven um. I just started here so i'm very new, but i wanted to give you all the specs on this hair before i let y'all see the video on how i installed it, and everything like that um. This hair is from premium lace, wigs and i got a 13x6 loose wave, 20 inches and um i'm gon na start with the pros first, because you know good is better but um. The pros is that the hair was super soft right off the package, no foul smell, no anything like that um, the lace was really good. You know, of course, i had any like bleaching and things like that. Um became light brown, but it was. It was pretty good, it bleached, really good and things like that um. It wasn't too thick like on some wigs. I don't really like that, but um it was. It was overall really good, hair and plus the curl pattern and its natural state. Oh my god. It'S so pretty like it's like the prettiest loose wave that i've ever had before and not to mention the price was very, very, very affordable, very affordable. So i was very happy about that and the shipping it didn't take too long either it was only. I think. I think about like four or five days so that wasn't bad considering you know everything was going on like the coronavirus and stuff like that. So i'm very you know pleased with this week very pleased and it could also, you know, hold a whole curl, it's good. So my curls have stayed in and stuff like that, um. The only con that i have is that the shedding i just it's not too bad. I guess you know, especially for the price that i paid for it um the shutting is not bad at all. I guess not bad at all for the price, but if it didn't shed this much i mean i would like it better, but i guess i can't really complain like i said, because the price wasn't. You know that bad but um. I don't really have any complaints about this week. Honestly, i can't honestly recommend it um to anyone really. I wouldn't recommend it for like a super long time wear, but i think it will last you, like. You know a good little minute so and you know, plus they give you like a little little cute stuff, like you know like this one fanny pack and like maybe like a wig cap and, like you know, an elastic band and a comb and stuff in the Box and stuff like that, so that was real, cute um but yeah. That'S all i have to say about i'm gon na this y'all get into the video on how i install this and how i got to like this and uh. Do me a favor and like comment and subscribe to my channel, and i will see y'all next time - okay, so here i'm just putting on my cap and i'm about to cut two holes by the ears and pop them through a lot of um people and youtubers. Have done this technique and it works okay, so here i will be adding on my first layer of got to be glue, free spray um just around my hairline and be careful y'all cuz. It is a little messy, as you will see, um, then in a little bit i will blow dry that until it's completely dry and go ahead and add on my second layer, okay and as you will see me do right here on my ear test with my Comb um, sometimes those are a little hard to you - know, get stuck down right there, so i just go ahead and press my comb against it. While i am blow drying just to ensure that the tabs, you know dry properly to the side of my hairline okay, so now, i'm applying the second layer, like i said before, and i'm just gon na blow dry that until it's completely dry now that that is Completely dry, i will be taking my ruby kisses, pressed powder that i got from my local beauty supply store in the color mocha, and i will be applying that all over the top of my cap, where my parting space will be um. You could try to get a color as close as you can to your skin color or you know exactly mine, don't really match for real, but it's cool. I will be taking my scissors now and cutting by the ear tabs and also up by the middle, don't mind my face because my eyebrows smeared a little bit but when you are cutting around your hairline, please please take your time and be careful because you do Not want to cut off your edges girl, we need our edges, so please do not cut them off and for the little you know, parts that are rolling up or the side tabs that might be coming up. I'M about to show y'all how to lay those back down, so it can be as flat as possible. Now you will be seeing me, take my got to be glue spray with my blow dryer and i will spray spray around the perimeter and as it's blow drying and getting sticky, i would be just flattening it down with the tail of my comb. As you can see - and you should just do that until the edges - and you know around, it - is completely dry after you are done with that step, you could take um a pad with alcohol on it and just wipe. You know the perimeter around the cap and get off all the excess dirt and makeup. This is the wig um. This is just after i had washed her and she's been sitting there for a couple days, but that's the natural curl pattern after it is dry here. I'M showing you that there are three combs two on the side and one in the back for extra security, and i did go ahead and put some foundation as well on my lace um, even though i did bleach it now, i'm just parting, the hair off on The sides, so i can cut off the tabs by my ears, so it can fit properly. You will see me do that on both sides, since i like to glue my wig down in sections, because that helps me out, i just go ahead and cut three sections out of the lace, and now you will see me use my eyebrow pencil to use it As a mark, where my glue should stop with this install, i will be using extra waterproof, wig lace glue. I would just be putting dots around my hairline and make sure it's kind of like a thin layer, and i will be spreading that out and evening it out with the tail of my comb, and i will take my blow dryer and have that dry. All the way clear it needs to be all the way clear. In order for you to apply your second layer, and when i apply my second layer, i will be doing the same method on all three sides. You now that my second layer is on. I will be blow drying it until it gets tacky um. You could check it with the you know, your comb. I wouldn't recommend using your finger because your fingers have oil and stuff on it. So once that is tacky, i will go ahead and lay my lace in and then with my comb, i'm just going to brush it back to make sure that my lace really melts into the glue, and you will see me do that after i melt in my Lace with the comb, you will see me take the blow dryer just to ensure that it is dry. This glue has a tendency of still being tacky um, even after you blow dry it, and here i am just repeating the process like i said: do the dots go ahead and even it out with your comb and blow dry, the first layer says clear and add On your second layer until it is tacky again, you will see me take my comb and melt in my lace with the blow dryer and mind you. I am using cool temp on the blow dryer night heat cool tint. Now, i'm just using my eyebrow razor to cut the excess lace off. I like using this better than scissors, because it just gives me a more natural jagged edge than using the scissors, and, yes, i already went ahead and glued down the other side. I didn't want to make the video too long. I just dropped the helicopter myself, but with the parts of the lace that um do not get glued down, i would just be taking a smidget of glue and just putting those back down, and you will see me blow dry them until it is dry you you Will be seeing me take dumber, but now that that step is over next, you will be seeing me part out the hair. Then i'm going to make my baby hair and as well as you will be seeing me, go ahead and go back in and pluck some more hair um i did plug before. I put it on my head, but i feel like i have a better visual of what my hairline and what everything looks like when it's actually on my head. Hmm before i even go back in plucking, i just took the elastic band. They provided and sat there under the blow dryer for about five more minutes. I cannot stress this enough when you are plucking, please do not stay in one place repeatedly move around just to avoid having bald spots in your lace, front or frontal or closure um. So for my baby hairs, you will see me go in and trim them with scissors. First then, i go in with my eyebrow razor and cut them. As short as my real baby hairs would be, then i go ahead and pluck them to be as thin as real baby hairs, because i don't really like thick baby hairs. I'M going to take my iso plus foam wrap as well as my got to be glued gel um with the foam. I just go ahead and just map out how i want my baby hairs to be, and then, with the got to be glued gel. I actually go ahead and put that on there, so they stay, i feel like they don't really stay that well with the phone wrap um. I went ahead and wet the hair. Now, i'm just putting on some foundation to the hairline just to make it look a little bit more natural. This is pretty much my finished product. That is all for my video thanks for watching, don't forget to like comment and subscribe.


Comments
Dell Thompson: She is so pretty!!
Premium Lace Wig: beautiful ~~~~~~
invictusmaneo: What density