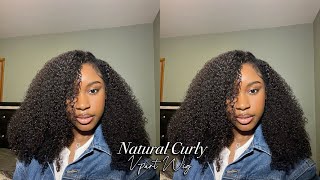
Tutorial: V/ U Part Wig Ft. Aliexpress Hair (Part 2)
- Posted on 05 March, 2016
- T Part Wig
- By Anonymous
READ DESCRIPTION for DETAILS!
Watch in 1080p HD!
Inquiry Contact: [email protected]
Hey Beauties!!!!
Welcome back to my channel..
This is how I get my wigs to lay flat and secure. The hair I am using is from Aliexpress.com by the company Ross Pretty.
LINK to this hair's INTITIAL REVIEW: https://www.youtube.com/watch?v=2s5BS...
LINK to purchase this hair: http://www.aliexpress.com/item/Queen-H...
Products Used:
-Styrofoam Mannequin Head
- Scissors
-Multiple Curved Needles
-Thread
-Sewing Pins
-Weaving Cap
***All Products can be found at local beauty supply stores***
In that case, I hope you all ENJOY! :)
Thanks For Watching!!!
..... don't forget to Like, Comment & SUBSCRIBE!
Inquiry Contact: [email protected]
INSTAGRAM: Chrissycous
TWITTER: Chrissycous
SNAPCHAT: Chrissycous
My life, so this is all the materials you will need check the description box below for all the products and where you can purchase them at and of course you need your thread needle Styrofoam head, and these are just some sewing pins to sew down your weaving Cap - and this is the weaving cap, I prefer to use it's the best and it's also adjustable. So if it's too big, you can always tighten it, and then I just pre thread all of my needles. Just in case, one breaks or one runs low on thread, and this is what I'm talking about. When I mean you will need those pins to pin down your cap and just make sure it's centered right on the styrofoam head, so your measurements on your side, part or middle part, will be just right. Okay, so what you want to do is get your needle and stick it in the ends of the wealth, so you're going to stick it through the wealth not under the hair. Stick it through the well and make sure you pull it and then I don't like to start sewing my hair at the bottom. Like the nape kitchen area, I like to do it kind of on a slant. So I start at the ear area and then I'm going to stick it through the cab and through the weft again and just to make sure it's secure. After sticking it through the web, I'm going to wrap, you can see the part, I'm picking up, I'm going to wrap it three times around the needle and pull the thread through and that's going to make sure my hair stays secure on the cab and it will Not go anywhere okay, so, as you can see, the hair is secured on the cap for our base and what you want to do is make sure you do not sew on the elastic band, because the elastic band allows you to loosen the u-part wig and to Tighten it if it's too loose so just make sure to sew above it and not on it, because if you still on it, you won't be able to adjust it. How you want to, and as you can see now, I'm just putting the needle through the cap and sewing it under the weft, I'm not going through the web anymore. It really doesn't make any sense to because of the knot we did in the beginning, and you just want to keep continuing doing that until you reach the other side of your head and before I flip it, I'm going to secure the end just like I did. The first time so I'm going to stick it through the West, wrap the thread three times around the needle and pull it through, and when you see me flip it over I'm going to do the exact same thing. We want to make sure that it lays flat and that it's secure, that's the main goal of a u-part wig to make your lay flat and to be secure because we don't want it to be followed or loose and all that so after I pull that knot, You can see it's secured just like the other side, and what you want to do is flip it over and do the exact same thing and right here, I'm just showing you how I sold above the elastic band. The little brown part is the elastic band. So I'm just showing you how to sew above that and, as you can see here, I'm sticking it through the wealth once again are wrapping the thread three times around the needle and then pulling it through making that knot and all I'm going to do is sew Across the head, just like I did the first time and do that until I get to the other side of the cap and as you can see on the middle part of the cab, I started to run out of thread. So all I did was stick the needle through the weft, just like I did in the beginning and I'm going to get the thread and wrap it around the needle three times pull the needle through the threads and that's going to secure the hair that we previously Sewn and everything so when we get the new thread and needle and continue sewing the hair on everything that we did before, that will be secure and sturdy and it won't be going anywhere, as you can see. Right now and I just continued sewing and, as you can see, I've reached the other side of my head now and what we're going to do is just keep sewing upwards. This is my bang area, the side part of my hair, where the bang will flow. So I just keep sewing upward a little past where I flipped the hair last time, and all we're going to do is just flip that over and continue sewing to the other side. So make sure you secure before you flip. By making the knot, then you can continue sewing to the other side of your head once again. Okay, so, as you can see, I flip the hair and reach the other side once again, so, instead of flipping it and continuing to sew to the other side, I'm going to start creating my bang, so I'm going to just keep sewing upwards until I've kind of Reached where I want more hair to be than the other side - and this is just starting to create my side - part shade and you'll - see how I do that and then we're going to flip it and just continue sewing to the other side. Again you so here. I finished my first or second puzzle, I'm really not sure, but, as you can see, I ran out of hair, but all you want to do now is, if you have red left on the needle. What you want to do is just get your new bundle and just stick the needle through that weft and just continue sewing after you knot it down like we did in the beginning. So you just want to make sure it is secure and just keep continuing to sew. Okay, so I just continue to so back and forward to each side, and then all I'm going to do is keep doing that until I reach the point where I have enough hair on my right side, because my right side is where my bank is not so To make the side part, one side has to have more hair than the other side. So, as you can see, I've reached a point where I had enough hair on the side where my bank isn't going to be, and I'm just creating the shape of the side. Part, and also how much leave out I want, and some people use a marker to create how they want that to be. But I've done this so many times. I could kind of eye it and see how much I want to leave out and the shape that I want, but this is kind of complicated, but I do this because I know it works so after I sew my leave out area out. I leave this space because I just want to make sure it lays flat and that I have the perfect shape and side part. So after I saw the shape of my leave out out, I just go back and fill in the space area and this just makes sure my hair is laying flat - and I don't know if other people do this, but I know I do and it works. For me, so I just keep joining you, don't have to do it, but this is just what I prefer to do and I'm just gon na keep doing the same thing. I'Ve always been doing making sure that I wrap the thread around the needle pulling it through and making that knot to make sure it's secure and just continue sewing and back to the front, and I'm just going to keep doing that back and forth back and forth. Until I filled up that space okay, so I finally finished sewing that space up and all I'm doing is putting the needle through the well for the last time and filling the needles through the thread and making that knot to make sure everything is secure. And what I'm gon na do is, after I cut the needle also the thread, I'm going to tie three knots once again, just to make sure everything is extra secure and that my hair is not going anywhere so you're going to see I'm going to cut it And then I'm going to just do three extra ties to make one last knot and we just want to cut off that excess thread. And when you flip that part over you're done with your wig and your part will be laid, your wig will be laid. So now all we're going to do is remove those pins that we're securing our cab and after we do that, we're just going to cut away all of that excess cab that we don't need. So all I'm going to do is cut straight through the middle and that's going to create. Where my leave out is going to be, and also you want to cut the sides and also the back, but make sure you do not cut off the elastic band. And, as you can see, this is my shape. I call it a: u part wig, but it's actually a V part wig, but you know same thing, kind of and just cut this off and then you're ready to sew your hair on, and this is the braiding pattern that I use for this wig. This is also what I do when I use a middle part or even a closure, and it's super simple. I do not know how to braid professionally or anything but to make sure Italy secure and super flat. I just saw the braids onto each other, and this is the only head that I'm leaving out I'm not leaving out anything in the back or the sides or even the front. And after that, I just sold the wig onto the braids and it lays super flat and secure and it just works. For me, this is what I've always been doing and it's the perfect size for my head again. This is the Ross pretty hair that I did an initial review on a couple videos back, so you can check that out in the description below, and I just hope this video helped you all and thank you all so much for watching this tutorial and don't forget To Like comment and subscribe - and I will see you all in my next video


Comments
Evita MontgomeryXO: When I tell you this is THE BEST tutorial that I have watched, I tell you no lies!!! The fact that you took the time to EXPLAIN and SHOW at a speed that I was able to follow speaks volumes. It really shows that you care if we (the viewers) get it or not....and I got it!!! Thank you soooo much dear. I can't wait to go and get my wig supplies... ill be sure to say #ChrissyTaughtMe :) Please keep the great informative videos coming. NewSubbie!!
ANJANEÉ UNIQUE: Here I am in 2021 watching this tutorial again because I made a wig from this video years ago and it lasted me forever! Now it's time for me to make a new one and I so glad that you still allow access to your content, even if it's 4 years old. Thanks Chrissy!
Charlie's 2nd Angel: Best u/v part wig tutorial ever...Love all your videos hun!!! Keep up the great work that you do for us...love it!!!!!!
Anjanee' Oree: Girl, yessss! I've watched tons of wig making videos and so far you've done the best job at explaining and demonstrating how to create the side part so easily.
Aisha-China: OMG now I know why I had such a hard time making my upart wig. I was sewing through the wefts each time instead of under!!! After sewing 3 tracks, I gave up and glued the rest. The hand cramp I got was no joke! Anyways, thank you for this video!!! Now I know what to do next time :)
Ashley Dodd: I've watched tons of U Part Wig videos and BY FAR this is the best one I've seen! Thanks to you I finally feel confident making my wig!!
Ketlucia Boursiquot: Easy and straight to the point. Thanks!
Shawn Plus One: Beautiful on so many levels. I can't wait to make this wig.
A S: Thanks to you I made my first wig and it turned out so good. Thank you so much for this video, you're awesome
Joy Morris Beauty: One of the best tutorials that I've seen! Thank you for sharing and for being so clear in your directions.
Mariah B: You just saved a life! lol I'm soooo thrilled to have watched this video. I've been afraid to make my own wig, because of not having a thorough tutorial, but I was going to wing it either way - but thank you, Chrissy! I'm getting started tonight.
Chanel Oldham: This is the best tutorial I've seen. I'm trying it today and I'll definitely shout you out in my video if it turns out right lol. You made it look so easy!
Krystal Nykole: The BEST tutorial I've seen. Awesome! Can't wait to make my first wig with the help of this video!!! TFS
SimplyKristy: Girlllll, I've watched numerous of U/V-Part videos from Big Name YouTubers and I must admit, yours is the MOST thorough, detailed and easiest to follow. TFS you Rock♡♡
Mi'Kaela Pope: Thank you so much ! I can now make my own wigs without trusting somebody else to make me one. You are the best ! Very detailed and neat. New subbie !
Brooke Love: Love your intro ✨❤️ helped me make my u-part wig !
Keesha Lafaye: Best tutorial ive seen so far!! Going to try and make my own wig for my wedding next month! cant wait!
Mrs.RED'VON 77: love the way u did this v part wig. I am so going to try this came out beautiful.
Akilah Oates: I am so in loveeeee with your videos ! this was so detailed; I really was about to pay someone 150 to make me a wig but after watching this I think I might just make my own ! Lol
Nieci Thomas: Please show a middle part version! This was one of the bests of watched. Easy to follow, clear and informative. New subbie
Nia: Great tutorial girl! I love making upart wigs, they make life so much easier lol
Shannon Watts: new sub... and thank you so much for the neat and detailed tutorial. will be making my first wig today thanks to you.....
Tiara J: OMG !! I tried to do my own wig today and it came out soooo bad I'm so upset at myself I'm really tired of paying someone to do my sew in I really thought I had this one in the bag it looks so easy but it's so hard
Ąndi Marię: You are very talented! I wish I could do that on my baby fine Italian/Native American fro. I make my own clip-ins. Started out gluing tracks in 10 years ago and it pulled to much of my natural hair out so I created my own clips and I never go without..... Love them.
TheGlamCho: Definitely will refer back to this video this weekend when I make my wig! thank you
Lolatography: I rarely ever leave comments but I had to let you know that this is by far the most detailed and easy to understand tutorials I've come across!
gwen27405: After watching over and over again....I think I got it. I love the idea of bringing the weft over then filling it inward also with you folding that part over it gives the illusion of lift in the front. I could never get that part right. I'm going to try this way. Thank you!!!
NiySpace: I've watched this tutorial so many times lol, it's my reference for when I make my own wigs. How do you measure for where you want your part ?
Kathryn Castanares: perfect!! new sub right here! very detailed and wig turned out beautiful!!! you have talent!
Nia LeAnna: Great Tutorial!! Can't wait to Make my wig !
Tiera Harris: damn this is a great tutorial, so detailed from start to finish. Thank you! I'm just seeing this the day after I finished my wig and cut layers in it. Could I take the hair out and resew it this way even though layers are cut? I did the fold over method so I only cut the weft of my last bundle.
CarinaMonroe: Best I've seen by far!! I'll be using this technique!
Kathryn Castanares: perfect!! new sub right here! very detailed and wig turned out beautiful!!! you have talent!
Marissa E: By far one of the best tutorials Ive ever seen! I feel like I can actually do this lol
Kya Howard: I love detailed videos, idc how long. So great job on that girl! Instead of sewing it down, would this wig cap be good for just adding my own clips instead, so I could easily take it on and off? And also, if I had full perimeter leave out, would it be easy to blend my hair to pull the wig into a ponytail, without any large bumps or anything?
Breyana Love: You're awesome! Your videos are so helpful and informative..Thank you!
Breah Taylor: this is the best wig tutorial i have seen, i have never made a wig before and this video gave me the confidence to finally make one. Keep up the good work.
Anita Odede: good job girl, created a similar thing some years back, i had no idea what i was doing by then. it came out not too bad but i soo love this one. have learned more. THANK!
Gemini Peterson: i love this! your technique is so unique. I've never seen anyone do it like this. I'm going to try soon. i want to learn how to make wigs so bad.
A J: Great video!!!! Thanks for posting! I will be making a wig soon. How do you measure your head so that you know the wig will fit?
Natural Since Birth: I just happen to stumble onto this vid, it looks great! I like the technique and I want to master this but I'm confused. Between 11:54 and 12:35, did you cut the weft then place that bundle to create the leave-out area/shape? Also the more/less hair depending on side was confusing as well. TFS!
Dorian Johnson: Awesome video!! One question! Do you use the flip over method to close off the bang area? Or do you cut the wefts and close off the gap with single tracks?
Aliyah lucas: This video was really good like step by step now I can start making mine and did you see the wholeee wig on or just the edges ?
India Spears: I love this style Did you do single wefts or double them?
Kayla: This is the best and most informative u part video ever! Thank you so much. Just to be clear, you cut the weft at the pin in order to make the v for the side part? Then continued filling in the space?
Melkiah Taylor: really helpful, great job. Thanks
nikki82279: Love your videos so far, I'm glad I found your channel ♥♥
Stacy J: I love how you made this wig. I will me making mmy own soon, hope I can follow
Momof3kinkycurley: nice techniques, the unit came out bomb!.
V Cooke: This is a good tutorial for people like me who don't really know how to sew hair. Thanks!
Tationna Hughes: how many bundles did it take you to complete this look ?
Keke1980s: Thank you for sharing! I've learnt from you
Chicaa: You did that girl
_galorenicolebeauty_: Love it❤️❤️
Miracle J: Color was spot on! Good stuff!
Ahyana Dunham: you should do your next video on your wig collection!
Chanell Victoria: would you use the same technique for a middle part u part wig?
VictoriaKLM4: Best u part tutorial I have ever seen!!
Neka Michelle: Trying this method out today. Thank u
Miesha Chandler: Very unique technique! SUBSCRIBED
Arlene Berkeley: New subbie ! Wonderful job !!!
BeYouTiFull_: Great video you slayed that wig honey!!
Jessie George: Pretty ,love it so much
Guest User: Do you put the needle through the weft everytime you end and flip?
PrncessKay: Best hair tutorial on youtube
Jermeyah Beauty: Loved that method you used once you got to the top for your bang, I'm gonna try it.
Niya Cox: Do you use the same method for a middle part?
LadyNise: I contacted the company about the hair that you have and I was told that "the hair that you have isn't sold on their aliexpress store " they claim it came from there other store not on aliexpress! be careful ladies
brandi johnson: The best tutorial.... I am using this today
Sydney S: This looks so good
Hannah Sanders: What colors did you use to dye the hair? My hair is that exact color and I need it to match.
Hadiya Fielding: When you get the chance do you mind making a wig tutorial with a lace closure?
Janae Johnson: What kind of heat protector do you use?
Taylor Stephenson: best wig tutorial I've seen !!
Jade Mesha: Can you wear this as a side part or middle part?
Dejon Phillips: In your last video you disabled the comments and I just wanted to say that your haircut is gorgeous and it suits you
Nadia’a World 🫶🏾: making one next week!!
Cee Jay: Good job Hun! ❤️
Kash'mir Sanders: Can you wear this in the middle as well or no because you created it with a side part?
connie summers: this has to be the best one I've seen so far
Chanell Victoria: AMAZINGGGGGG!!!!!
Laveda Johnson: Can you show how to sew the wig on your head please. Love your videos!
Yezzchozen Chozen4glory: Thx very detailed I learned how to make a wig What color and lengths please is this cap all nylon? Is this style cap sold in Swiss lace or silk and where if you can share. Can it be washed? Can silk mulberry thread be used instead ? Can you bleach this material before sewing in weft or does it come in nude?
Madi 123: at 13:22 when you started back over to fill in the hair did you cut the previous track after sewing it down?
Moca : can you make a video on how you install/sew in your units chrissy? nice tutorial btw.
RACHAEL RENEE: I have a question. How do you add the "Previous Video" Clip to the end or your videos? Anyone ? Thanks XXO Love your channel by the way!
Kourtnei Walker: This is my favorite video!!!
Emorygurl13: If you didn't want to sew the wig on, how would you recommend securing it on your head? Like if I wanted to be able to take it off each day
Brianah Ellis: love the hair!! and i know this is a weird question but what is the name of the song you use for the outro? lol i love how it sounds!
Shawna Ogden: Would this last longer than a regular sew in? Btw amazing jib‼️
J E: Amazing
AllAbouttKayy: this video just saved my life
Courtney: If I rather make this a middle part , rather than a side part, Will I just continue to move further and further up each side ?
Thelovelyjae: How many bundles did u use??
Way2Kay: Very pretty.
Aramist Prazuch: how many bundles were used?
Courtney Foster Beauty and Lifestyle: love the video but loved the quailty even more. what kind of camera are you using? its soo clear. Im looking for a new camera for my videos. thanks!!
Nasay Jones: what happens to the flaps in front of the ear on the cap?
Charmane Jenkins: Do you have any u/v part wigs for sale?
GlamBCosmeticsBeauty: I love this video