How To | Deep Side Part *Synthetic* Wig Install!
- Posted on 17 August, 2022
- T Part Wig
- By Anonymous
WIG LINK: FREETRESS EQUAL WIG Illusion HD Lace Frontal Wig 13X6 HDL-04 (RHFDEEPWIN) https://a.co/d/eP6zWvp
HOW TO: DEEP SIDE PART *SYNTHETIC* WIG INSTALL!
hi everyone! hope you enjoyed this video! Don't forget to like comment and subscribe, and ill keep making content for you guys!
FOLLOW MY OTHER SOCIAL MEDIAS:
INSTAGRAM: https://www.instagram.com/liichanell/
TIKTOK: https://www.tiktok.com/@lichanel?lang=...
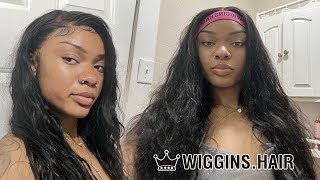
Hey guys and welcome back to my channel okay, okay, today, i'm going to be showing you guys how i got this deep side, part with this 60 dollar synthetic. Yes synthetic wig! I don't know about y'all, but i definitely ate this up stay tuned until the end to see how i achieve this flawless. Look: hi, hello, hello, hello! Do i even have to explain myself you already see that title i'm doing another quick install! I can't help it. I can't help it. It is what it is so today guys gon na attempt to do the deep side. Part wig, install um i've been seeing this for like months. I should really try to do that with one of my synthetic wigs. So that's exactly what we're gon na do. I got this synthetic wig, it's actually one of my old ones that i've actually done a youtube video on. If you guys seen my my flawless synthetic wig install with a 60 dollar wig. This is the 60 dollar wig guys i revamped it. I washed it so it's nice and silky. I didn't flat iron, it or anything just literally blow dried it and it's giving silk already. So i'm really excited for this. So yeah we're just going to go ahead and do what it do, and here is the voiceover alright guys. So what i'm doing here to start off this wig install i'm going to be doing the ball cap method with the wonder, lace, bond, adhesive spray. I don't want to use the got to be glue spray. I just want to use my adhesive spray from wonderlace bond for this wig install, because i noticed that whenever i use the got to be glue spray, it does have like a white cast and it dries. It becomes a bit gooey. But i noticed that with the wonderlace bond adhesive spray, when it actually dries, it hardens really really well and really fast too. So i want to you, know, try it out and plus it doesn't have that white cast. As i was saying about, got to be glue spray, i mean at the end of the day the got2b definitely does its job, but i feel like the wonderlace bond. For me does wonders for my wig installs, so i'm going to be using that for this wig install. But obviously you see me, you see me cutting out the perimeter of my head for the bald cap method. Um, i'm going to you know just really get into the nitty-gritty. Like all those rough edges around the perimeter, i'm snap, i'm snipping them away, making sure that it's as seamless as i can get it and now going in with my got to be glue, i'm going to be gluing around the perimeter to make sure that those rough Edges are smoothed out and just super duper seamless by the time i put on the powder over the bald cap after that glue dry, i'm taking a wet wipe and i'm just going ahead and cleaning up the perimeter of my ball cap. But after that, i'm putting on the ruby kisses powder around my ball cap to make it look seamless, i'm definitely not the best at ball cap methods clearly, but this is the best we're gon na get okay, so yeah. So now we're gon na do yeah. Okay, so, okay, first of all, this is not it's supposed to be in the middle. First of all, do y'all see this lace. I know it's not probably on my head, but do y'all see this lace? Oh, okay, okay, it's getting very much hd, okay, guys! So right here i am going to go ahead and detangle this wig. So the fact that it's synthetic it is more prone to getting tangled much much easier than human hair wig. But i'm going to go ahead and section off the perimeter of this wig. Just to make sure that i have all the baby hairs that i want out of the way, and that will allow me to have an easier process with applying the lace glue onto the lace. Okay, so i'm gon na tell you guys a really, really good tip. If you guys are probably a beginner with wig, installs and you're, just watching this to get some like information and everything um, while i'm drying the lace, i'm getting the ends of my rat tail comb and i'm pressing it down on the lace. What that will do that will help, obviously melt the lace and make sure that it's stuck and it is secure and it's not going anywhere. You know so definitely press down on the ends of your rat tail comb onto your lace. While you are drying it to help it melt so once i applied my silk band for my lace, i'm going to start using this time to go ahead and outline the defined deep part, all right guys. So this is the shocking part for me once i started hot combing, my synthetic wig look at the shine and the silkiness y'all. This genuinely shocked me like. I was like oh okay period because, like my one month, old 60 synthetic wig, i have to revamp it. I have to wash it and everything if you guys want me to make a separate video on how i revamp my synthetic wigs, then i could definitely do that for you guys, okay, so i wanted to put it in normal speed for you guys just so you Guys could have understanding with a curved parting when you want to do this deep side. Part you want to curve the part that you have. So it's not going to be fully straight. You just really want to have that curved lining for your deep side, part. Okay, so this part is pretty self-explanatory: i'm just separating my hair to start detangling and straightening the synthetic wig. So yes, the synthetic wig does take heat um. I believe it takes up to 360 to 400 degrees, fahrenheit um, with the heat so yeah. You could go pretty high with this, but yeah, i'm just straightening it out making sure that it's all smooth all tangle free all right guys. So this is how the hair looks after i straightened it. As you can see, it's very soft, very silky, like i really did my thing with this wig, i'm not gon na lie like, and this material like these fibers of this wig is so so good like y'all just have to have it and i'm not even sponsored By this wig or anything, i'm just putting y'all on game, so let's continue all right guys. So this is the moment of truth. Taking off my silk band, the lace is giving scalp giving hd frontal all right. So i'm very happy with the result and how i melted the lace, but now usually after i take out the band, there's usually like this extra glue on the baby hairs. I take the ends of my edge brush like the comb part and i just kind of like scrape the hair almost, and i run it down like i comb through the baby hairs to make sure that it's not so stiff from the glue. And it's very you know loose and everything so yeah and over here i'm obviously cutting the baby hairs to my desired length. Okay, so this is just a little mishap that i wanted to keep in the video, for you guys see the ear tab isn't fully like stuck on there. I just put some glossy glue and we'll just press that that on that's such an easy fix guys. So if you guys have that going on just got to be blue, let it dry a little bit and it's all good. So i just curled the ends of the baby hairs to make sure that i kind of have that like fluffy look, okay, so, unfortunately i had to do my baby hairs off of camera, because my camera literally died as soon as i started. Okay, so right here is very, very important. Obviously my baby hairs is done, but right here i am taking a little thin layer of the side part and i'm sectioning - that off, because we're gon na actually be cutting that okay. This is what makes the deep side part a deep side part. So we're gon na go ahead and cut it cut, it cut, cut, cut, cut it all right and then we're gon na use. Well, i'm just gon na go ahead and try to map out exactly like how i want it before i even do anything else with it. I'M gon na try to you know, obviously cut it to my desired length, as i am doing so, and i need to get new scissors because i'm clearly struggling all right and now that i have my desired length for it. I'M going to use my got to be glue and i'm going to smooth that out over the baby hairs. Now what i would do if i was to do this again, um what i would do to make it a bit better. Is i wouldn't actually do my baby hairs? First, i would cut the layer of the side part. I would cut the layer of the side part and do my baby hairs with it. So, as you can see, it's overlapping my baby hairs, so i could have smoothed that overlap with my baby hairs. If that makes sense, i hope i'm making sense but um yeah just to make sure that it's like it all, looks very unison. Obviously, it looks great like this like girl. It looks amazing like this, but you know just for further reference like that's something i could have done. That'S something that's a tip that you guys could take away from this video as well just smooth out the overlap of the side, part with your baby hair just to make it all look, unison, i'm very much a perfectionist when it comes to my hair. So that's just something that kind of stood out to me and i wanted to let y'all know about that, but obviously right here, i'm just smoothing it out, smoothing it out and it looks so good guys. This is like my first attempt at a deep side, part, and i really want to get it on camera, for you guys, but yeah like this is giving what it's supposed to have gave. The lace is giving scalp the deep part is giving ocean deep. You know so yeah, okay guys, so this is the final result for my deep side, part synthetic wig install. I hope you guys really enjoyed this video, don't forget to like comment and of course subscribe for more hair videos coming in the near future and yeah. Thank you guys so much for watching and i'll see you guys next time.


Comments
Jaden Greene: I love lili's content so much. Keep up the good work girl❤
suz: Could you put the link of the wig & hair product you used in the video introduction column? I think that would be great
ThebestnoobYT: Jesus is coming soon! Follow Jesus!
Shenairo Amindie: Hi