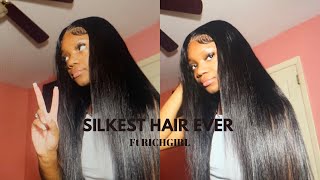
Watch Me Apply This 30 Inch Aliexpress Wig!
- Posted on 11 August, 2021
- T Part Wig
- By Anonymous
Hey Anti-Affiliates/Squad!
Here’s is the final part to this AliExpress 30inch wig series. The next video will be a styling video and a update on how the hair is holding up.
(VIDEO IS NOT SPONSORED)
hair link: https://www.aliexpress.com/store/91042...
*MENTED WEBSITE: AFFILIATE LINK
https://www.mentedcosmetics.com/antoni...
*LASHES!
Antiaffiliatebeauty.com
*TOP 5 FOUNDATION: https://youtu.be/hdfenSeddDM
Their Business inquiry/ sponsorship :
Email: [email protected]
Facebook: ANTIGORGEOUS
Instagram/Twitter : @ANTI_GORGEOUS
Snapchat : ANTIGORGEOUS
IMOVIE
Editing by : ANTIGORGEOUS
Camera : SONY A5100
Lights : 1 RING LIGHT , umbrella light, and a small background light
Intro made by: https://www.instagram.com/wecravemakeu...
#aliexpresswig #30inchaliexpresswig #affordablewig
Oh hi guys and welcome back to my channel, it's anti gorgeous here with another video, as you guys can see by the title, i'm. Finally, installing that 30 inches of hair that you guys saw, i did a unboxing for now. This video will be a voice over. Unfortunately, because it was just a lot going on in my background, so i wanted to get this video out and it's extra late at night, so um, i actually just you, know, went ahead and put the wig on and i'm just going to do a voiceover, but The video is going to be up close when i'm installing the wig, but you guys will still get the point um. I do want to talk a little bit about the hair, but um as you guys can see. I feel like it looks pretty good um pull the hair to the front, so this is the hair. I hope i'm in focus too, but um i basically um crimped the hair. Like i told you, i was going to do an unboxing video um. I did bleach the knot that video is already up, so if you guys have not checked that out, i showed you guys how i bleached and semi customized um the wig. If you guys want to see how i style the hair, you guys can leave some comments below and let me know if you guys would like to see that in a separate video. I just didn't want to make each video super long. So, that's why i did the unboxing and then the customization and then the install, so you guys go ahead and check out those pants videos, but other than that. The hair is really really nice, like i'm so happy with how it looks on my head. It kind of comes off darker than what i thought it was gon na um come off. I don't know you guys. Let me know i feel like it's giving off like a very dark black, not jet black, but it's giving off black to me um. When i look in the camera, that's enough of me babbling, you guys came to see me install this wig, so go right ahead and keep watching the video, okay, so starting off, of course, with some braids or have you want to braid your hair down to make Sure it's flat i'm going to be using the stocking cap and i'm not going to be doing the ball cap method, because this first application i wanted to use a spray so um. I just use this stocking cap and i'm sure you guys the wig and the crimp job that i did. I feel like i didn't do a bad job at all. I'M gon na be using this clip only to kind of like secure the wig, but before i do anything, i'm going to put the wig on my head and make sure i know my placement because you want to see how far the hairline goes down. Some ways come large: some come extra small, so before you commit to spraying or gluing down the wig, you want to kind of just get a gist of how it's going to look on your head. Now, of course, before i lay it down, i'm going to fix that stocking cap, but we're just checking it out. You know seeing where the ear tabs, how far that comes down how much i will have to cut off trying to get a sense of the lace and everything like that. Okay, so moving on to customizing the stocking cap, you want to use a foundation that is close to your skin tone, because of course you don't want any marks of demarcation. So you want to make sure it's like a seamless application. When you put the wig on you, don't want to see like that white extra light line, so just to make sure that we have everything. Looking good, i'm also going to put my foundation on my lace, part really mainly on the middle part, because i'm going to be using um the middle part for this unit and then we're going to cut off the ear tabs. Now i am going to speed this part up um, you do want to be careful and make sure you. Of course you don't cut your ear, but you don't cut too much lace off. So i really didn't go up that far. I kind of just um kept it as close to my ear as possible. Now it was um enough room for me to cut off a little bit more, but i'll probably do that in the next application again cutting off this lace when i get a fresh wig is so like. I don't know intense for me because you really don't want to like cut off too much lace, because it's not going back, so i rather cut off too little than too much okay. So i'm just going to wipe off my makeup, because i did do my makeup for the purpose of this video. I didn't want to come on dry face it, but i'm just going to wipe away the makeup from my hairline when i make a white first and then i'm also gon na go in with some alcohol, on which i did to make sure that um the area Is dry and then i'm gon na be using this got to be spray to kind of glue or use like as an adhesive to you know, lay down my wig um again. I actually prefer using glue to lay down my wigs but um. I wanted to just use the spray first just for this video and then my next application. I will be using glue. I just like glue just lays down and make the the lace seems um seamless, because um, it's just thicker, you know it lays down fatter. This might be a little bit difficult for some people to use a spray if you don't get it to be dry down a little bit before you put the lace down. So i had to do this a couple of times. I'M not gon na lie, but you know we got it done but, like i said glue, definitely let your lace um. It makes it just look better. So again, i'm going to keep spraying the spray and making sure that i'm drying it down and the only thing the downfall with doing it. This way is that you can kind of get like lumps or waves or creases whatever you want to call it in your lace. If you don't get it down good enough um, which i kind of got a little bit, but it wasn't that bad of a job that it was going to deter me from finishing so um. I did keep on this little uh. Actually it's a belt for my clothes because i don't have any like scarves like lace scarves to like tie it down. So i just found anything in my drawer and i just had my edges down. But now i'm going to cut off the lace with an eyebrow razor, because i just feel like it's more precise and you can get jagged lines. I tried to do it with the scissors at first and just was not working. I felt like i was about to um cut too much lace off, so i feel like with a razor you can get as close as possible and cut off the lace and you can see what you're doing. So. That'S what i'm doing right now, um! I did leave a little lace on because again my initial first wig application - i kinda - just i don't know - i'm not gon na say i get lazy, but i try not to take off too much until i'm actually about to put it on the second time and Then i can just go in and cut the extra lace off and stuff like that so um, i do have extra lace on there, but the next install that will be coming off. So i'm using this little um hair. I mean not hair belt. It'S a clothes! Um belt that i'm using as a scarf to tie down my edges and then uh. I just think that i just tied this up for, like an extra 15 minutes, just to ensure that my lace is gon na lay down onto that spray. Um, like i said using a spray, is pretty tricky to make sure your laces um laid down, so i had to do this a couple of times, so this is where we're at right now, and i was kind of pleased with how i was looking. It definitely looks different on camera than it does in person because i feel like the lights are on me and the camera is picking up like that shine, but it actually didn't look like this in person. So, looking back, it's kind of like what so um i did use my foundation brush and i kind of blended that extra lace that i didn't cut off into my skin. As you guys can see it's kind of giving me like. You know a little a better um blend there, so you guys can do that trick at home. If you do leave extra lace on so we're going to create some baby hairs in this unit. I only created two baby hairs because i didn't want to go overboard. Um with the baby hairs this time, but again who's to say the next time i apply this wig, i won't you know, put a couple of more in there, so you just want to cut out like a i'll part out the hair, and then i'm going to Use this slick stick to act as like a extra um hold for like the little flyaways before i hot comb it. Some people use like a little keratin stick, so it does the same job um. This stick is a little bit more on the greasier side. I actually did just buy a curt. What is it a keratin stick? I think i just called it. I did just buy one this weekend, so i am going to try that one out this is the only stick that i've normally used, which works great. It gives your hair a little shine and it lays down the hair and prevents fly away. So i'm cool with this one um. The characteristic is a little bit more um expensive than this one, but um you guys can use both. So i did hot combing and then i'm going to flatter on these baby hairs flat and then i'm going to go right ahead and cut it to the length that i want, which is pretty much like. You know a couple of inches long, so i have enough room to like curl it and lay it down. So i'm going to be again doing the very popular trendy trend of um. You know curling it with the small flat iron and then slicking it down. I just feel like this is a game changer and anybody at home can do it and it really just gets your baby hairs, um, curly and cute, and it lays down flat. So i'm going to be using. This got to be gel to lay down my baby hairs. Now, if you don't want your baby hairs to be as like, i guess hard um, you guys can use phones, but i normally just use this and then just kind of just brush or comb to soup. My baby hairs, which works for me, but sometimes i use foam, but not this particular time um. I just use what i had at hand, then i'm just gon na run over the hair one more time with a hot comb, just to make sure everything is laying flat. And then i just rub my hands through to kind of break up the crimps and just to remove any extra hair. That'S left behind for me cutting the ear tabs off or like plucking the hair, so that is it for this video. I hope you guys enjoyed also leave some comments below, if you guys want to see how i style this hair. I plan on doing at least two more different styles with this hair. Since it's so long, i don't. I don't want to just be boring and just do like a middle part, so i do plan on doing like an updo um. If it's possible probably throw some braids in this um, i'm so excited for this unit. Y'All. I told y'all that this unit again was under 300. I paid 277 dollars for 30 inches of hair. Now. One thing i do have to say that i didn't say in my unboxing video is that um with a 13x6 wig, you basically are not getting too much space to do like a sad part, but i got about this much space that i can play with, but Again, i told you guys that i'm only going to wear this in the middle part and then on the sides. You got about two inches of space before you get to the track. So that's another thing with a 13x6: i'm not sure how 13x6s were made in the past, but watching some videos. They said that they were made different, but you do get a little space just in case. You want to kind of like hot comb it back, but you do run into like those tracks right here, so you can't really manipulate it too far back, but you can do it enough where it's like cute. It'S really giving me what i need but um yeah. That'S basically it for this video guys. Thank you guys. So much for watching show some love in the comments also make sure you guys are subscribed and i'll see you guys next time.
Comments
cupcake cupcake: Can you do a tutorial on how you did these crimps?
Kersha Beaver: Omg this is pretty
Nivia Abraham: So good
Alissa: How’s the wig ?