**Very Detailed **|| T-Part Wig Tutorial|Ilbeginner Friendly// Nyalaz Marco Hair
- Posted on 01 September, 2022
- T Part Wig
- By Anonymous
**Very Detailed **|/ T-Part Wig Tutorial Il
Beginner Friendly- Nyalaz Marco Hair
Thanks for tuning in and l hope you loved the video. If you have any questions, suggestions or just wanna say something nice make sure to leave a comment in the comments section and SUBSCRIBE!!
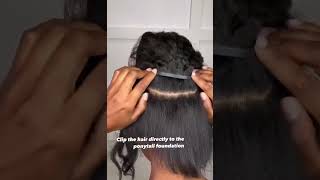
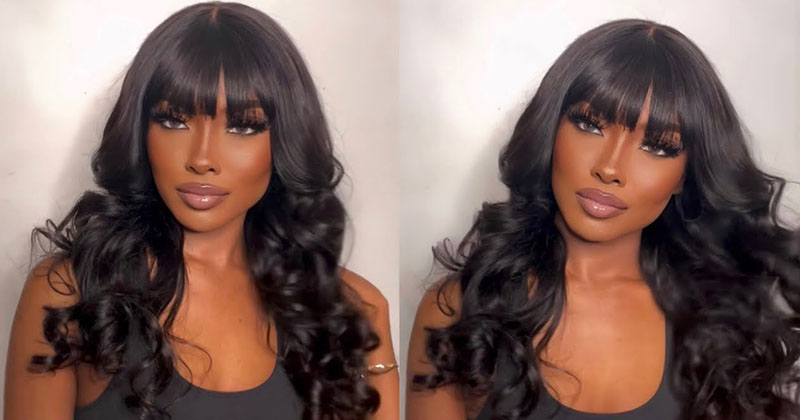
Hey guys welcome back to my channel, it's your boyala's Marco, and I am here with a hair video and in today's video we're going to be styling this unit. Here it is a teapot, wig and yeah guys just sit down, relax and I'll, be giving you all the tea to this hair. How we managed to achieve this look so yeah stay tuned, so I've already washed the hair conditioned it and treated it well, and I used the African thread method to straighten the hair, because you don't want your hair to be straightened using any heat method. That is not good for your hair, just stay away from it so yeah. This is what I did off camera, because I didn't want this video to be too too long so yeah guys, as you can see, I'm doing the best cornrows, and these are really really really important, because you know it's a protective hairstyle and it will protect your Hair from breakage from any damage at all, so you need to have these under your wigs and also they have to be really neat. They have to be ready for anything, you don't know what will happen in the streets. The streets are not safe, so you know you're slaying with or without your wig. If your wig come off, you are still good, but that shouldn't happen, guys you own that wig, you know, wear it like it's yours and make sure it's secured. This is why you need to keep on watching this channel because, as I will be teaching you guys giving you all the tea that you need so yeah guys just sit down, relax and yeah. Let'S get into this, so I'm using a gel called Pomade gel. So this gel, I believe, is an Asian brand. I don't know whether it's from Singapore or a Chinese brand but yeah I bought it here in China. It is very, very affordable, I'll, put the link in the description box. I think it is under a dollar and it works. Super super super good. It holds the natural 4C or 4B hair really really well, and if you know how to use it well, you can be using it for your gel apps or your Sleek ponytails, even braiding. You know so yeah guys. I recommend this it's good, but then sometimes, if you overuse it, you start noticing some white flecks, but don't worry. If you keep on watching uh my channel in the next coming videos, I will show you guys a detailed video how to use this job, because it is very useful. You know. So if you guys want a tutorial on how to do cornrows. Just let me know in the comment section down below I'll, be so glad to make a video a very detailed video, a beginner friendly video on how to do your cornrows um. There are different methods on how to do cornrows, but I do it my way, especially the way I start. The corners is a little bit different from what I see on the internet, but yeah guys. Everything else is very much similar, but I will try and make a very detailed video so that you guys can learn one or two from it. So yeah guys we're almost done with the base cornrows and they are looking really really really nice and from here we'll continue with the weak installation process, but it's for now just get into that guys. Look at that, so I just went ahead and went in with my hair growth oil that I got from niri Spa I'll, put her Instagram in the description box so that you can purchase yours if you want. It is good for hair growth, how to dandruff, strengthening your hair and all those good stuff, and I also went ahead to clean her forehead. You know to just remove the natural oils, because if you have those oils like the list, might not like really stick well, it might start lifting and also I went ahead to um. You know put some Foundation that is similar to a skin tone and yeah. That is what I did. You can also use the foundation that is similar to your skin tone and that will just work well and then the glue that I'm using today is board hold. It is super super duper nice. If you use this um this glue, your wig won't go anywhere like it will stay in place, but you have to make sure that the layers are really really thin and make sure that the glue dries clear before you go to the next layer. So for this particular install, I went in with two layers: yeah two layers were just working well for me, foreign to customize, the wig just putting the foundation also on the actual lace wig, so that uh everything does just make it completely well and right now I Was trying to position the wig to just make sure everything is sitting where it's supposed to sit? And I like starting from the front - because you know it's a teapot wig and just trying to make sure that the the middle parting is sitting right on the center head. So right now I was just using my retrocom to just press the hair down so that everything just sticks well, um. You know on the scalp and also I didn't customize this week guys because it's a teapot wig. It is a thin section of lace in front and if you go ahead to pluck the hairline, you might start seeing the grid lines of the actual bundles inside which which we don't want. So I don't advise to customize uh your your teapot Wig by plugging you can do that, but maybe just a little bit and also when you're cutting the lace just make sure you are cutting in a zigzag manner, because nobody has a straight hairline. So just make sure you just cut in a zigzag Manner and also guys don't be afraid to ask your clients for help. Just make sure you also ask them to you know: hold some parts so that everything, just just you know, works very, very, very smooth and also you notice that after you install your wigs, there are some parts that won't uh. You know: stick probably the glue didn't reach those areas, Don't Be Afraid, guys just go in with your glue again in those parts and um that will just work perfectly fine. It is actually better to have a lace part with no glue than having glue. That is in front of the lace, because that will just be messy so yeah, but I hate it though I hate it. I always want to make sure that my lace is sitting right where the glue begins and everything but yeah. If that happens, just go in with your glue again so yeah guys. This is what we did and just make sure you follow these tips. So before I went, I had to put the mode band. I went ahead with my got to be uh, so for this part, if you have any holding spray, that will also just work perfectly fine, I didn't have any holding space. I just went in with my got to be thank you foreign in with my mousse, so that I can get rid of the FlyAway Hills and I also use a wax stick from Urban goddess. I also used a map paint from Urban quarters, so I will make sure to put her Link in the description box so that you can pictures her wig in store kit. It is very convenient you guys would love it for your installs, so I just went ahead to use the same brush that I used to customize the lace I didn't put any further Foundation just use that same brush with the residue Foundation. That'S on the brush! That will just work perfectly fine to just blend the lace and make sure it Blends well with the skin tone. Look at that guys. It is giving scalp okay, baby hairspot guys what's an insta without baby hairs. You know what I'm saying so we have to put daniela's Marco signature baby hairs so for today we're not going for dramatic baby hairs. We'Re just going to do the baby here. No baby here look yeah so that everything just looks very, very Flawless and yeah guys. We'Re just going to do the Scooby-Dooby action. This part guys it's it's I I believe you know practice just makes everything perfect. I don't really have, like you know, a method to do baby hairs just play around with your uh, with your uh mousse and your brush to just you know, do the Scooby-Dooby and yeah guys. This is the final. Look. Look at that guys, yes, shake it! Girl shake it silly haircut back. This was looking really nice. I love the highlights. The highlights are just you know, sitting where they're supposed to sit and guys. Let me know what you think in the comment section down below and and let me also know what videos you'd like to see so yeah guys make sure you subscribe turn on your post notification so that you'll be the first to see the next video peace out. The world

Comments
Happiness Anurika: Love the edges… ndaneta nekuona baby hairs iri kuiswa kusvika pasi pehuma
Tryphine Dzimbanete: ❤️❤️❤️we are here to learn . school us master
Tryphine Dzimbanete: please i want to learn how to make cornrows. my fingers are so slow to take the next hair . please make sure the camera will be pointing so close coz i really want to learrn....some tutorials are always in a hurry
Her_Majesty_Tamara: basa unobata zvako