Omg This Wig Is Everything! 1-Min Easy Install Fb30 Brown Highlighted Curls V Part Wig!
- Posted on 31 August, 2022
- T Part Wig
- By Anonymous
I am using curly FB30 v part wig in video: https://amzn.to/3nNVSoa
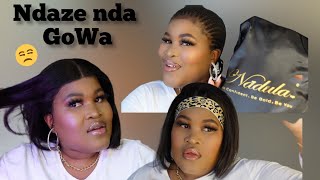
Hey loves welcome back to my channel. Todays video is sponsor by the fabulous Nadula Hair from Amazon. They sent me over there V part wig in the color FB30. Thank you for this sponsor video Nadula Hair. This wig is a 9/10 love the color and overall wig. The moose on you other hand was not good and will not recommend for this style Ir hair. Thank you love for watching todays video dont forget to comment down below give this video a thumbs up and Subscribe. See you in my next video
●▬▬▬▬▬▬▬▬▬♛Nadula Hair Amazon♛ ▬▬▬▬▬▬▬ ●
I am using curly FB30 v part wig in video: https://amzn.to/3nNVSoa
☛Get EXTRA 10% Off Use Special Code: NADULA10
Nadula Hot Sale: https://amzn.to/3lr31tR
Hair Infor: Brown Highlight V Part Wig Curly Hair 18inch
Using Special Code To Get 10% OFF: NADULA10
Can Not Miss Out V Part lace Wigs: https://amzn.to/3ynLkks
Recommend bundles with closure: https://amzn.to/3Im3zLE
Nadula New In Products: https://amzn.to/3c149lO
Amazon Nadula Website: https://amzn.to/3yEjYEE
Join Nadula Hair Prime Best Deal Club for More Discount: https://bit.ly/3kuB9ED
Follow Instagram @nadulahair_amazon: http://bit.ly/2DoZAP0
Instagram@nadulahair: https://goo.gl/nJ8zFY
YouTube Channel monthly giveaway: https://goo.gl/FLkxCs
Email: [email protected]
Tag # showyournadulahair on Instagram to win free gift even free hair!
#vpartwig #vpartwigwithnoleaveout #vpartwigwithleaveout #diyvpartwig #howtoputonavpartwig #howtomakeavpartwiglooknatural #howtomakeawiglooknatural #howtoputonawig #gluelesswig #bestprotectivestylefornaturalhair #protectivestylesforafricanamericanhair #howtogrowlonghairfast #hairstylesforwinter #howtomeltlacelacefrontwig #wigsforblackwomen #howtomakealacewiglooknature #protectivestyle #Curlywig #Amazonwig #curlyhair #humanhairwigs #wigsforblackwomen #easywiginstall #readytowearwig #curlyhair #protectivestyles #naturalhair #naturalbeauty
————————————————————-
Bussiness inquire email only:
—————————————————-
Connect with me
IG: https://www.instagram.com/linababy_2/
Snap:Linababy_2
Tik Tok:Linababy_2
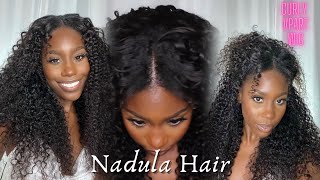
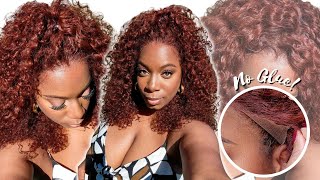
Wow, that's really retro, hey my loves! It'S your girl and baby and welcome back to my channel. So your girl, as you read by the title, this is a sponsored video and this video is sponsored by nadula here from amazon shout out to them for sponsoring this. Video they sent over your girls, some goodies and a wig shout out to them. I just love when it's sent over the goods. Okay i'll, be needing the goods. I love the goods. Hair companies. Send me the goods. Okay, i don't know if it's me but i'll be having to go through my goodies to show you guys what i got in my videos, but the first item they sent over was a pink bonding. This is cute okay, um. The next item they sent over was a lace mill bin um. I really love these and i'm i'm so happy, i'm getting different styles. So, yes, i can, you know, maybe go out in public if i got ta run an errand with this okay. The next item they sent over was a makeup brush and i was like okay. What is this, and i look like this? I was scared, but once i took it off the neck, it was a really really nice makeup brush and it's great quality. I love the rose gold or the gold handle part on it. It'S really really nice and the last item they sent over was some lashes. So yes, thank you. Thank you. Thank you nadula here. I really really appreciate all of the items you always send over. You always do your thing with the goodies in the wig, so this is the wig, and this is how it looks as i'm taking it out. The package in the net - so yes, this is a highlighted, fb 30, so dark groups with blonde highlights - and this is how the front of the wig look. Of course, i'm going to cut that off. I'M combing the back two adjustable straps, a comb on the side. Each side and then right in that middle part, it has four combs two on each side and these are um clipping combs. So i'm sorry snapping comb so they're they snap in which i love love, love, love, love! So, yes, this is the wig, and this is how she looks all right. You guys so now for the fun part, i'm going to go ahead and take off my bonnet in my cap and yes, these are my braids. So yes, yeah hella new growth, a lot! A lot a lot of new growth. It is time for some new braids, okay um the way my cousin braided, my hair, shout out to you lee for braiding, my hair. She did it kind of like slanted. So what i decided to do was take down at least two to three braids complete. This look. So if you do have your wig braids um under and you like, i kind of want to do the style, but i want to take down my braids and i don't know and i'm one of them, i don't braid, my hair, i hate braiding, my hair. I hate braiding, my hair, i'm tender, headed as it is too so. Yes, i end up taking out two braids, and this is my leave out um, so i decided to braid the back. Like i parted my hair, and then i decided to braid. The rest back is so now that i'm all done with the braiding part of the lever i took out i'm going to go ahead and cut those two little bands off that i showed you in the beginning of the video i'm also going to cut off that Nape part and i'm going to place a new stocking cap on my head, which is optional. I just want to be extra. You know secure, i don't know, but i did push it back in the front, so this wig cap, if you do, wear it, it's not going to sit all the way on your head. It'S going to be like halfway on your head. I mean it's really, no purpose for it, but me i just like a little extra. It just makes me feel a little better. So now i am clipping in my wig, i'm going to start at the top, so this is going to be like the placement order. I start from the top um you can start from the left or the right side, i'm going to clip in the front and then i'm going to make my way to the sides to the back and oh, that's how i recommend placing this wig. If you like to place it differently, go ahead, but it did make things a lot easier for me when i place the wig like this, so here i am taking out my leave out and trying to blend, and then, when i looked at it, i was like. Okay says what you think you're doing because um this ain't gon na work like this honey, it's not to work. No, so we got to go back into the lab and i decided to braid up just a little bit more of that leave out. You don't need much, ladies and gentlemen, if you you know, but um you don't need a lot of leave out. If you look at this wig online, it kind of shows a demonstrated picture on how they install and laid this hair with the leave out part or if you want to look up a youtube. Video on this here see that they didn't leave out a lot of hair or they didn't leave out no hair at all. I wanted to do the no here. No, no leave out look um, but it just like i say with my braids being the way they were. I was like. Let me just leave a little hair out, so this is me braiding, some more of that leave out up, so i'm going to go ahead and oil. My scalp, please, ladies please, please, please make sure you guys are all in your scalps under these wigs taking care of your natural hair under these wigs. These are protective styles. If you are installing these wigs the right way, these can be protective styles, so just make sure you're taking care of your natural hair. Ladies, so here i am putting my stocking cap back on and i'm going to redo this the right way we're putting this wig back on and yes, y'all see that y'all see it. It just looks way better like you could just tell how it's laid it. Just look like it's gon na be laid okay, so here i am taking my wig paddle brush and i'm going to brush out those curls, and these are the curls fresh out the pack so brush them out brush them out brush it out brush it out. Do not be scared to brush it out if you want to finger comb it. You can also do that as well, but you know the look i wanted to get. I wanted to just stretch this hair all the way out all the way out, and this is a 18 inch by the way, so the style, color and length on this wig is b parts 18 inch in the color fb 30. So yes yeah, i'm sorry! I didn't even say that in the beginning of the video and also you can get 10 off if you use code, not doula 10, so i'm gon na have all the information down below all of the information on the wig. The discounts, the website, everything so check out the description box, so this is the mousse that i'm going to be using today and the way that the bottle is made. I had to stand up to get a good angle. This is the canton wave with curling mousse, and this is the new bottle. The way it's made so so i did apply a lot on the hair. This is 150 density for this unit, so i did apply a lot of mousse. I was trying to try some new moves out. I always try to try something loose out. So here i am taking my detangler brush and brushing the mousse into the curls and the mousse seemed like it was okay at first but yeah. I did apply a good amount of mousse throughout the whole hair. The texture of the mousse was like it gave like a water feel like a watery feel, so that was something i was like um when i first started applying it. I was like okay, that's what was making me use a lot more because i was like it's not giving like the moves i'm used to using, but this is a whip wave move. So it's a different type of moves. It says it's for curls, but i don't know if this is for these type of curls. I don't know how to explain it, but my first time trying out this mousse. This is how it looks. One side me putting the mousse on and the other side is dry and me not putting any product on it. I don't know what side i'm on as i'm talking and as i'm in the video. So i'm just going to say one side and the other so yep so i'll be back, and then this is how it looks after i got done applying all of the mousse again like i say it did get the job done for the beginning. Look but again, i'm gon na get into that the mousse later, so i'm going to part out my leave out and blend, so my hair texture is 4c. So, of course, is was not the same texture of the hair that they sent me, but i did blend it at the best of my ability it did blend. I will have to like try some other products on my hair. That would blend a little better. I mean it did what it could do for the time being, but this is definitely not for 4c texture here this mousse. Definitely not for that, but yes, so this is how it's looking so far. So i'm gon na take my african pride olive miracle edge control in here. I did uh pause, it freeze it, so you guys could take a screenshot of it. Honestly, i really don't think no edge controls works for my texture here y'all. I just don't know it's just. It does not work for me, but please loves comment down below some good as controls for um african american hair, because y'all, like i say, i find ash controls that does work for my hair texture and then like after a while. They just stop working on me, so i don't know yeah. I don't know i don't know so. Please help your girl out because yeah, but i'm just looking down my edges doing a little. You know. Sometimes, however, you want to do your edges to blend in this unit. You can, but this is how you know. This is how i do mine y'all, just doing something something: lights and slights all right love. So yes, yes, okay and my oprah voice. Yes, so this is how my hair looks. It doesn't look the best, but again, i'm gon na have to find something that will work with my hair texture, but the wig a1 quality delay the install. Yes, i still have a little mousse in the back, but this is how it looks in the back. I also did use some pink lotion to put a little shine on the wig as well. All love. Thank you guys for watching, and i will see you guys in my next video bye. I swear

Comments
Kanadaa: Okay leave out, this came out nice
Jamika Smith: Beautiful