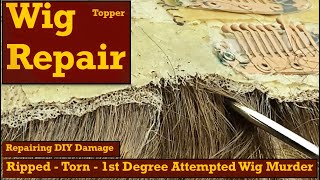
How I Repair My Balding/Overplucked Wig Closures | #Closurewig
- Posted on 13 November, 2021
- T Part Wig
- By Anonymous
Hey guyssss,
Here with a different video! In this video ill show you how I fix my closure and add on hair when the closure starts to bald. It is quite a long process so you will need patience and practice
Things you will need
- A micro crochet
https://www.ebay.co.uk/itm/Crochet-Hoo...
- Mannequin head
- some weave tracks
- A hair brush
- Hair clips
-PATIENCE
Steps
1. Cut the hair from the tracks
2. Pick out three strands of hair
3. Loop it on your finger
4. Use the crochet and hook it into the lace of wig
5. Hook in the hair
6. Close the latch and pull it through
7. Open the loop of hair and pull through
8. Repeat steps 2-7
*** My details ***
Business Email: [email protected]
Instagram: Lauriellexo
Snapchat: Lauriellexo
Twitter: @LOLAndLife
No copyright infringement intended in this video.
Intro song : Victizzle - Welcome to my world
Song used during tutorial:
Music: Mai Tai
Musician: Jeff Kaale
Outro song: M&N pro - Get lucky cover
#wigrepair
#laceclosure
Is guys welcome back to my channel and yep i'm here with a new nail, so clickety clack, your girl is back today's gon na be a hair video and it's quite it's gon na be quite different, because it's not gon na be focusing on natural hair. It'S gon na be a wig video and i think that is my first wig video, so yeah. I am going to show you guys how to revive a balding, wig, um and yeah stay tuned. So if your wig is looking like this and you want it to look like this stay tuned, and i will show you guys what i do to revamp my so this is my wig. I completely changed this. This way used to be long and it was bolding, but i managed to change it into a barb, okay, it's kind of stiff, but you get the gist. So i've already started working on it as you can see um, but, as you can see, it's still not like completely straight. If you get it, there's still a bit of a a gap going on, so i'm gon na show you guys how i'm going to close that gap. If you get what i mean, so you don't really need too many things. You'Re gon na need a mannequin head with some pins you're gon na need um some of the weave, so i made i personally made this wig, and this is some of the hair that i used. So i'm going to use that if your hair was kind of if your wig was already like made, i think you can still do that, but yeah. This is what i'm using you're. Also gon na need scissors to cut the tracks. This is the tool that you're gon na be using to put the hair on, and it's like a little crochet thing, but here says it says: carbon anti-static cone. I don't know if that's the actual word for it, but this is what i'm using. It would also be useful to have like a comb, so you can just comb some of the hair out of the way and some clips it'll be preferred if you had like those long snappy clips, but i only have crocodile clips so yeah. That'S that's just life guys, i'm in the most awkwardest position right now, as you guys can see, there is the knot. Obviously it's not as neat or whatever, but from far it looks, okay, so yeah. So i'm gon na try and make this very easy, and you know, hopefully you get the gist, so the first step is to take some of the hair. So that's what i'm gon na do and then cut it. So obviously, once you do that well, it depends on the hair you have. My this weave is really fraudulent, so this is the actual length of it, and this is just a lot of hair they've added to it. So i'm left with some strands. Okay, so i've started off by just clamping the hair together, because the hair just gets mixed up everything's moving all over the place. So i want everything still. So that's the first step. I take i'd, say three strands so it's. I know it seems annoying, but three strands is actually all you need three strands. All you need, because if you make, if you add more than that, you will have very clumpy clumpy hair using this you're gon na put that through the lace you're then going to attach that to the hook, you're going to close it like that, so that it Doesn'T come out and then still holding on okay. So, as you can see, that's been attached, so then what i do there we are that's opened and then i just crochet that through like that and that's been attached. I don't know if that's been seen, because the way i'm holding this thing is really difficult. So let me just zoom in yeah, let's zoom in like that, and then i will show you guys how i did it me get again do one of the best so guys. That is how i add hair onto my bolding, wig and yeah. It looks so nice, but yeah it's it's, it's a very tedious and very time consuming task to do so. If you have the patience, then this is good. If you don't, then i don't know for you guys and also i've done this with nails guys like when i do this. I usually do it with no nails and it's a much quicker process, but this was so hard for me because my nose are just getting in the way, i'm not gripping on things properly and it's getting loose but yeah. As you can see. This is really really like: it's gone back to how it's supposed to be like a nice parting and yeah, it just looks good, so yeah. I hope you enjoyed the video subscribe. Give me a like comment on the video on how you think this was um. Let me know if you guys tried it out and also subscribe, so that i can make more videos for you guys but yeah. I hope you enjoyed the video bye. You


Comments
Kim Williams: Ehh tu m’as sauvé now ik meme x