How To Quickly & Easily Install A Quick Weave With Leave Out:Tips And Tricks Ft. Beauty Forever Hair
- Posted on 01 September, 2022
- T Part Wig
- By Anonymous
This is a detailed step-by-step tutorial video on how to install a quick weave with leaveout at home!
●▬▬▬▬▬ #BeautyForeverHair ▬▬▬▬▬●
☛Get $20 Off Use Special Code: beautyytb
☛Buy Now, Pay Later, 4 or 6 Interest-Free payments
Video Hair: Kinky Straight bundles 26" 26" 26"
Direct link ➤https://bit.ly/3dMwP2W
https://www.beautyforever.com/ ➤ Easiest Install V Part wig: https://bit.ly/3pIgpeS
Best Realistic HD lace wig ➤https://bit.ly/3KkQhAf
Affordable Wear & Go HeadbandWigs ➤https://bit.ly/3TiSnEB
Full Bundles Deal➤https://bit.ly/3TiSbVT
Affordable Fashion Lace part Wigs➤https://bit.ly/3KktcxA
Super Brand Day Huge Sale ➤https://bit.ly/3wwcmpU
#Beautyforeverwig #Beautyforevervpartwig
Aliexpress Beauty Forever Website: https://bit.ly/3epWyuk
Amazon Beauty Forever Hair: https://amzn.to/3p4FYHL
Instagram@beautyforeverhair: http://bit.ly/IGBeautyForever
Beauty Forever YouTube Channel: https://bit.ly/38akLUg
Customer Service WhatsApp:+8613783534924
Supplies Needed:
Hair
Hair glue
weave cap/ stocking cap
hair protectant or Got 2b glued hair spray
blowdryer
scissors
White eyeliner/lipliner pencil
Steps to install quick weave:
PREP:
1. Braid down your hair (optional, can pull into ponytail/slick down), and make sure to leave out enough hair at the top to cover your tracks.
2. Put on the wig cap (any color)
3. Use a white eyeliner/lip liner pencil to mark the area around your leave out
3. Apply hair protectant to cap avoiding areas of leave out , can use gorilla snot hair spray or morning glory hair protectant
4. Blow dry hair protectant making sure it is COMPLETELY dry
INSTALL
1. Measure the track hair against your head from ear to ear
2. Cut the weft that you measured
3. Apply hair glue to track and allow to dry for no longer than 30 seconds
4. Lay the track onto your cap beginning at the bottom working your way up
5. Repeat the above steps until you reach your leave out
6. cut off the remaining cap that's exposed (be careful!!)
7. Style your leave out as desired
Watch my other videos!!
How to Takedown your quick weave:
Watch me Chemically Burn..I mean relax my edges
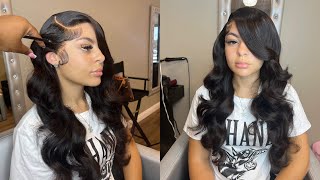
What'S up guys welcome back to my channel or welcome to my channel? This is your first time here i am diana and clearly i am excited about this install jumping right into the video i'm starting off by separating my edges or my leave out. That'S going to be in the front for the style, i'm doing a side part. So i have my hair already left out in the side and i already braided my hair um going straight back. Actually, it was in braids from a previous style, but we're not going to talk about that so yeah. So my braids, my hair, is already going straight back and braids like that. I did what i could and i have my leave out on the side, because my leave out in the middle is very short and broken off. So i'm gon na do a side part for this style. Here, i'm just taking some bobby pins and pinning the ends of my braids to my head. I know like some people will like sew their braids down or like use other methods to tie them down their braids. I don't got time for all that, so i just take a couple bobby pins and um. Pin it up. So this is what my hair is going to be. Looking like underneath my cap, i have my braids pinned up in the back. I have my leave out on the side and my edges left out and i'm just going to go ahead and braid down my leave out in the front just so it's out of the way um and i can see what i'm doing when i'm doing my hair For this install i'm using a single black cap, i'm not going to use two. I never use two one is enough for me, so i'm just going to go ahead and put it on my head and i always stop the cap right where my part is for my edges, where my leave out is that's kind of like an indicator of where I want my cap to stop and then i'm just going to take my white, eyeliner pen and mark out um, where my leave out is just so. I know how far to take my tracks, so i'm using the morning glory protective shield in combination with the got to be free spray to protect my hair on the cap. I feel like these two work together, work miracles, i don't like one without the other um. So i'm just going to pour out the morning glory or the protective shield first and get it as close to the the line of the cap as possible and just work my way back and spread it out. I kind of got some of my hair. Don'T do that um, but yeah, i'm just going to spread it out and then i'm going to use the freeze spray to kind of like fill in any gaps. Um because i don't like using a ton of the protective shield honestly because it gets super wet and it takes extra long to dry. The freeze spray works just as good. So that's kind of why i like to mix the two. So i don't have to use a lot of either product. You know it gives me like a good, even distribution, if that makes sense, um so yeah, i'm just making sure that i get the protective shield, as you can see here, as close to the front as possible, because when you blow dry it it's going to help Mold, the cap and seal it in place, so it doesn't slide. That'S why this part is very important. You want to make sure to get the spray and the protective shield as close to the hairline as possible, for this install i'm using this 26 inch, kinky straight hair that i got from beauty forever hair. This hair is super pretty and thick um, but because it's so thick, i actually straightened a couple of the bundles before installing it, because i did not have time to straighten it after so um. This is what the hair looks like when you unravel the weft. You get so much hair in the bundles. I wound up using um two and a half bundles and i got a really really full style um. So what i'm going to do is measure the track from ear to ear, making sure i'm holding the track down and i'm going to cut it and then i'm going to flat iron it before i put the glue on and install it only because i want to Make sure i can flat iron it as close to the root as possible, and i feel like i couldn't do that if it was already glued on because i feel like i would be tugging on it too much, so i'm just flat ironing it ahead of time. Um so now i'm going to go ahead and put on the glue. This is the 30 second glue that you can find at the beauty, supply store and the purple and red bottle. I love this glue. I don't use any other glue. This is my go-to glue. So i'm just going to put the glue on the track um. This can be a little difficult, sometimes because it's annoying well really it's just hard to try and like film and put the glue on, but you know doing it at your house. You can just lay it on the table or whatever um, but i'm gon na put the glue on blow it a couple of times. Um give it a like. I don't wait, the full 30 seconds. Honestly, i wake a couple of seconds um and then i go ahead and apply it to the cap. So, given that i can't see where i'm applying the track, i honestly just use my fingers to feel where i should place it and before i press it in or seal it in. I just turn around and look in the mirror, real quick to make sure i like how it looks and make sure it looks even and then i seal it in by, like you know, i press it in with my fingers and then i'll go through with my Blow dryer to seal it in place. If you mess up or misplace it, don't worry, you can just slide it around and fix it before you blow dry it. So if you missed it the first time i'm gon na go through again one more time, because it's a pretty simple process, but what you're going to do is measure the track from ear to ear or side to side. What i do really is, i use my fingers to feel where the cap ends and i go from like into the cap to into the cap and i'm only flat ironing the hair during this step, because this is kinky straight hair and it's harder to flat iron. Um in general, but if you're using like a regular hair like regular straight hair, you do not have to do this. I'M just doing this right now, because i want to go ahead and get it out the way. But after i go ahead and flat iron, it i'm going to throw the glue on and i'm going to attach the track. So, honestly, for me, it's easier to apply the tracks um looking in the mirror. So i can see what i'm doing um again, because i can't see the back of my head anyway, but i'm really just using my fingers to feel where one end of the track or one end of the cap is and then i'm going to use my fingers To walk the track all along the back, because i can feel you know where the last track is and where i'm laying the new track and then i'll stop it where the cap ends pretty much. So one bundle has gotten me almost halfway through my head. As you can see in the back, the track started curving. That was unintentional, but i mean i guess it's fine. You can do it like that. I typically don't do my sharks like that, but i know some people do but yeah one bundle got me through a pretty good amount of my style so jumping into the second bundle. You really can get a good idea of what the texture of this hair looks. Like it is super super like kinky, it kind of reminds me of like a brazilian curly, but just a little looser um yeah, but that kind of makes it a little difficult to install. So i'm still going to go through and flat iron it before i put it on, but the texture is really pretty and it blends really well with my natural hair um, i actually actually like thought i hated kinky curly at first but like after wearing the hair. I actually prefer kinky straight, not kinky curly kinky straight, like i actually prefer this texture, it's really really cute and it's super thick because one thing i hate is thin hair, so this hair is very, very thick and full. Okay, one two skip a few 99. We'Re now at the top of my head, so um, as you can see here, i'm at the last track, um that meets the white eyeliner, pretty much that meets my leave out on the side. So this is going to be the last track that i lay using this like circular. U motion after this, i'm gon na have to switch it up a little bit, because now i'm gon na have to focus on doing the um. The this the side part. I guess now i'm gon na start laying my tracks in like an l-shaped motion, because i want the hair to fall in my face a little bit um and i want to also be able to you know, cover the sides, so the l shape worked the best For this, so i'm just going to measure it from back to front and then bring it across the front and cut and glue. So i'm not going to lie to you. This is the part where i got a little nervous because i usually hate having like a whole bunch of hair falling in my face, like it's cool, to have one or two tracks, but when you have to have a whole bunch, i get nervous because i don't Want to have it lopsided, i don't want it lumpy, but i think by make because i made my braids super flat underneath my wig cap. It did not come out lumpy and i was so happy with it. It was a lot of hair in my face, then more than what i was used to, but i just figured you know it's just doing something: a little different, um yeah. So overall i was happy with how it came out. So after laying about three of the tracks in this l-shape motion going in front of my face, i started laying the rest um vertically, pretty much just because i didn't want any more hair going in my face, like i said, i hate having a whole bunch of Hair going in my face - and i just wanted to fill in that gap as best as i could um, so i'm just gon na lay them, as you can see here, going front to back okay. So it's time to move this party to my bathroom, because i hate styling my hair sitting down honestly, like especially because this hair so long i needed to stand up and i needed a big mirror. So i could see what i'm doing so right now, i'm just going through and flat ironing the hair and getting out any other kinks as much as i can um. I know i flat ironed it before i installed it, but it's still not as straight as i liked it, but it's still super pretty. You can still see a little bit of the texture, but that's fine because it really helps it blend with my natural hair. Here, i'm just going through and cutting the cap being very, very careful not to cut um my hair, because that would suck - and i would cry um and i've done that before and i don't want to do that again. So yeah i'm just using my thumb to feel where the cap is and i'm lifting up on it. I'M just going to take the scissors and cut all the excess cap off and then i'm going to go through and unravel my leave out and style. My leave out here i'm just using a touch of bio silk so that my leave out won't look crunchy and i'm going to go through and fly iron it for my edges, i'm using the black eco style gel to lay them down. This only works for my edges, because i've relaxed my edges, um had my edges been natural, then i would have had to use the red eco booster wax. But since my edges are more tamed, gel works, just fine gel does not work on my natural hair um but yeah. I do relax my edges. If this is what like your first time seeing one of my videos, i do relax my edges. Typically, i do have a video showing myself relax, my relaxing my edges and i can link that down below for you if you're interested um. I don't do this all the time. I do it probably like every six weeks, but actually i haven't relaxed my edges um before this video. For a few months i actually took a a break um, but i couldn't resist and had to go back to the creamy crack to lay down my edges last. I'M just going through and adding just a touch of layers to the front, really not a lot, but just like a little hint to kind of frame. My face a little bit. I didn't want to cut them too short, because i kind of wanted to keep the length and the appearance of that length. I thought it was really pretty um, but i did want to you know, give it a little bit of character, and now i'm just going to take my flat iron and bump it just a little bit or like curve it away from my face. Just so. You know just to polish it off a little bit, but besides that, this style is complete. When i say i love this hair, i love this hair. I love the texture. I love the length. I love the appearance. I love how long it is. This is probably like one of my favorite installs, honestly um, it couldn't have came out any better. I did get a little nervous at first, but it came out so beautifully and i'm so proud of myself. Like i said this hair is from beauty forever hair. All the information will be in the description box below, but definitely go check out, check out this kinky straight hair, because this is where it's at anyways. You guys thank you so much for watching this video adios until next time.
Comments
KAYLa BESLaYinG: I am a new subscriber and girl I can just binge watch all your videos all day love how u explain everything and make it beginner friendly ! I also love how u show how u can still slay a hairstyle on a budget keep the amazing tutorials coming ✨
Beauty Forever Hair: Awesome great work!
Blessings from dagods: What products do you recommend to make the quick weave last longer