How To: Style & Color A Textured U-Part Wig | Texture Crush
- Posted on 20 July, 2017
- T Part Wig
- By Anonymous
This is a how to video where I show you how to bleach, color, and curl a curly textured U-part wig from Texture Crush.
P R E V I O U S V I D E O S
How I Style Headbands and Turbans
HerGivenHair Review and Tutorial
C O N T A C T
F O L L O W M E
instagram | @iknowleee
snapchat | @iknowleee
twitter | @iknowleee
I N F O R M A T I O N
Curl Crush 16" inch U-Part Wig
Products
Creme of Nature Moisturizing Shampoo
Creme of Nature Intense Conditioning Treatment
Oyin Handmade Hair Dew
Mielle Organics Mint Almond Oil
Bleach
30 Volume Creme Developer
Clariol 7th Stage
SIGN UP FOR INFLUENSTER
https://www.influenster.com/r/1412269?...
[[[ get FREE products]]]
E D I T I N G & C A M E R A
Final Cut Pro 10
Canon 70D
This is a sponsored video.
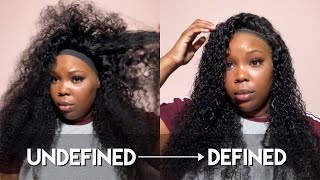
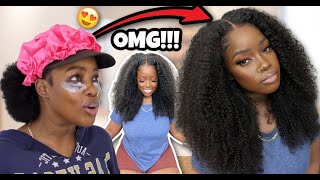
Hi loves welcome back to my channel. I know I'm looking like a new person harder. You do you, yes boo, so I'm going to be showing you exactly what I did to this here. Everything that I did to this day, I'm giving you all the deets on my wigs on my clippings. What I do this time in this video, I actually show you how I colored the hair to match my hair. I am not at all like an expert at color. I just do my own thing and hope. A brighter day comes out right and so far it has come out right. This hair is by texture crush. This is very cute marketing. By the way, I love this and it is a 16 inch. U part wig, it was the curl crystal. The texture was really curly, which you'll see because the texture does not look like this at all. I altered the hair to get it to look like this and it came in like this cute little pink bag full week. The wig actually was a u-part wig and it had straps, but I cut the straps, so I mean you don't have to cut the straps, but it was just easier for me to work with the way. If I could, the straps and saw all of the information on texture crush will be left down in the description bar. If you want to know about that, along with everything that I use to color it the products all that good stuff check it out in the description bar and make sure that you guys subscribe to my channel and stay tuned to see how I went from a Taper cut since it's because it's cute right, you think so I kind of like I wanted to show you guys the wig in its original state. So it came with this information card. It is a 16 inch, curl crush! U part wig, and this is exactly how it looked and the inside of the wig. It does have six clips three around the perimeter of the part and then three around the edges, and these two straps, where the u partner was created, actually cut those straps off later on when I actually put on the wig. But this is a wig. It'S extremely well made now it did not match the original color of my hair, published it. I use a 30 volume cream developer and this Clairol 7 stage. I use two pecks of the powder and mix it together and after that I just stirred it until it was a creamy texture without any lumps. I am NOT an expert at coloring, it's strictly trial and error for me. So please don't judge me because I don't really know what I'm talking about. What I did was. I started off slow and I just kind of use the spoon to apply the bleach, but I noticed that the hair was changing quickly, so I had to apply it much quicker and I use larger clumps of the bleach to color the hair, and I really just I bought it when it seemed like it was changing to the color of my hair. I ended up rinsing the bleach out. I tried to treat this pretty much like. I would treat my own hair so after coloring it I thoroughly shampooed it. I used the cream of nature shampoo and then I followed up with a deep conditioning treatment, which was also by cream of nature, and I did let this sit in their hair for about 20 to 30 minutes. Following that, I just used my own handmade hairdo as a leave-in, which is you know it's my favorite, and then I used my male organics mint almond oil to seal in the moisture solos we've are back. Do not judge me on what I have going on with my hair now, but here is the hair. It has been fully colored, I'm gon na go ahead and clip in the wig. There are six clips and I'm gon na shift the wig so that the? U part is actually on the side where this large twist is. I clamp the straps in the back together. This isn't how you're supposed to do them, but you know I have to do whatever works for me, like the clamps are not going to fall exactly where they were made to fall, but that's okay, my little straps came undone straps are in we're gon na find The clips and clip them so I'm gon na do the back one. First. I like these clips cuz. They don't like fully clip in they're just kind of like slide so they're easy, and now I'm going to do the middle part. There are three around the middle part: I'm trying to get it as close to my leave out as I possibly can, so I'm pushing them all the way down. There'S another clamp over here in the front, I'm making sure that all of my twists my little loose twist or tuck there before I kind of like slide these clamps in so they just think I use if the wind blows. You know we don't want to be exposed. That would be a tragedy like weave in the wind, it's weave in the wind. So here's my little leave out. I'M gon na leave that like this. For now I could just wear this hair just like this. So here's what I did I let it dry after I washed it and colored it, and this morning all I did was comb it out because I wanted it to. It was looking really curly like it looked like these pieces and that does not match my hair. So I was trying to get more of my look, but I actually plugged in a curling one, because I wanted to go in and add curls yeah, I'm just gon na leave my hair alone for now, but I'm gon na do that and then I'll come back When I get to the front and show you how I'm using the curling wand to curl this weave I've curled the bulk of my head, I really only have like this section right here in the middle. I didn't really do tangle it. I just kind of like ran my hands through the ends. As you can see this, this section is kind of thick and then I've been rolling it around the rod in different directions, and I hold it on there for about seven to ten seconds once I can feel the heat on my hand, I let it go cuz. I'M like okay, it's curled, you get a curl like okay, so I'm done guys. That'S it not! We were. We will not go out of the house like this. Look at like Sheneneh. Think of my hair down just kind of trying to spread it out. So, as you can see, the color blends well, but the texture not so much so what we're actually going to do with these curls is separate blending it a little bit more with the weave I'm twisting it around it so that it flows into it. That'S it simple and it's cute and I love it. I wish my hair look like this in real life. This has given me scissor lives, but thanks for watching love us. I hope that you enjoyed this little tutorial /. I guess it was / review. I showed you guys, basically everything that I would do. The name of this here again is texture crunch. I am in love with it. I like the texture, I love the durability. I think that the hair is super. Super easy to work with the lint is different for me because I don't usually wear long hair, but with this particular texture I definitely think I can. I also enjoy how you can kind of go from the curly to the more kinky look, because this is more kinky than me. I enjoy the versatility about it. That'S the word, I'm looking for it's very versatile in that, and I think that, even if I straighten this hair, it would have like a really really nice texture, so we're gon na see, but for now I'm gon na rock this because I feel cute. I really do I feel really cute so yeah. You guys tell me what you think also since I have been wearing these extensions, whether they be clip Ian's are wigs and you have any questions about textured extensions. Then please leave them in the comments below and I would definitely message you guys back. I'M pretty good about replying to comments, so leave them below make sure that you subscribe to my channel before you leave this video hit that subscribe button. I'M gon na wait a second I'll. Let you have a chance. You know so red button down there to subscribe. You did yes, you need to come back for more uploads. You do. Did you read you? Okay, thank you. So I love you guys. Thank you for supporting me, and I will see you guys in my next video

Comments
Joifully Natural: SO PRETTY, LEE!! I've loved this since I first saw it on you! You did a wonderful job with the color & style! Love you!!
Jasmine: Great video Helecia! And that dress, I have the same one
Cantrice 599: Love the video and the look! I'm way to lazy for it LOL!
tionna1985: Great job,looks totally natural.
Sheda Noel: So so beautiful I see why your feeling your self...
Jenny's Corner: Love It
Unique Drea G: Pretty!
Sarde’ Grissett: super cute, it is giving me sza vibes love her