Wow! New Bald Cap Method! Custom Hairline Detailed Curly Wig Instal!! Slaymas Day 6
- Posted on 16 December, 2021
- T Part Wig
- By Anonymous
SLAYMAS DAY 6!! Complete start to finish bald cap lace melt!!
Shop Ebin Wig Glue:
Ebin Supreme wig glue https://amzn.to/3GK8S5u
Ebin Supreme Spray https://amzn.to/3E2q8Bi
Ebin Tinted Lace https://amzn.to/3F2Li3F
WIG IN VIDEO https://bit.ly/31kkXzs
Discount: Marie
Length: 20 inch
Cap: 13x4 Lace Cap
♡ Products Mentioned:
Slay Band https://bit.ly/3CMaF8Y
Stocking For Wig Cap https://amzn.to/3e1saXX
Wax Stick https://amzn.to/32fjivi
My Amazon Store: https://www.amazon.com/shop/msprecious...
________________
Check Out My Wig Styling Playlist: https://youtube.com/playlist?list=PLDv...
Catch Up On My Latest Wig Installs https://youtube.com/playlist?list=PLDv...
___________________
Get the SCALP Look
Hide Knots & Grids https://bit.ly/3F983Dz
Fake Scalp Material https://bit.ly/3mp7qwU
___________________
Let's Stay Connected
♡Instagram: https://www.instagram.com/mspreciousma...
♡ Twitter: https://twitter.com/MPreciousMarie
♡My Website: https://mspreciousmarie.com/
♡ Tik Tok https://vm.tiktok.com/ZMRwbmjdu/
Sign up to get a wig customized: https://www.secretkreations.com
Business Collaborations Email: [email protected]
Send me a video request: [email protected]
________________________
Other Beauty Favorites
Feel AMAZING!!
Teami https://www.teamiblends.com/discount/M...
Discount MPM20
Whiter Teeth Kit https://brytnsmile370.grsm.io/b52sy2ww...
Discount MPM25
_________________________
Tech Info:
Camera used: https://amzn.to/39yd6Pg
Lens: https://amzn.to/3u767WO
Editor: Final Cut Pro
Music https://bit.ly/3ireQyM
_________________________________
*Hair or products shared are my OWN personal and honest experience. This video may contain sponsored content and affiliate links which I get a small percentage that helps invest back in my channel to continue to bring great content! Thank you for your support!*
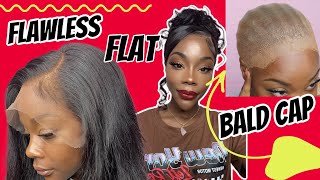
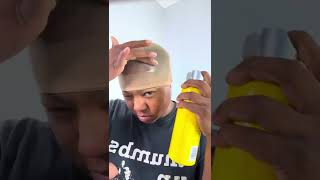
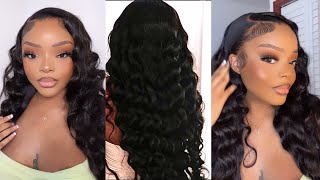
Welcome back for slayness welcome back! Thank you guys so much for joining me for today's video. Before we jump into this install because i told you guys - i was gon na come back with a makeup tutorial this week today was supposed to be like a hair and makeup video. However, i had to separate the two, so tomorrow will be the makeup. Look that you guys have been asking me for this week today we're just going to focus on the install honey because we're getting closer to those holidays, and i know a lot of people it's hard to get into your salon right now to get your hair done. I'Ll show you guys today how to slay that wig at home, like a professional honey, so today's style comes from pretty luxe hair. It'S one of my favorite curly, wigs from them hands down the color, the wig. Everything is just phenomenal, so i will be sure to put this wig below in the description box. Before we jump into the install today, we will be using the even new york, wonderlace supreme, hope, glue for this install. I was sent this probably my third time using it in today's video. I will be sure to put this below in the description box. You guys um. You guys know that i love all of their adhesives um. So today i wanted to do a glue down install i'm, not gon na. Take this wig off, i'm actually gon na be wearing this wig all weekend. If i do plan on removing this wig, i'm going to show you sunday on how i remove it. So i wanted a hold honey. So if you follow me on instagram, i will be posting updates on my story each day up until sunday to show you guys how this is holding up, but right now, like girl. Now the lace on this wig is that light. Colored lace, so you may want to tin it. I really do wish that they would have used the new like invisible, clear lace on this wig, because, oh my god, it would be amazing. However, as you guys can see, i'm gon na show you how to make it work. Okay, we gon na make this work. You'Re gon na see how it is straight out of the box. Again, don't forget to check out even new york's um wonderlace. The links will be below thank you even for sending this over um but yeah honey. Let'S jump right into this wig install here's the wig right after i washed it and bleached the knots. This is a 13 by 4 cap. Whenever i go to glue my wigs, i do the ball cap method, so i'm using the even wonder, lace spray to secure the ball cap method. Now you can use any hairspray that you have, but just make sure that it holds that cap in place for this method. I am using a stocking cap, so what i'm going to do is make sure it's completely dry. Before i cut away all of the extra stocking that i don't need, you only need enough stocking where it looks like a scalp underneath your wig and give the appearance of scalp honey. You want it to look like your ball, so that when you part your wig, you look like you have scalp. So now that i have that done, i'm just going to go ahead and show you guys what the hairline of this wig looked like straight out. The box: this is the parting space you get now. This is a 13x4 cap. As i said, however, you do get a good amount of parting, but we're going to go ahead and just section away some hair out the front, because i am going to tweeze this hairline. It is so sad. This wig does not come with the new pre-plugged hairline. I really would love for it to. However, this wig does not, and also the lace is just regular lace. So i'm also going to show you guys how to make that lace, melt and blend like clear lace, make sure you keep on watching that it could be coming up in this video now. Can we take a moment to talk about the hair color on this wig? I absolutely love that it's true to brown, there's no orangey tones, no red tones, it's just a beautiful color, and this wig already looks like my natural hair. Okay. So if you are looking for a wig that is not black, i love this wig. I think i shared this wig before in a shorter style a long time ago, um. So, as you guys can see, this is one of my favorite curly colored, wigs ever that i have ever tried. It just is so pretty and it's so natural looking like. I said the only thing i wish is that this wig would come with that clear lace and everything. So this is what one side look like that i have tweezed compared to the side that i have knots and we're going to finish this up and jump right into the install alright. So you guys know how much i stressed to you about cutting the ear area correctly. You want to make sure you cut this area correct where that lace will fall right above the ear and not pressing on the ear, because if you don't, you will get early lifting with your glue so make sure you are lining this up perfectly. Where the ear is not interfering with your wig application, so again we are using the even wonderlace bond supreme glue. So what i'm going to do is take this cap fold it back so that i can see my ball cap method and i'm going to apply that glue right to the edge of the ball cap. So you want to make sure when you are using hair glues. You spread this glue out evenly across the hairline, avoiding your hair, of course, but just making sure you do not leave chunky spaces with glue, because if you do it's going to take longer to dry, you want to let this dry until it is clear before you Decide to apply another layer, but again just take your time and smooth this glue until it is evenly around the hairline. Once that is dry clear, i added a second layer of glue and did the same exact thing. I did not go to three layers. I only want the two, but you can choose to apply how many you want the more layers you apply, the more secure it's going to hold for longer periods of time. Okay, so once that's dry now, it's time to go ahead and apply the wig. So what i'm going to do is take the wig and take your time with this. Okay, you don't want to get the hair stuck into it. You want to place that lace over top of the glue but at the same time making sure that the hairline is lined up where you want it to be so, do not press down until you get the wig, where you want it position, because once you press That lace into the glue - it's stuck okay, so i'm just going to take my time here and work this until i get it right, okay, so for the longest time i had a fear of real glue and placing my wig, because i was so scared that once I get it stuck, i'm going to have to rip it up because i've made a mistake and place it in the wrong area. So just take your time with it and like i said it will not stick completely until you actually press. So now we are going to go ahead and press that lace down with the sleigh band, i'm going to let this slay bin sit for at least 30 minutes before i remove it. Okay, so i'm going to go ahead and remove this extra lace. Now, as you guys can see, the lace color is very light, so i'm sure you know how to fix that in a second now i decided to remove my lace before removing the slay band, because i actually had company coming over. So i didn't want the laces sitting on my forehead, but you can definitely wait until after your hairline is completely dry to remove your lace. Actually, i would recommend that so that you won't have like pieces of lace that you didn't cut after about 30 minutes. We are laid honey. Look at that hairline y'all, there's no white residue, there's no mess even i love the supreme whole glue. So very much. Thank you for sending it over. So i'm just going to take my wax stick and go ahead and push this hairline back with the hot comb, because we are about done um. You want to make sure you do this just so that you can get all of the stuck hairs that are in the glue out, which it really is not a lot of hair stuck. So that's a great thing now, with the trick with this lace, as you guys seen, it was very light. However, this is the reason why i decided to place my wig with the edges um in front of where i glued down the wig, so that it could be more like scalp. That way there will be no rim of that lace around my forehead area. Do that make sense you guys? So if you place your wig the same way i did in today's video. You don't have to worry about the lace color um, but if you do need to change the lace, color definitely use the even tinted lace or any type of lace. Tint, because, with this lace color, it can definitely be changed with any lace tint and you can get it to match your complexion if you are darker okay, so when it comes to laying your edges, you have to determine, of course, do you like baby hairs? Do you like just soft edges, do you like wispy baby hairs, so for me, i like to keep my baby hairs very natural. Looking i don't like intense baby hairs, so i'm using just a edge brush and a little bit of the even wonderlace spray to lay down the areas around the edge that way, if i have like pieces of lace is still lifted, this will help to correct it And then i'm going to take some hair mousse and just push back some of the hair because, like i said i don't want really intense edges here or baby hairs, but i can honestly say that this looks so good. This is probably one of my best installs. I have done in a very long time just because i kind of took my time with it today. Normally, you guys know that i'm using the um wonderlace sprays, which are temporary holes. So when it comes to me using actual wig adhesive glue, i definitely take a little bit more time with the application, because i don't want any mess-ups, because you guys know the removal. Okay, honey is insane and you definitely don't want to have to redo your install and re-wash that glue off of the hairline stuff like that. So just take your time with it and don't let your nerves get the best of you because honey. I know. I know. Okay, so we're going to re-tie down that hairline again with the sleigh band this time only leaving it on for about 10 minutes. You can take a dryer to it for a few minutes or two minutes or whatever, just to make sure it sets right and then once your 10 minutes is up we're gon na come back and of course, i'm gon na go. Do my makeup real fast? It'S coming soon, you guys so make sure you stay tuned um but yeah. This is what the end result looks like everything looks good, i'm just going to take some of my bronzer and go around the edge where that laces because, like i said it, is a bit light, so i'm just using the bronzer to darken up that area and It works out really good too, and that's it. You guys you all. Let me know what you think about this wig install. I absolutely i love it. I think the color this wig from pretty luxe hair, is gorgeous it's one of my favorite colored curly. Wigs ever i will be sure to put this wig down in the description box, make sure to check down there and any discount codes will also be linked down there and even the glue. I love it. This just looks so good you guys. The glue will also be linked below in the description box, for you all so happy holidays, and i will see you all back in my next video

Comments
MsPreciousMarie: Hey Precious Squad!! I filmed today and edited today to get this video out for y’all TODAY.. WHEW. I’ve been busy with the holidays BUT the makeup part will be up tomorrow for you all! Happy #Slaymas Day 6!!!
Nancy Williams: Every wig you install you slay .I love the color pretty lady. I bought the wig after watching you slay it . Can't wait to get it installed
Beauty by Jay Morris: The wig is gorgeous Marie, the install is perfect, thanks again for sharing #slaymas
Loretta Wells: This is a great look on you. I have such a hard time with all glues and I have given up on them. You make it look so easy and I want to try it again. Thanks for this video.
Crystal Amos: The hair color is pretty loving the curls goes with your skin tone perfect huny and yes the makeup huny is popping as well looking forward to the makeup tutorial
keke s: Beautiful wig!!! I love it!!! Install was flawless! Gorgeous as always.
Deverly Finch: You're always on the money! Thanks so much for your expertise and great generosity sharing it.
verrell hanley-moncree: Love it! I feel confident enough to try this method now. But it won't be until next week or so.
Esther Sowell: All of your installs are perfect they look so natural and yes the hair is geougerous
Tricey Will: I love this wig. The color is
Kimberly Kyles: Gm Marie you Nailed It every time this unit is Gorg an goes well skin tone an this Stabbed Beat Look Okayyyyyy thx for always sharing your tips on all your units an Happy Holiday stay safe an enjoy your weekend stay motivated and keep on Manifest. Peace and blessings
Bonnie Taylor-Williams: Beautiful, flawless!
Mammie Summers: One word Marie, AMAZING!!!!
Rochelle Katz: That looks fabulous
Jay S: Gorgeous!
The Glass City Girl: Yaassss! this will be my go to for my vacation!!
rac Gillett: Yes, I love the color
Camille Evans: Beautiful
Bargain Beauty: Heyyy, Marie! Aww... No, two in one?