Natural Quick Weave Side Part Leave Out | Unice Hair Aliexpress | Forevercryssy
- Posted on 11 November, 2019
- T Part Wig
- By Anonymous
KEEP UP WITH ME
♥ Instagram: https://www.instagram.com/forevercryss...
♥Email: [email protected]
♥WEBSITE: https://www.forevercryssy.com
●▬▬▬▬▬ ❤ALI UNICE HAIR❤ ▬▬▬▬▬●
11.11 Shopping Carnival UP TO 46% OFF (11th Nov-12th Nov)
Add Cart/Follow Store to Get FREE COUPON ➤http://bit.ly/32AXvIO
Hair In the Video: Brazilian Body Wave 16’’18’’18’’+16’’closure
Brazilian Body Wave Bundles with Closure➤http://bit.ly/34N5iVj
HIGHLY RECOMMEND Brazilian Body Wave Wig ➤http://bit.ly/2p2bnOq
More Affordable Body Wave Products ➤http://bit.ly/32Dabie
UNice Hot Sale Wigs➤http://bit.ly/2rzji73
Coupon Code : UNICE5
95% Girls Will Order UNice Hair Hot Selling➤http://bit.ly/2KcgXW2
New Transparent lace products Coming ➤http://bit.ly/33BCgIc
New Coming 6x6 7x7 Lace Closure ➤http://bit.ly/36RzCQD
Aliexpress UNice Hair Official Store➤http://bit.ly/34Sz3UX
UNice Hair website:http://bit.ly/32DsALU
Amazon UNice hair:https://amzn.to/2zxP2gm
Want to promote Ali UNice hair???
Contact: [email protected]
Whatsapp/iMessage: 008613782365322
Wholesale: [email protected]
Follow UNice hair on social media:
Want To Win Free Hair? SUBSCRIBE UNice:https://bit.ly/2W4ttu3
Instagram:@unicehair_aliexpress http://bit.ly/2QkdC9f
@unicehair :http://bit.ly/31zPnbw
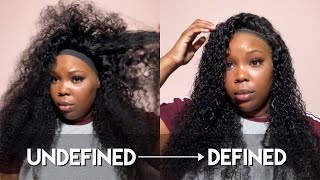
Hey babies, welcome back to my channel so jumping right into the video. As you guys can see. I have about a inch and a half of leave out. I did not do this around my perimeter, but I do have it in a full sleep ponytail with a little bit of eco styler gel, and that is it so I'm gon na be using one wig cap today. Of course, you can find this at any local beauty supply store. Actually, you can find it in anywhere even Walmart, so I'm gon na be taking this lightly flesh-toned. I guess a crayon pin, I think, is actually like an island to actually just a completely line out. My parting area or the area that I don't want pretty much any glue to get on, so this is gon na, be my leave out area, and so I'm doing this for beginners. If you guys are experienced with this. Obviously you can skip that step. But if you are a beginner, this will help you tremendously with laying tracks. So I go ahead and part out the additional area behind my ear and then, of course, I use the track itself to measure exactly where I want that to wrap around from ear to ear. So once I got that cut out, which usually I do it while the West are dumble dub, I can't speak, doubles because yeah just to avoid having to do the same process in the same area, twice I'll, go ahead and double the tracks all the way up. So I do have my salon Pro 32nd glue and I'm just literally placing the tracks and a curved up position and then also a little bit in front of the wig cap itself. So I'm not putting the track end or the tip of the track directly on the wig cap, like I'm, putting it a little bit in front of it so that it holds on to not only my head, but also the you know the wig cap. So in case you guys are wondering how does the cap stay on, you know, does it move around and things like that? That'S the trick so curve them up and then always make sure that the tips are a little bit in front of the actual wake up, and so I don't cut the tracks like into really really small sections. Just because I find it a lot easier to. I guess pretty much do this, while they are longer and just kind of continue the process going upwards. That way again, you get the most out of the hair. So if you lay the tracks in a curved position, you cover, I guess more areas of the head in a faster way or at a faster pace. Then you would have you cut them short and started from like the absolutely your neck upward. So that's another little tip in trick for you, I'm consistently showing you like the front and the back of my hair, because I really want you guys to get an idea of where I lay these tracks and how to continue to place them. So I'm gon na go ahead and take this same marker to show you a very good guideline when you're doing side part. So obviously, if this was the middle part, it should be even all the way up. But because it's a side part you are gon na need a little bit more hair on either the left side or the right side and to make sure that everything is lined up. You want to make sure that you have about an inch to two inches around your leave out section off so that you are not putting any tracks there because you want to just fill in the gaps. The whole way up, as you guys, can see so yeah. So I'm just literally going from side to side, and this is kind of where it gets messy. You don't really not really messy, but you don't have to be so precise in the placement of the tracks because you're, ultimately just trying to fill the space. So I do kind of put them far apart, maybe about an inch, maybe about a half an inch in between each track, just to make sure that everything lays is natural. I didn't want to use too too much hair, and at this point I think I was just starting to get into the second second bundle of hair and all again all the details will be posted. I'M saying again, I never even told you guys', all the details of other hair will be listed down in my description box below as well, and so this is a body wave. I do have 18 18 and a 16 inch and then, of course I got a closure, but obviously I'm not gon na be using that today. So this is from you. Nice hair definitely make sure to check it out if they give me a coupon code. I'Ll also be sure to give you guys that in my description box as well but yeah, so I'm just continuing up and then like I said you can follow that last guideline to go ahead and just use that I guess as like a placement or where that Last track needs to go and they always make sure that you're carving that track and putting it a little bit in front of the cat because it will hold it tight. This is what will allow your quick leaves to last about a month or a month and a half, sometimes two months depending on you know how that works out, and this just proves to you that you really don't have to do. The quick leaves with a braid down so for you, girls that don't know how to braid. Do not worry. You literally just pull it into a ponytail and keep it moving. So now that we've gotten to the leave out area - and it is a little bit curved - you want to make sure that you are putting your tracks in the perfect possible position. So I'm gon na leave about at this point a half of space yeah from my actual leave out and then I'm gon na go ahead and fill everything else in so that means I need to put a little bit more on the left for the right. Vice-Versa, you do that until you reach those lines again before deciding to go ahead and start to cut. You know: cutting the UM the wait cap or anything like that, because you don't want it to split back because that will happen. I know you guys a lot of. I get a lot of questions about that. You guys ask me that all the time, so I'm going to show you a trick to keeping that cap in place as well and so yeah. So, as you get closer to the leave out area, you want to make sure that you're still curving the tracks. I don't know if you guys are familiar with the invisible part method, but if your hair is short, this will definitely help you with the blending process. As well, you can do this on either side if you want, I only did it on my right, your left side, but you can also do it on the I guess the opposite side as well. If your hair is a little bit shorter and you need help with blending, I'm so yeah once you got all that done, you guys can see. All that I have left out now is just that leave out area and then a little bit more of the cap. So I'm taking my hairspray, you can pretty much use whatever you want. I'M just really locking the cap in place. Obviously this is my got. Ta be glue hairspray, so I'm just using that in a combination with the blow dryer just to make sure that everything stays in place and then I'm gon na go ahead and cut out the cap so yeah once that is nice and secure and it gets kind Of hard, so that's actually good, because it's easy to rinse out of your hair. You guys know it's just some hairspray, so at most it may have a little bit of alcohol in it, which is kind of drying. But outside of that, you should be fine and then go ahead and just pretty much cut the remaining parts of the cap, and you want to do this slowly, cuz, you don't want to cut your actual hair. So if you need help, definitely don't be afraid to ask for assistance but yeah, as you guys can see, I've completely pulled out my leave out area, and that is pretty much that so yeah and now I don't have to worry about the glue being like on My hair or anything and as you guys can see it kind of went a little bit a little bit too far in this area. So I literally just cut that off and the cap is still in place because again, all the other parts are pretty much covered. So there we come when the cap is not going anywhere. I don't know why. I talked on it like that, but you want to go ahead and cut out that final track, which it just line up perfectly, and you are pretty much all that from here. So make sure you have it in place, go ahead and hit it with a blow-dryer, real quick. You don't have to do this throughout your hair, but on this last track I recommend doing it because you are putting it putting it right in like a parting space. So you definitely want that glue to come to dry down fast and not melt into other areas of your hair, so go ahead and brush everything out at this point, you will get some type of shedding, obviously, because you've been cutting the tracks and then gluing them Down, usually what cook leaves you end up not getting as much shedding? That'S like a sewing because it's glued like that from end to end, but yeah so get rid of that initial shedding and then here of course I did end up cutting about two to three inches off of the hair, because I wanted to go for more of A natural look so something right up below my collarbone, then I'm taking my camera flatiron or it's a thermal styling spray number 19. Just to help me still press the hair, because of course it is a body wave and it was not like previously co-wash, usually co-washing. Your body with hair and allowing that's like dry, you will be able to shading it a little bit easier than going straight from bundle or packaged hair to a fly and so keep that in mind. And so here I'm using my baby list, a one-inch flat iron and pretty much just going through the hair. This did take me about in total, I believe about an hour and 30 minutes which is not too bad to do a full, weave and stuff like that. Styling included - and it should last me about a month to two months, but you guys know - I literally will probably have this stuff like two days, and that will be that on that. So now is a very good time to go ahead and subscribe. If you guys are not already turning your pros notifications, because I have a ton more a ton of more tutorials to come from this and then, of course, if you guys are not or have not already had a chance to check out my other quick weave videos And definitely make sure to check those out where I'll show you. How did you kind of like some half-up half-down, some bob styles and things like that so, but if you guys have been here before, I think you already knew that. Okay, so anyway, I'm just still going through the hair and, as you guys can see that Flatiron spray kind of works, that's like a light holding spray. So we're pretty much is locks the hair in place and then allows you to easily silk press everything out, and so it doesn't leave like any chalky residue doesn't make the hair look, feel oily or anything like that. So this has been like my number one product when it comes to flat ironing like bundled hair or, like you know, wigs and weaves like that, so yeah. Now that you've pretty much gotten, you know all the hair straight and straight as possible. I did actually go back and kind of trim the ends a little bit more and then, of course, I cut a little bit of layers toward my bang. You guys can see I'm just lightly doing this and like a diagonal motion, if you're not familiar with how to cut layers, I believe I'll have a detailed video on that as well, but if not and hopefully you're a visual learner, you should pretty much just get The process, starting from about the bottom of my chin and kind of just cutting down in a diagonal motion, literally layer by layer kind of going back a little bit more each time so yeah there we go y'all. My lips were so dry in this damn video. I had coconut oil like right beside me. I don't know what's going on, but my lips have been so dry. I must be dehydrated, I'm not sure, but anyway, just doing my final pass, the flat iron over all the hair and kind of just make sure that everything is completely smooth down. There'S no lumpy areas in the base and as a S & C, it's a really nice and pretty luster and length as well. It looks really really natural, so I was loving that and then for my natural hair, of course, because you guys know I've been on this heat free journey, I'm using my chi thermal Flatiron spray. I know you guys are always attacking me about these heat protectant. So y'all better not come for me this time. Okay, this is the first time, I'm literally like straighten my hair, since I told you guys that I was going on my heat free journey, which I believe was about four months ago, so I am excited about that and honestly, I've already taken out my hair since This video was created and my hair curled right back up, so I'm so proud of it it regards to that. But yes, I'm just going through and shaking everything and, like I said you guys, my hair was wet when I made this video. So obviously I had gel on all the other areas of my ponytail, but not this leave out area. So I put the thermal spray on there and then I went ahead and went through with the blow dryer just to kind of blow everything out to make sure. Obviously it was dry before is something to do like a flower, and so that's kind of why you're getting this kinky curly textured situation happening right now. Alright, so I'm just blowing that out and you guys I got this mini travel blow dryer. I think in a boxycharm I think it was like they're three months megabox or something like that. I was like wow, that's so cool came with like a blow and also a mini flying as well so yeah, just pressing out my hair and, as you guys can see literally one pass did the job, but I did notice that my hair was a little dry. So I can clearly see that I needed a trim um and now that my hair is just kind of growing out from that you know partially natural and the other part is like that heat damage. So it's just kind of textures on top of textures okay. So I'm just smoothing this other side down as well, just kind of going through and yeah I'm pretty much gon na finish the same process, and then I will be right back all right so now that everything is smoothed down, I'm gon na be taking some of My cream of nature argan oil. I believe this is the extra holes edge control to actually rub over the tops of my hands and then lightly on the tops of my leave out areas so not dragging it down onto the weave too much, but definitely on my leave out area, and I use This to smooth and really melt my hair into, I guess the bundle hair without having to go back through with a flyer. It literally works like a dream. So if you guys have a more kinky sex or definitely try it out, and let me know how you feel about it and just use a brush to kind of go through it to let you know pretty much block everything into place. Y'All, you know I'm struggling right now struggling but anyway, so I am using some of my edge booster just to get these edges in. What'S her, I wasn't really sure like how I was gon na sell them, but yeah. It ended up working out in the end and then taking some my cream of north nature, I'm singing some about creep of nature spray y'all. I got the most going on right now. Oh uh, pretty much just ask some shots in my hair, and this is pretty much the final look. You guys. I definitely love this style. The hair was extremely a soft bouncy full and definitely gave me that kind of like natural look like you'd, be worse to just suppress some natural hair. It looks really really pretty and really natural, so I definitely make sure to leave any comments or questions down below. Let me know what you think about it and again all the details on the hair will be listed in my description box. If you are not already subscribed, go ahead and take care of that swimming your post notifications, I love you guys. I stay pretty and I will see you in part two, where I pretty much give you a styling video and then all questions in regards to these quick weaves will be answered in the third video. So definitely make sure that you are on the lookout for those and yeah I'll see you guys later bye, baby


Comments
Kayla C: I tried doing quick weaves because of these videos and honestly it always comes out bombbbb ♀️ keep them coming
Ryn H: I really love quick weaves like honestly and your videos really educated me on how to install and safely remove them ..... Ik some people believe glue isn’t good for ur hair but honestly my hair has been flourishing and growing since I’ve been using quick weaves and I have relaxed hair.
PeaceBeStill: Just did a QW for the second time in my life doing your application (going from ear to forehead) and it DOES look so natural! The first time I ever attempted I went ear to ear and it was way too much hair and it did not look natural. It looked wig like. Right now I feel so cute! You're a great teacher
Alicia Jones: This is sooo cute! You make me want to drop everything and head to the beauty supply!
Danica Reed: I love how natural it looks
Sweetness Shelton: Great job girly! Love it! Very natural looking.
sharon gordy: Yesss! A good old fashioned quick weave with leave out . Beautiful as always
Gabrielle Antoine: Watching this during quarantine and I’m actually going to try it!! If things don’t work out, don’t worry, I have nowhere to go #LoveThis
~Daphne Amy's World~!: Wow I haven't done a quick wig in a long time I miss doing that also missed makingyou making me want to get back into doing those again you did an amazing job ♥️
Vee: Im in love with this it came out perfect
Domonique Smith: You’re skin is flawless!! Thank u for such a detailed video
What’s Niki Cooking (Niknax): Beautiful and it looks full and natural
Annie Phillips: So flat and seamless
SONDRA C: Beautiful job. You may want to try the “Kiss Dry & Style Heat Brush” available on Amazon. Detangle hair starting at the ends to prevent excess breakage. Keep up the good work. God Bless
IAmWhitneyChantél: Use a glue shield before laying tracks to protect your hair for those in the comments who were asking
Beauty By Shaee: this is cute , i think ima do a quickweave with a closure
Vanessa Mendes: Love it will be trying it soon
Kitsolovely Life: Very nice and well explained
Sandy g.: Natural looking asf,
Welcome to the Now: I really want to do a quick weave. I havent done it in years, but im so scared about the glue on my hair. I’ve had bad experiences so that’s why im scared
Elaine Manley: Excellent job!!!
Mrs. Shaniee Kennedy: Well done!
Lovingfamily83 Lovinggod83: Love it
Victoria Claire Official: Pretty look.
Jasmine Brown: I love this. I cant wait to try it
Kay Lee: Nice - presentation so down to earth. .......end product great. Dnt change, easy to understand. P.S. didnt see the sleek stick name/brand. Thank you.
Its_dayday: I have locs so I wanna try this but with a closure for obvious reasons lol
MIRRATHABRAT: ❤️❤️❤️
Kay O'coney: I need to try this, i miss natural leave outs but doesn’t glue get onto your real hair?
Liz Rivera: Whenever I cut the stocking cap it looses to much and I feel like all the hair moves alot and looks like I have way to much hair on the sides.??
L S: Girl I had to slow this playback speed down! You speak so fast lol. But thank you, this video was very helpful ✨
MIRRATHABRAT: ❤️❤️❤️❤️
Tabby Williams:
Penni Max: How do you feel about the protective cap (the clear jelly looking stuff you put on top of the cap before you glue). Is it worth it, or not?
Betty Boop: Cute
terrion castro: It cute but you talk to fast ❤️
Cleopatra Dawn: Girl all I can say is that you talk ur ass off. I was glad when I had that 10 Second music break whew!
Penni Max: Your mirror must be the goat lOl. Where did you get it? How are you doing your own hair at such ease. Especially without seeing the back of your head