Prettiest Balayage Highlighted Wig Ft.Yolissahair
- Posted on 30 August, 2022
- T Part Wig
- By Anonymous
Direct Hair Link:➤https://bit.ly/3oZ7o0p
Hair Info: #yolissahighlightwig Body Wave 13x4 Lace Frontal Wig 20inches 180% density
❤ #yolissahair Official Website:➤https://bit.ly/3P1SZez
Products used:
•EBIN NEW YORK Wonder Lace Bond • Adhesive Spray
(Supreme Hold, 2.82oz/ 80ml)
•Ruby kisses crème foundation
•Bold Hold Active
•Luster's Renutrients Slick Stick, 2 Ounce
•Nairobi Wrapp-It Shine Foaming Lotion, 8 Ounce
•Spritz extreme hold spray
•curling wand
•oil shein spray
•91% alcohol
•rat tailed comb
•Wig cap
•elastic band
•Eyebrow razor
•cuticle scissors
•hot comb
•MOST IMPORTANTLY: Generic Value Products shaping spray plus for curls
Please like comment and subscribe!♥️
CONNECT UP WITH ME :
YouTube: @slimm_rae
Instagram: @slimm_rae
TikTok: @slimm_rae
WORK WITH ME:
-Email me for business inquiries
Songs:
One way instrumental by Autumn
Use to this instrumental by future
Oui instrumental by jeremih
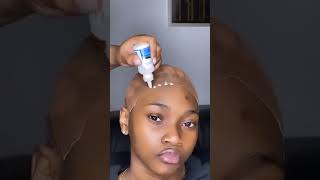
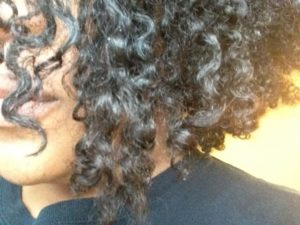
Okay, it could be as bright as heaven outside this lace is not giving laces given scout and that's a white best one period. Okay, hey guys. It'S lim rae welcome to my channel, thanks for being here, um today i'll, be showing you how i installed this face. Frontal wig from yolissa hair, it's a 13x4 and, as you can see it has blonde highlights it was one of the prettiest wigs i've ever had in my life, and i will be showing you how i installed it step by step today. So i started off shaving off my sideburns because, if you're anything like me, your sideburns be side burning. All right, like i do have thick sideburns, but taking it off, helps my lace front. Stick after that i went ahead and gelled back my edges. We got to be glued, you know, got to push the edges out the way and then you want to go ahead and take the blow dryer and dry. They got to be glued so that your edges stay out your way then you're gon na go ahead and apply your bod cap to your head and take your ruby, kisses cream foundation and whatever color is the closest to your complexion and you're gon na apply it All over your bod cap after that you're gon na go ahead and cut out your ear holes. You want the ball cap to be very nice and snug on your head, while you're doing this so that it can lay flat after you, um cut the ear holes. You just want to stretch it out, so it fits your whole ear into it. Then, after that, you're gon na take your ibn or i don't know how to pronounce it but you're gon na take that adhesive and just spray all over your hairline and then blow dry it. Personally, i do all of this in sections, because sections always make everything. Look better and you're able to take your time everything's, more precise and yeah. You also want to make sure your ball cap is completely dry before you go ahead and cut it just make sure it's really dry, you don't want it wet and gooey. So after it's completely dry, you go ahead and cut and then you're going to take that little band from the bottom and place it on the top of your head, so that your ball cap isn't baggy and then finish up coloring your bod cap and cutting. So, while you're cutting the bob cap, you also want to get as close to your hairline as possible, because you don't want the wig to be too far down touching your eyebrows and you don't want that now. You'Re going to take that same ruby, kisses foundation, and you just want to go ahead and tint the inside of your lace. Now you want to go ahead and cut out the ear tabs of the lace so that the wig fits on your head, nice and snug. After comparing the hairline of the wig to your natural hairline and making sure it's lined up you're, just gon na go ahead and clean up the excess, bald cap. Like i said before, it's close to the hairline as possible, then you want to go ahead and take your alcohol and just clean up the residue from the adhesive spray and everything like that and the foundation after that. You want to go ahead and clip your lace front into about eight tabs. If you think it's better for you to do less, then that's perfectly fine, but me i cut it into eight tabs. That way i can glue it down little by little. Then i take my bold hold active and i go ahead and apply the first layer of the fold hood adhesive glue. Personally, i like to call this liquid gold in a bottle, so i do this section by section just like i do everything else and i lay it down with a popsicle stick which you can obviously get from like the dollar tree and then um. I wait for each section to clear dry and when it's dry you'll be able to tell, because you can't even tell it's there, it's 100 clear go ahead and do this same process about three times lay down the dots of the bolt hold spread it down. Wait for it to turn clear and repeat, like i said about three times the more times you go ahead and apply that bolt hold the more hold you're gon na have on that wig. So if you know you about to get down and dirty, then you want to make sure to put as much glue as you need to put down, don't be out here: caught slipping, no pun intended now boom. As you can see, it was all clear and ready to go and i just went ahead and lined up the hairline of the lace front to my hairline, where i know it would be, and then i just use my fingers to press it down as well. As my fine-tooth comb, you could go ahead and press it down wherever you need it to be, and if you just made a mistake and put it too far down or too far back, you can easily just lift it up and reapply it to your head. So you want to take your time and do this all across your hairline, make sure that um it's nice and flat and tight - you don't want it to be real lumpy, because then you're gon na have a lumpy wig and you don't want a lumpy weight. So just make sure it's nice and flat, you can use the um the tail of the comb to press it down as well, and you just want to do the same thing across your whole hairline after you're finished and it's nice and flat. You want to go ahead and once again section by section just cut off all those little tabs, one by one, don't rush yourself and you also want to go in a zigzag motion. You don't want to just cut straight across or it's going to make. You look like you just got lined up at the shop and that's not what we want ain't, nothing wrong, we're gon na line up, but that's not the look we're going for if you're wearing at least funnel wig, so zigzag zigzag, zigzag. Take your time cut the lace as far back as possible and just make sure you're covering up your whole hairline. Now this next step, you want to do really quickly. You want to take your extreme hold, spritz spray and just spray across the hairline of your wig. Like i said, you want to do it as quick as possible, because that spray is really liquidy and it could cause your lace to lift and you want to hurry up and put that elastic band on there and allow it to melt. So while you got that lace cooking up underneath that elastic band, you want to take your lot of body foam and apply it to the top of your roots. I guess you could say and just use the hot comb to go ahead and mold the hair, how you want it in this case, i wanted a middle part, so i went ahead and took my hot comb and just molded the hair into the direction i wanted. It to fall, so i also use a wax stick in order to lay everything down and i'm gon na have all the details to all the products that i use down below in the description box and now at this point i go ahead and just run through The hair with the flat iron just to prep it to get ready to curl it, and i went ahead and put my hair into clips to get it on my face and it was time for baby hairs. So, as i told y'all before, y'all want to go ahead and part cut with a blade rather than scissors. And then you want to go ahead and curl it with your miniature curling thingy thing. And then, after that, you're going to take out to be glued. And just apply the got to be to the top of the baby hairs, not the whole entire thing, as you can see, i'm just applying it to the top. Then i'm gon na take my nairobi foam and that's what i'm gon na apply to the rest of the baby hairs to give it that nice fluffy not firm to the head, look same thing just with the sideburns cut, curl and lay so it's not exactly in The video, but before i did start curling my hair, i went ahead and sprayed the entire wig with some heat protectant spray. Just because curls is a lot of heat and, as you can see, i'm not an expert on curling hair but curling any type of hair. With the wand is kind of self-explanatory, just twist it around the wand, wait about 10 seconds and then gently. Let it go and it should bounce back with that curl and the beauty about curling hair is that it really doesn't have to be perfect. If you're going for the look that i had um, you really could just play around with it for real for real. If you don't get the curl right, then just brush it out, and do it again. So at this point, when the curls have finally reached your satisfaction, you just want to go in with some oil sheen spray and just spray down your whole entire head, making sure your hair is not frizzy, giving it a nice smell and just adding a shine to It - and i also didn't put it in this video but most importantly, you want to go ahead and spray all the curls with the hairspray that i list down below. So this was the finished result. As you can see, i was looking good. The curls were perfectly imperfect, i loved the color and the edges was laid and it was giving my natural hair. This hair was really good, hair um. I would recommend you try not to use too much heat on it or using as much heat protector as possible, because this hair will burn. I'M gon na be honest with you, but it also had really good thin lace. This was up close and personal and um yeah. I really did enjoy this wig. The link to the wig will be down in the link box below the second person dedicated


Comments
Yolissa Hair: So pretty!! This highlights look great on you!