Slayed This Reddish Brown Curly Style| Beginner Friendly | Ft Unice Hiar
- Posted on 04 September, 2022
- T Part Wig
- By Anonymous
Hey Beauties
Welcome back to my channel Hope You Enjoy This
H A I R D E T A I L S
Get Extra 10% Off+ Free Robe Use The Speical Code: Nicelace
●▬▬▬▬▬▬▬▬▬♛#UNice Hair♛ ▬▬▬▬▬▬▬▬▬●
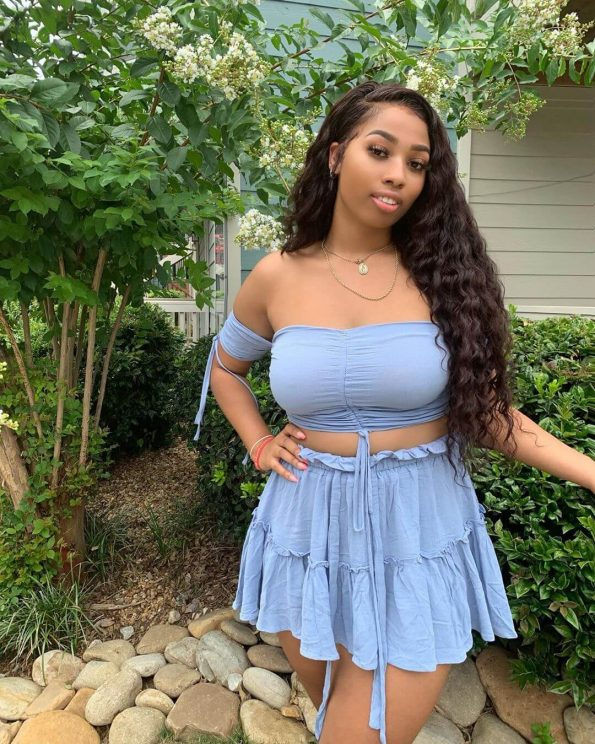
I’m using Reddish Brown Curly Wig 24inch: https://st.unice.com/c1lh9
https://www.unice.com/ More Discoutn In UNice: https://st.unice.com/c1lha
Download “UNice” App (Extra 5$ OFF) ➤ https://link.unice.com/appdownload-you...
Within 30 Days, NO Reason Free Return For Subscribers Orders
Afterpay & klarna & Quadpay & Sezzle, PAY 4 Equal payment Within 6 weeks!
☛NEW arrival precious blonde wigs in UNice: https://st.unice.com/c1lhc
Affordable & Popular Glueless V-part Hairstyles: https://st.unice.com/c1lhd
GET FREE HAIR With Friends Help on ”UNice” App➤ https://link.unice.com/bargain-ytb
Aliexpress TOP UNice Hair store➤ https://s.click.aliexpress.com/e/_pvse...
Amazon UNice Hair Store ➤ https://amzn.to/3afUszy
[email protected]: https://www.tiktok.com/@unicehairoffic...?
Instagram @unicehair: https://www.instagram.com/unicehair/
UNice YouTube Channel: https://www.youtube.com/c/UniceHair
Facebook @UNiceMall: https://business.facebook.com/UNiceMal...
Facebook UNice Fans Club Free Wig Giveaway: https://st.unice.com/afcc9
#unicehair #unicehdlace #unice
______________________________________________________________
H A I R P R O D U C T S & L A S H E S
______________________________________________________________
B O U T I Q U E
______________________________________________________________
P R O M O + P R O D U C T R E V I E W S
______________________________________________________________
♡ S O C I A L S ♡
❤ Instagram: https://instagram.com/charleenforever/...
❤ Twitter: https://twitter.com/Charleenforever
❤Tiktok: http://www.tiktok.com/@charleenforever...
❤ Amazon Must Haves: https://www.amazon.com/shop/sochar
________________________________________________________________
Hi guys welcome back to my channel so today i filmed this tutorial on this hair. I am wearing hair from you nicely so, if you're interested in seeing how i got this look, keep on watching all right, you guys so like i said i do not wear bald caps anymore. So i'm just going ahead with a ponytail and i just put the wig straight on top no stocking cap, like i told you guys in the past, i feel like stocking caps are pulling out all my edges, so i prefer to not do any stocking caps. I'M going to go ahead and just adjust the wig and start cutting around my ears and cutting off those extra laces right after i finished doing that, i'm going to go ahead and begin to cut the lace. So this hair, i did pre, pluck it, and i did also bleach it um. The knots were kind of the same color of the actual wig just a little bit darker, so i thought bleaching. The knots would definitely give it a nice natural look which it did so. Definitely if you do get this wig, i do recommend bleaching the knots so now i am going in with my lace glue. This is the stone melted lace glue. These are available for my purchase. The link will be in the bio, so i'm just going to be doing one thin layer, because i don't want too much hard glue on me right now and honestly, i didn't even want to glue it down. I really wanted to got to be it on, but i wanted to see how it would look melted with the lace and yeah. So i just went ahead and did one thin layer once that dries clear, i'm going to go ahead and just begin to apply it. So here i am just fully applying the wig. I don't know what happened to the beginning clip, but at least i got this part so now, i'm just going to make sure that all little areas are fully glued down um. If my ear areas aren't fully glued down, i'm just going to go ahead and do one layer again and make sure i get some corners and all that stuff make sure you guys are always making sure that everything is fully glued down, because that is how you Guys get that seamlessly flawless. Look now, i'm just going in with my comb and i'm just pressing everything in making sure everything is fully melted, y'all, looking nice, how nice this looks like everything, looks so good. I'M now going to go ahead and begin to pull out. My baby hairs, i'm not going to quite do my baby hairs just yet i'm going to go ahead and basically mold them into position. So i'm just parting out my baby hairs. I wanted to do two of the little temples and then cyber, but i did end up pulling out a medium, a middle piece. Let'S say a medium piece. I did end up pulling out a middle piece to do baby hairs as well. I'M not really too sure of the style of the style. What'S the name of the style that i'm doing to my hair is called, but i'm just doing like a mid ponytail with some parts in it. So i thought that these baby hairs would definitely go best with that look, so i'm just going ahead now and parting out the hair and i'm hot combing everything down, so everything is slick and not in the way. Lastly, i just have to do this sideburn once i finish, i'm going to go ahead and go in with my round of got to be i'm just going to spray that just to give my hair an extra melt and then i'm going to be taking my you, Nice melt band and i'm just going to tie my hair down with that and let that sit and dry for about 15 minutes. Once that's finished dry, i will come on the camera and continue styling the wig all right, you guys. So it's been about 10 minutes. Not even 15, but y'all. Look at this lace. Look at this smell! Everything looks super super good. So now i'm just going ahead and making sure my baby hairs are to my satisfaction and making sure i pulled out enough hair for the baby hairs. I'M looking for my hair cook, y'all, looking so unorganized, so now i'm just going to go ahead and take some tweezers and i'm just going to thin out some of these parts that i pulled out just because i don't want the baby hairs to be too bulky Or too thick, so i'm just going to do like a little bit of plucking, nothing crazy! So now i just go ahead and i cut my baby hair to a nice length and i go in with my pencil, curling iron. This is one of the smallest flat irons you can purchase and that's what i got from my local beautiful store. So that's the curl that it gave me. I'M gon na go ahead and cut the other one and, as i said before, guys i like to cut the hair a little bit longer, because if you cut the baby hair short and you try to curl it, you will end up burning yourself. So make sure you guys are very, very careful so now i'm just going in with some got to be. I usually use my baby hair goo, but today i just went ahead and used some got to be. I don't really know why, but i have been trying to master doing baby hairs. We got to be moves different type of things other than my gel, so the baby hairs did come out good. It does take a little bit long. You just need a little bit of patience because it's like a liquid to dry type of thing, but i i definitely love my baby hairs and i think they came out gorgeous so so here i am deciding that. I'M just going to go ahead and get a little middle part hoop or middle center swoop. So i'm just going in see my two brushes wet, i'm just brushing that in holding it and brushing it in making sure it swoops beautifully. I was gon na do like a little swirl right there, but then i was like no. That looks crispy, so i changed my mind so yeah y'all, i love this hair, like i really don't like color hair, but you, nice, hair, has always had some really really good hair. So in my opinion, and look at this look at that, so i did go ahead and put a little bit got to be, but i did not tie my hair this time um. I think it's better to only use your melt band when it comes to basically trying to protect your edges after getting them fully done and also melting. Your lace in i wouldn't recommend putting on a melt band after you unslicked and did your wet baby hairs, because that does make your baby hair shift around and move which i had to learn the hard way. So now i'm just taking my wax stick and i'm just slicking down each part. It'S going to be three sections, so left middle and right, and i'm just going in with my got to be my hot comb. You are going to see me use a wand curler because my hot comb, the teeth on it, are so small because my other one broke and i have not had a chance to go, get a new one. So y'all. If you fancy your mohawk, the teeth on my hot comb are so tiny, like, oh my god, it's horrible, but i'm just going to go ahead and go into sections. The key to getting this to have a nice part is doing what i'm doing right now. You have to flat iron the hair, the middle center part here, going straight up and that's what's going to give it that nice gap. So now i'm just going in and i'm going to sections again, i'm doing the same thing with that side, making sure everything is flat and cute and i'm also using a wax stick that is purchased for me. So if you guys are interested link in the description box, but now i'm just going ahead and finishing up and so far i love how it looks. It was slicked down very, very nice, just with a little bit of got to be and a wand. The hair would have came out super super pretty if i had time to wand curl it, but i did have to go run and do orders today and ship out wigs. So i did end up vlogging, so there will be a vlog to see, but i did unfortunately break my camera, so there is no ending of the vlog. I have to probably make a blend ending off of another camera. So now i'm just going ahead and tying my hair into a ponytail y'all. I did my thing with this install this looks absolutely beautiful. Y'All make sure you guys check out you, nice hair. I have worked with you, nice hair for years. Don'T forget to widen out your part with a little bit of makeup. Y'All. Look at that. I love this hairstyle, i'm going to do this hairstyle again, so y'all stay tuned. So this is the final look of the hair i i am wearing. I think this is 24 inch or 26 inch, i'm not sure, but i will have the correct link in the description box below, but i am wearing like this nice, i'm wearing this nice, beautiful, color and y'all know i don't wear color, but i gave it a Shot and i actually i like it - i like the color - i like the style that i did. I was actually been trying to accomplish this look but didn't really know how to do it, but i just went in like different sections. The main thing you need to learn like you need to do is um hot comb. This part up first and then that will kind of have you have that gap? I comb it in and then straight back so yeah. That'S how i got the look. So, thank you guys so much for watching make sure you guys check out you nice hair for some bomb, affordable, quality hair. If you guys are interested in this wink wink. If you guys are interested in this wig, i will have the descriptions listed down below and also my lashes are. For me, these are a new style comment down below. Let me know what you guys think i should name this because i think it's like it's giving like links. I know y'all here, baby cairo in the bed, but anyways yeah. Thank you guys. So much for watching make sure you guys subscribe below. I have a bunch of new videos coming bye,


Comments
Ivorie Creque: Love it
Ajia: Finally been waiting for this ❤️❤️❤️❤️ *First Comment.
tashaye brown:
blessed & highly favored: What color is that?
La Morena: Pretty but what’s with the parts? I see kheumani do this style without the parts. Just plucked good right at the widows peak
Nessa: Hey boo