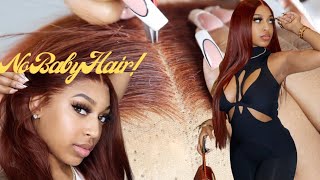
My First Time Trying 613 And.. I'M In Love!! | Install + Soft Wave Curls Tutorial Ft Yolissa H
- Posted on 27 September, 2022
- T Part Wig
- By Anonymous
R U NEW HERE? ↑ SUBSCRIBE!
if ur returning, hey #kashbaby! welcome back ♡
♡ H A I R I N F O
●▬▬▬▬▬▬▬▬▬♛Yolissa Hair♛▬▬▬▬▬▬▬▬●
Direct Hair Link:➤https://bit.ly/3ufwfAh
Use code: “kashiajabre” for $40 OFF
Hair Info: #yolissa613wigs Blonde Straight Hair 13*4 Lace Front Wig 24inches 180% density
❤ #yolissahair Official Website:➤https://bit.ly/3R1a9v5
Yolissa Hair New Comer? Look Here!
Get ❗️$150 Coupon Package❗️Join in Yolissa group:➤https://bit.ly/3momOuu
Trendy #yolissahighlightwig :➤https://bit.ly/3uiSnKa
Follow Yolissa Hair On Social Media
Instagram: https://www.instagram.com/yolissa_hair...
Facebook: https://www.facebook.com/yolissa_hair/...
✔Wholesale Contact +86 15803834514
♡
P R O D U C T S U S E D
Ghost Bond Adhesive
Ebin Wonder Lace Adhesive Spray
Style Factor Wax Stick
Got2B Hairspray
Similar Videos:
https://www.youtube.com/watch?v=fZFYMj...
https://www.youtube.com/watch?v=kdFeZ_...
-
follow me ♡
Instagram: https://www.instagram.com/kashiajabre/...
Fashion Instagram: https://www.instagram.com/fashionsofka... (OUTFIT DETAILS)
Twitter: https://twitter.com/KashiaJabre
Snapchat: @kashhbabyy
shop my site ♡
kashiajabre.com
business ONLY ↓
faq ♡
age: 20
birthday: 7/13
height: 5’6
camera: canon G7 x ii
#KashBabies, Have a question or need advice? Feel free to DM me! ♡
C R E D I T S ♡
Music by
Edited by @Kashia Jabre
Intro by @Michael.Ny
Current Subscriber Count:
390,000 ♡ T H A N K Y O U !
Foreign, so thank you guys so much for sponsoring this video um y'all. I was a little scared to try this hair out, but I ended up really loving how this hair turned out. So if you guys are interested to see how I installed and styled it, please make sure to continue watching this video, but before we can get into it, y'all already know. Try Got ta, Give me a big old thumbs up and also comment down below, and let me know what you guys want to see next subscribe to my channel, because my cash baby's lit I'm late and described, then you can believe two in us on what that's Gon na hear you so yeah y'all, let's just go ahead and get right into this video all right, all right, so y'all I'm a little nervous about this blonde. It is so beautiful. Though look, I really really really love the color. This, of course, is 613 hair, but I toned it and if you want to see how I toned it, I will have the video on my pick Tock. So I'll put my tick tock on the screen, but this is how the color came out. I just feel like it toned down a lot of that yellowness in it and just made it like blonde like ash blonde, and I really really like it, but I'm so scared to install it. Like I've been looking at this wig since yesterday, I've been done with it like done, coloring it and everything since yesterday, and I just been installing putting it on because I'm just like. I don't know how is gon na turn out, but I am just ready to get it over with. I think I'm about to kill it, I'm about to I'm about to I'm about to kill it yeah, I'm a little nervous. This color is super bomb, though I don't even know how I managed to pull this off, but it looks amazing y'all and the hair quality is just bomb like so bomb. I want to do a hairstyle with this hair, but I don't know what hairstyle I want to do and I don't know I just don't know what I want to do with it. Yet so I guess I'll just wait to you know, install it and then see how I feel I was gon na put some curls in here, but I just got a feeling that the curls not gon na hold and I'm not going to wear right now. So I kind of don't want to waste my time and curl all of this hair and then it's just gon na fall, but at the same time I feel like curls will look so good with this hair. So I haven't made up my mind yet I don't know what I'm gon na do, but I have strained out this hair and of course toned it into everything and I flattened it out while it was on my wig head. So it's like all ready to be installed and yeah just about to get into it. I'M gon na talk y'all through this one. I'M gon na talk y'all through it. I'M gon na show y'all, I'm gon na talk to y'all step by step. While I'm doing my hair and yeah so so first thing, I'm gon na do is re-clip my hair back. So like nothing gets, you know the hair don't get caught in none of the products or glue that I'm using okay. So now, basically, what I have to do is get rid of all of the cap that is showing up underneath the wig um. I am seeing when I'm trying to like size it on my head that it's a little bit snug like the hairline, is a little bit too. I don't want to say too small, but I wish you know it had a longer hairline and I don't know why. Some wigs are like that and then others aren't because they're all what 13 by 4 or 13., it's always 13 inches, but it's just sometimes the wig hairline is just way too far back. If that makes sense for my natural hairline, I don't know, I have to cut away all the cap that is visible up underneath so that it is not showing - and that is super important for this wig, because this hair is blonde. So it's not gon na hide too much, so you zoom in so y'all can see. If y'all can see like that little bit of cap that you can see right there, you don't want to be able to see that at all, so I'm gon na keep pulling it back. Okay, see that is better. You can't really see any cap, but now I have to make sure that when I place all of the wig down that you still can't see anything see I'm having to tug on it to kind of bring It where it needs to be on both sides. And you don't always want to have to do that. That is what causes your wig to lift faster, because it's like tension on it. So, of course, you know you try to avoid this, but in situations where you can't you kind of just you kind of just got ta make it do what it do. So this is where I'm going to be placing my wig and I don't see any cap so from here. I can start to add makeup to the cap into the lace. Okay, so y'all, I always use a powder that is super close to my skin tone, and I just put this all over the cap to try to like turn it into like you know, make it basically disappear. I'M also going to put some powder on the inside of the lace, so I like to just flip it back like I did and then just apply it up underneath the bottom. This is literally going to make the hair looks like look like it's coming out of your scalp. Some people use lace, tint or um like Foundation, but I find that powder works best for me, but to each its own you can use whatever you have. I guess anything: that's just gon na make it the lace, the color of your skin, I'm gon na, apply a little bit more and then I like to also put makeup on the top of the lace and I'm really trying to avoid getting makeup on the hair. I got a little bit over here, but I'm gon na have to wipe that off, but you really want to avoid especially light colored hair. You don't want to get makeup all on it. I guess that's like the downside of using makeup instead of lace, tint or something like that, because you won't have to worry about that, but you can just avoid getting it on the hair and just place it right before the hair. Okay. So now that I have all the makeup applied, you don't want any makeup on your actual skin. So what I'm going to do is take some alcohol and a cotton pad and just wipe all of that away. So, as always, I'm going to be using ghost Bond glue and I'm just going to be applying this on the edge of my cap to kind of blend this out. This is just gon na make the cap even more invisible. I just like to go along the line of the cap and really work that in make sure you have no harsh lines or clumps, because it will dry super white and you want this glue to dry, clear foreign glue. I'M gon na go a little bit more heavy and I'm not gon na focus it right on that cap. I'M going to kind of bring it a little bit more for where the actual wig is going to be sitting and I'm gon na do two of these layers and then I'm gon na. Let it completely dry and, as you guys can see, the first layer is already clear and gone. You don't even see it anymore. So that's exactly what you want and that's exactly what we're looking for here. You don't want any white glue left period, so you have to make sure when you're going in with this much that you're really blending it out. It'S kind of how you apply lotion. You wouldn't just leave a clump of lotion on your skin. You would rub it in and that's kind of what I'm trying to do here to avoid you know it dry and white and it normally dries white when you don't, you know smooth it out, so I'm just making sure to take my time doing that. Thank you. Okay, so now now it's time for me to go ahead and place this lace down, so I'm gon na flip it back and then I'm gon na pull it Forward where it's gon na be sitting about here and then I'm just gon na place it side by Side making sure that it's exactly where I want it to be, but I'm going to push it in with my comb also. This is the part where I kind of have to tug, but it's okay boom. It'S literally on there now y'all. Okay, now I'm gon na take my comb and really push that in there push the lace into the glue make sure everything is touching. The glue this hairline looks so freaking good and I didn't even pluck it like no plucking whatsoever. I normally don't put like my colored units because it's easier to see through especially super light colors like this so I'll be trying to avoid um. You know having spots where you can see through the lace, so I just don't. I just leave my colored units all the way along okay. So now I'm going to take all the hair and put it up for just two seconds: We're not gon na! Have it up for long, because I don't want to like Dent the hair. Now. This looks this actually looks really good now that it's on all right so now to further melt this lace, I'm gon na use this even wonder: leg spray and I'm just going to go all around the hairline of this unit and then I'm going to tie it Down with this band for about 10 minutes, while I'm styling the hair and then y'all see so this is the next step um you want to do this kind of fast or the lace will start moving and that's how it is pretty tight, but not too tight Because if you tie the band like super duper, tight it'll make your lace bulk up underneath. So I try not to tie it too tight but tight enough, where it's right close to my skin and then, while I'm styling this hair, I'm also going to just cut some of this lace off, so I can see a little bit better. While I'm doing this all right so y'all, I still don't know what I want to do, I'm about to try to put like one curl in here and see how I like it, and if I don't like it, then we'll figure something else out. But I saw this install picture, so I'm gon na try to recreate it make sure. Let me plug my stuff up, so I saw inspo picture with body curls, so I'm gon na try to mimic that. But if it doesn't work out, then I'll probably end up doing like a hairstyle like maybe like a half of half down type of situation or something of that sort. Thank you, foreign. The tool that I'm using is a baby list. Ferrari collection. I believe one inch curling iron and I got this as a gift, but I believe that it came from Marshalls or Ross, so it wasn't very expensive. I'M sure it was probably like fifty dollars, but you know baby list goes for like two hundred dollars. So that's actually a really good deal for baby, so it wasn't retail, which is a great deal and I'm always finding like little things in there too. Even though I got this one for a gift, I have found like other Hot Tools in there that were you, know, high-end and I caught them for a very, very good price. So if y'all have a local Ross or Marshalls make sure y'all go in there and check sometimes because they'll be having some real good stuff in there, that you would probably never think that they would have, but they do. Okay. So before I fully commit to these curls, I'm gon na take out this side, so I can see if I even like it and if I do I'll, just re-pin curl them up and do the other side. But I need to see if I'm gon na, like it before I waste my time, but the curls look like I'm just about to comb them out. Okay, so I'm back and I decided to do another style of curls, because the body curl just wasn't working out for me and the bang wasn't doing what I wanted to do. So I just did like these ocean waves. Looking like, you know, effortless ways, type of vibe instead of whole curls, and I like this so much better. I have the bang pant back so that it stays this way, but I'm going to show you guys how I'm doing it on the other side and I'm also going to cut layers into the side as well. So I'm going to do that first and basically, what I'm doing is just wrapping the hair around the barrel as if it was like a wand, curl or something, and then I'm just going to close it and hold it for a few seconds. The other side is a little bit easier because I already had it curled, so I probably got ta hold this one a little bit longer to get the same look, but this is what I've been doing and then I'm just going to move on to the next One, but I'm rotating the way that I am wrapping it around the barrel. So one time I'm gon na go this time. I'M gon na go forward the next time I'm gon na go backwards, so we're wrapping it forward like this and then I'm just gon na close it and hold it for a couple of seconds. So let it go and then it just creates this little wave and I'm just gon na keep doing this all around my head. Thank you, foreign. Thank you. Thank you. Thank you, foreign all right. So now that my hair is curled - and it looks so freaking cute - I'm gon na take off this band because it's time to cut the lace and plus my ears are like screaming for help. Okay, so I think I let the band on too long trying to figure out what curls I wanted to do. But it's nothing that we can't fix. But you can see like the little white areas right here where the band kind of got stuck. But now I'm just going in with my scissors and cutting off all the lace and I'm gon na go back in, of course, to specific sections, making sure that I get it all that I like to just go ahead and cut off majority. First, get it out. The way okay, so I'm gon na, have to go for an another melt session, because this lace is not doing what I wanted to do. But before I do that, I'm going to add a little bit more makeup to it and then I'm gon na spray it and then reapply the band for just probably a couple more minutes and then I'm trying to decide if I want to do baby hair. Since this lace isn't like really melted, how I want it to be - I probably will do baby hairs now, but we're gon na do all of that after um re-melt this glaze, because this it's not gon na work, honey and I believe this lace was transparent. So it's a little bit thicker than um. You know HD lace, so it's a little bit harder to melt. It'S not impossible. It'S just a little bit harder because it's a thicker fabric, so you really have to like. You really have to make sure and like do like a couple of extra steps to make sure that it's how you want it to look, because it is a thicker fabric. All right, okay, so it looks much better now, so I'm going to take these clips out before they ruin my curls and decide whether or not I want to do baby hairs because I don't know. Let'S see I mean I feel really pissed with no baby hair, because you really can't see them so yeah. I think I'm gon na do no baby hairs, because I really like how this looks. It looks like a fresh bleach, but I'm gon na fix the part, because I didn't let y'all see like it looks fine, but I want to really make it look natural. So I'm going to put it like my color of foundation or concealer right down the middle. So it really emphasize my part and really make it look like it's coming out of my scalp, so I'm about to do that now, but I'm really liking how everything is coming together. It looks really cute y'all, really cute 10 out of 10.. Okay. I changed my mind again. I think I want to do baby hairs. I know I know I know I'm just gon na do two swoops on the side and that's it and then I'm gon na be done for real for real all right so y'all. This is my hair. I'M about to do my makeup. Put some clothes on and everything so y'all can see the finished and final book, but I really love how it came out so far and I'm just like wow, so I could pull off any color like and I I feel like I can do anything at this Point so I'm finna do something to my face and um I'm gon na see y'all in the next clip foreign. Oh my gosh y'all look at my hair. I love this so freaking. Much like I did not know. I was gon na like his hair at all. So this is like a complete surprise for me, but it turned out so freaking good and I just love it so much like this video. All the links on this hair will be listed in my description box, as well as the coupon code, so make sure that you check down there for that. Y'All already know before we close out this video, you guys got to give me a big old thumbs up and also comment down below, and let me know what you guys want to see next and also back to my channel, because my cash baby's lit I'm late And if you subscribe, subscribe, belit too, and that's on what that's gon na be here so yeah y'all. This is the end of this video. I will see you guys in the next one. Thank you guys so much for watching and bye. Thank you.
Comments
Montanna DeVane: This color looks really good on you!!
Diamond KayLynn: The curls are GIVING
iamliyah: You look so pretty ❤️ I always wanted to try this color
Yolissa Hair: So beautiful!!!Thanks for choosing Yolissa Hair
briannalashae♡: looks so good on you
Faith Gray: You look so beautiful the color fit you
Kayla J: Omggg so freakin gorgeous! You look like a Barbie
Tiffany T: Try a shadow root on this hair !! It would eat downnnn
life with len: Looking great and the pink dress for tour white wig
Tashanda Myers: Ok Barbie I see you so beautiful
Brit Muse: Yeaaaa kashia