How To: Install Deep Wave Frontal Wig From Ruiyu Hair From Aliexpress | Vnveronica
- Posted on 19 October, 2021
- T Part Wig
- By Anonymous
GET THE WIG HERE
C$ 88.44 75%OFFIn Deep Wave Frontal Wig Curly Human Hair Wig HD Lace Frontal Wig Transparent TPart Brazilian Wet And Wavy Lace Front Wigs
https://a.aliexpress.com/_mtoabw6
PRODUCTS I USED:
1. EBIN WONDER LACE BOND
3. Ghostbond glue
4. Hot comb
5. got2b invisible glue
6. TAMYDOLLHAIR WAX STYLING STICK
DISCOUNT CODES
1. TTDEYE CONTACT LENSES use code "vnveronica" save more 10% off https://ttdeye.com?aff=32981
2. SHOP AT MISSEEDESIRE: https://www.misseedesire.com/
DISCOUT CODE: VN25 GET 25%
3.OTAKU CONTACT LENSES : save VN25 GET 10%
https://www.billionairebeauties.com/pa...
4. GET THE JEWELRY HERE: use code VN25
https://www.instagram.com/belizzadesir...
MORE VIDEOS TO WATCH:
1.
FOLLOW ME ON:
Instagram: https://www.instagram.com/brenda_ncha...
facebook: https://www.facebook.com/
snapchat: brendanchama
Poshmark: https://poshmark.ca/closet/vnveronica2...
Email: just email me at veronicanchamaondomedjafor any collaboration or any business opportunities xoxoxo
Hey guys! my name is Veronica and for today video i'm shearing with all of you guys my current everyday makeup look. I hope you guys like it please subscribe for more videos, comment down below and don't forgot to click the notification bell beside the subscribe bottom. xoxo
#aliexpresswigreview
#lacefrontwig
#wigtutorial
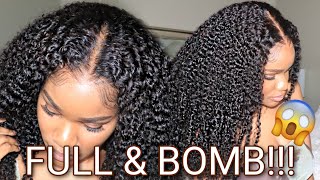
Hey guys welcome or welcome back to my youtube channel. It'S your girl, veronica back here and today, as you guys can tell by the title, i'm gon na be doing a hair tutorial, so this hair is from rui and i'm gon na be showing you guys what i got from the package and also i'm gon na. Be showing you guys how the hair looks like how i pluck the hair and also the process of how i install the hair so first thing first, this is how the packaging looks like, as you guys, can see it's a beautiful, pink packaging. So inside of the package i got few goodies, i got those mac lashes, a whip cap and also a car for hair care tips, and for last and not least, this is how the hair looks like i really love this hair. The hair is really soft. I love the density of the hair and, as you guys can tell, this is how the hair looks inside and also this is the line of the hair. So the first thing that i'm going to do obviously is pluck the hair i like to do this, even though the hair came pre-plugged, but it's something that i personally like to do, especially because i love the look after so unfortunately, on this week i couldn't plug It as much as i would like to because the there is not enough space between the wig and the front or but i kind of like do it a little bit. So you guys gon na see the final result. So now i'm gon na go ahead and i'm gon na use. My can do gel to move my edges out of my face. That way, my edges can be protective and honestly, i recommend you guys to do this every time you do your wig, even though you're not using glue just do this process. It'S really nice and thanks me later so on this specific video, i'm using the ball cap method for those who know, i always use this method, because i love how it's make your wig looks like and also i love how natural your wig look with this method. So now i'm gon na go ahead and start spray uh the the cap, as you guys, can see, and i'm using a different glue beside the gotchu big glue uh. I just discovered that glue and i like it better than that one by the way i'm gon na leave all the products list down below in the description box, including the hair itself, so make sure to check the description box. If you guys want to buy the wig and also if you guys want to know which products i use so now, what i'm doing obviously is called the cap, as you guys can see, and i'm using my small scissor to do that. This is a very important uh process, so you have to make sure that you cut your cup properly, because that way you can also put your wig on the right place. So i'm gon na make sure that i take every single piece of extra or whip cap. As you guys can see here on the process and after i'm gon na finish to cut the the cap, i'm gon na go again with my glue and this time i'm using the got to be a glue and i'm gon na uh make sure that the whip Cap is melted. The reason why you have to do this is because that way, uh your whip cap is not going to be see through your wig, especially if you are using hd or transparent uh wigs. So you have to make sure that you melt your wig. So do this frost and then dry it and after that you can go ahead and start using your foundation like how i'm doing right now so because that way, everything's gon na match and looks really nice. So now i'm using my um my glue - and i forgot the name of this glue but like how i said all the products gon na be list down below. So i'm gon na make sure that i i apply my glue and i spray my glue out as you guys can see and yeah. So i'm gon na do that and then i'm gon na dry the glue out of the camera and then i'm gon na come when i'm gon na put the wig on so now, as you guys can see, i'm putting the wig on and i'm going to secure The wig on the back so after that i'm going to go ahead and start pulling the wig exactly where i want it. But what i'm not going to do is press the wig right away. So, as you guys can see, i'm going step by step. So i don't recommend this step when you are beginners and especially using this glue that i'm using and the reason of it is because, after you press your wig on it's kind of like a little bit hard to go back. So, that's why i don't recommend this technique for beginners uh anyways. I'M gon na leave other videos down below where i use another technique to install my wig, using this exact uh glue that i'm using on this video. So now i'm gon na finish to cut any extra hair that i have on my ears. As you guys can see, and then i'm gon na start pressing. My wig down, you can use a hair dryer or you can just do the way that i'm doing right now, so it doesn't matter because the glue uh dry really fast. So after that i'm gon na use this stick. I don't really know the exact name of this product right here, so i recently added this to my routine and so far i like it. I love the combination of bob products like the hotcom and the product that i used before and honestly. I really love how the wig looks like i highly recommend this wig, it's amazing. So if you guys looking for a really nice, affordable wig, i highly recommend this one, because it's really nice so and the quality is amazing for the price that i got it so now, i'm gon na go ahead and use this scarf to secure my uh front Part of the wig, as you guys can see, and now i'm gon na go ahead and i'm going to start brushing the hair and detangle the hair a little bit. So one thing that i always do when it's comfortable curly, hair or wavy hair. I always make sure that i use water or any curly product that i have on my hand, but on this video i just use water. So, as you guys can see, i'm just spraying the water and go through the hair with a comb or you can use any wet brush that you have so after that i'm gon na leave the hair. The way that it is, i'm not gon na apply anything else. I'M not gon na do anything out with it and i'm just gon na continue to cut my lace, as you guys can see. I'M cutting the extra lace that i have in front and i'm using this face shaver thing and i don't like to use scissors anymore because i don't like the effect of the scissor. I recommend you to start using this uh tool right here, because it's really nice. It gives you that zigzag motion that we always looking for and yeah. That'S how i cut my um, the extra lace that i have and then with my scissor, i cut any extra lace that i have on the sides. So i'm going to go a little bit over with the glue again and make sure that everything is glued down. As you guys can see, and then keep coloring any extra lace that i still have left and yeah, i really love the hair. So like how i said, i'm gon na leave the hair the way that it is until it gets dry and then i'm gon na search you guys at the end of the video so after making sure that everything is glued down. Now i'm going to use another technique that i like to use, especially when my wig is not customized, so i didn't customize this wig and the first thing that i'm going to do obviously is spray more uh glue and i'm using the same spreader. You saw the beginning of the video and then i'm gon na go again with my hot comb and make sure that everything is nicely uh lay down. This is the technique that i'm talking about. If your wig is not customized or your wig doesn't looks natural just take a bronzer and put the bronzer between your wig, so, as you guys can see, so i take few pieces of hair in front and then put it between the lines so yeah. I really love the effect of it and that's just gon na change. The way that your wig looks like so after that i'm gon na go ahead and i'm gon na skip using my hot comb as you guys can see, and basically that's all about this tutorial and guys. This is the final look as you guys can see. The hair uh get dry and honestly, i'm more than in love with this wig. I love the hair. I love the waves, i love the density and honestly the hair looks phenomenal. I really love it. I highly recommend this wig so like how i said: i'm gon na leave it down below in the description bar so make sure to check it out. So, thank you so much for watching and please make sure to subscribe comment and follow me on my social media and i hope to see you guys on my next video bye.


Comments
The Don: Hi what’s the lenght ? 24?
ronnie g: Not sure what kind of curls those are cute but don’t look like deep wave more like spiral it’s cute
osbourne Nerti: 7jr7zj #von.ngo
Rena Lenore: pekjoj #von.ong