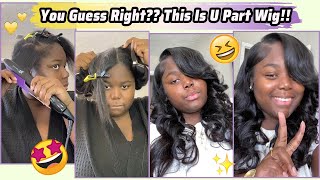
How To Make A U Part Wig Full Sew In With Leave Out | Step By Step| Ft Ula Hair
- Posted on 28 July, 2021
- T Part Wig
- By Anonymous
Hey Lovelies, in this video I'm showing a step by step process of how to make a u part wig with leave out, how to make sure it's perfectly well fitted and how best to attach your clips in to your wig for extra hold. I used the sew in method for this u part wig instead of a hot glue method because I want the wig to last long. This u part wig tutorial is very beginner friendly as I made sure to be extremely detailed about every process.
#upartwigtutorial #upartwig
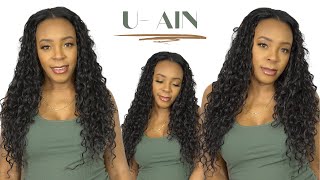
Details of Deep Wave Hair Bundles Down Below;
☆☆☆☆☆☆☆☆☆☆☆☆☆#ULAHAIR☆☆☆☆☆☆☆☆☆☆☆☆☆☆
$10 Coupon Code: MERCY
Product information: Deep Wave Hair Bundles 3pcs in 22inch
Video wig link: https://bit.ly/2Sd9P2f
Highly Recommend Hair:
Affordable 12A Brazilian Hair Bundles: https://bit.ly/3dw6Ry1
Affordable No Lace No Glue Headband Wigs: https://bit.ly/3sgvunV
Hot Sale HD Undetectable Lace Front Wigs: https://bit.ly/36YDRL8
Special Offer Buy One Order Get Two Bobs: http://bit.ly/3cpP4an
Wholesale Big Promotion Hair Deals: https://bit.ly/2IZzO9i
Check all items on Ulahair Store: https://www.ulahair.com/
Follow ulahair for giveaway:
Instagram https://www.instagram.com/ulahair/
Facebook https://www.facebook.com/ulahumanhair/...
Youtube https://www.youtube.com/@ulahair
Tiktok https://www.tiktok.com/@ulahair
Contact for wholesale:
Email: [email protected]
Whatsapp: +8618924029739
____________________________________
INTRO: 00:00 - 00:30
ITEMS NEEDED: 00:31 - 01:11
PREPPING WIG CAP: 01:12 - 04:20
SEW IN PROCESS: 04:21 - 07:39
MOISTURIZING CURLS: 07:40 - 08:50
SEWING CLIP INS : 08:51 - 10:29
U PART WIG INSTALL: 10:30 - 14:47
Hey lovelies welcome back to my channel. I am the basil mercy in this video, i'm going to be showing you how to make that well fitted perfect u-part wig, and i'm also going to show you how to place your clip ins to give you the perfect results.. If that's something you're interested in make sure to keep on watching love you Music, so first thing: first, i'm going to listing out the things we will need to make this: u part wig! So i'm going to be using this dome cap, i'm also going to be using my wig comb or you can go ahead to use a clip in whichever one works for you, but for this tutorial I'm going to be using both of them actually. So this just opens up, and you just put this inside your hair and then you just close it, that's how it's very easy to use. Also, you need your extensions, i'm going to be using these extensions from Ula hair. They sent me three pieces of their deep wave hair bundles in 22 inches, so i'm going to be making use of that. So this is everything that came inside the package. If you like to check them out, i'm going to leave every information in the description box down below so now we're just going to prep our wig cap. This is actually very essential to get in that. Well fitted! U part wig! So i'm going to take the measurement from the start of my hairline to the back of my neck, which is actually 14 inches. I'M just going to transfer that to my canvas head and my wig cap, so that i just want to make sure that it's the inches or the measurements of my head. I'M just going to make sure that i transfer that into my wig itself, so that it's staying in place and it's actually not so big and it's just the right size. So those two lines on the canvas edge is kind of actually mimicking the nape of your neck. So i just went ahead to pin that down on those two sides. Then i'm just going to go ahead. You see this it's. The recap is a little bit too big, and i really want this wig to stay on my head well fitted, so i'm just going to go ahead to get rid of every fabric that is too big on the wig cap. I'M just going to go ahead to put that in stretch it as much as i can and then just fold it in and then i'm just going to go ahead to sew that that's. This is actually very essential in getting it to be very fitted. So i'm gon na go in with my curved needle. This actually helps me a lot. I don't know if anybody uses a straight needle to sew their hair, because the curved needle is just a lot more better and it's way faster. So i'm just going to go ahead to sew this, like, i would normally sew my wig. Whatever technique you're use in sewing your wig, you can just go ahead to just sew it across so after making sure that is properly knotted and properly tied, i'm just going to go ahead to measure the inches. I want my you parts week to be so. I went in with half inches on both sides and four inches deep, so half inches on both sides which make an inch. I because an inch would be okay, because i didn't actually want a lot of leave out. I didn't want to actually have to bring out a lot of leave out of my hair, so whatever works for you works for you, whatever you think is best for you or whatever you're going for that will work out fine too, so i just went ahead to Mark my four inch deep and then i'm just going to draw that like a: u shape to kind of follow through. So i'm going to go ahead and map out the placement of my track. So i'm going to be doing one inch on the bottom and half an inch on top, so how you map out your tracks totally depends on how many bundles of hair you have or if you're, going in single weft or double wefts. So you just have to keep that in mind, so i'm just going to go ahead to fully map out that pattern all through the wig cap, just going straight by it, doesn't have to be so straight because you're just using it as a guideline. It'S not really like it's not an essential, it's just a guideline, so i'm just going to take my cup needle and i'm just going to pass in through the double work. So i'm going to start with the double width, and then i'm just going to attach that to the recap and sew it as normal. So for this you can actually go in with the bonding glue or hot glue gun, whatever works for you. Actually, i just feel very safer sewing it in. I feel very, very much safe sewing it in, but if you want to go in with a bonding glue, i mean that works too. That works fine and that's actually a lot more faster than sewing, but i prefer soon so getting to the end of your track. You can actually decide if you want to cut it or if you want to go ahead to flip over and just sew normally without cutting. I don't like cutting my weft. I don't know i'm just used to not cutting it and some people don't cut it because when you cut it, it kind of sheds a lot more. But if you want a good quality hair, it won't shed, but i'm just used to flipping over that's the method. I always use when i'm sewing, so whatever works for you. Actually, you can actually go ahead here to cut the track at the end of that line, or you can go ahead to flip over, like i'm doing so. The rest is just really a repetitive process. I just go in and sew and then flip and then so again, it's really repetitive so getting closer to the top. Maybe i have like three lines to go. I cut off the track. Why? Because there's not really a reason: it's not a necessity. I just do that because i want to be sure that the bundle doesn't stop halfway like it doesn't finish halfway when i'm like closing in under you part, so i just go in first before continuing to sew. It'S not a necessity. If you feel your bundles are enough, you have you can just go ahead, so my wonders were enough, but it's just something i normally do, and it just helps you kind of just cite what you're doing you can go ahead just like so this first line, then The second line, then go ahead to just continue what you're doing so. This is really it's. This is it for sewing it in. You want to make sure you knot that last knot very well. You don't want it to come off loose. You want to not extremely tight going nuts again as much as possible, so this is what is looking like when we are done so i'm just going to go ahead and just put in my curls just kind of get all the clothes to come together as one So i'm going to take my spray bottle just spray, a little bit of water. You don't want to drown the hair in water. You just want to spray enough to have it like really soft, so your fingers can go through them. You don't want to drown it at all, after that, i'm going to take my anti jackets, not on my watch and just take a little bit of that and just run through that section. So i just section the hair spray water on it not so much and then run it through by any leave-in conditioner you have and then i just brush it through. You have to use a detangling brush. I did i use this brush or this other brush. These are like the two best detangling brush. I know please do not use a normal brush while doing this process. A detangling brush will serve you best, so i just go ahead to do all that throughout the rest of the hair and just have it very sleek and very smooth and all in one curl pattern. You can see how lovely look it came out with a little shading. That'S all the shading that came out from the hair and then i'm just going to cut my new parts out. I don't know i feel like i should have sewn the clip in before. I went in to deep condition it that's how i feel i don't know, but any process is fine. You can go ahead and do anything at once, so i'm just going to go ahead and start putting my clip ins. So i just put one clip in at the edge of the hair and then i'm going to put one at the middle of the u-part. So that's how i place it. I just place three so two at the end, there's one at one edge and one at the other edge. Then one at the middle of it. Then i put towards the back of the wig and really that's all i need you can go ahead to use extra clips if you want, but for me i just feel this forward able to hold the hair. If you want extra security, you can go ahead. To put at the sides of the wig, so you have like five five clippings now you have six clippings right. So, if you put at the side, everything will now be six. So if you want that extra security, you can go ahead to do that. But for me, four was okay and also i used the weak comb at the back. Like i said i would earlier, and i just feel a weak comb is better at the back, because it's just very easy. It'S very easy for you to just stick that in compared to flipping it at the back. You know putting those clip in and having to try and clip it in every time, but with a weak comb. You could just pierce it through. So that's why i use the weak comb by the back - hey lovely, so we're done with the wig right now, so i'm just gon na do a very quick install and just try and run through it. I know i look a mess right now, but i do have my braids in at the back. My sister just kind of did a very rough, quick braid for me. I think like two days ago, so i still have it on so i just have my hair out. This is not much just like an inch or more of hair, and then i just brushed in some at the front. So there's like a tea party braid pattern. All right, so i'm just going to go ahead to straighten this before i go ahead to put on my wig, so i'm just going very fast and not waste that time. It'S just a very quick install for you to see how i installed this wig on myself. Since first i'm coming going in with my heat protection spray, i have the little island on because sometimes it just peels, so that's helps me, keep it from spilling. So that's all i'm going to be putting in on my hair because you don't want your hair to be damaged mostly when you do this like almost every time, so i just go in and start straightening the hair i kind of like straightening the hair better before Putting on my wig, because it just gives you room to be able to get deep into the hair and not have to worry about the wig if you're going to straighten the wig, because it's a cool pattern. So i just go ahead to straighten everything out. You made this mess so then i'm going to put some under for just me guys. This wig is actually it looks gorgeous. I love the core patterns and everything, so i'm just going to go ahead to keep that in when you're clipping. I think you need both of your hands that just help you click better when you use both of your hands, so i'm just going to go into the back. First of all, like i see when you click one side, you have to clip the back. Like put the comb in before you now come in to click again, so i'm just going to go ahead to cut up my middle part. I can't even remember the last time i had my hair relaxed, but we actually still made it worked, and this came out so beautiful guys. So don't forget, you can actually check out the week down below i'm going to leave all the information you need down below. In the description box so make sure to check them out, and you can also use my coupon code and get some coins while you go at it so to get the curl pattern of the wig, i'm just going to be using my crimper to kind of just Mix the curl pattern, i'm going to take a bit of my hair and a bit of the wig itself and just kind of coat them together. I would actually have preferred if i had like a smaller cream purple. I couldn't get any so i just used what i had and it still came out quite alright. It still came out very okay so but i would have just replied it to like the smaller one, but this came out. Incredibly, this is my first time actually using a crimper, and i mean for a first timer. I think i did a good job all right, so i'm just gon na go ahead to like just do my edges of camera and just kind of style it. This is my favorite mousse. Ever i'm just going to go ahead and apply that mousse into the hair. If you want the hair to last for a longer time, if you want that color pattern to last for a longer time, you can go ahead to use some got to be spray on it. So that's really it for this video guys. I really hope you enjoy this. I really hope to learn a thing or two don't forget to check out the hair down below. Thank you so much for watching to the end of this video. If you're watching the end of this video, you already know you're the what yeah had to know. You are the real mvp love you so much, and i will see you in my next video bye, 😘❤️

Comments
Ula Hair: OMG!! so detailed and perfect tutorials, it is very nice for beginners. thank you for review our human hair sis can use her $10 off code: MERCY
Confort Habia: What a talent. I’m still here struggling with how to make my wigs looks sleek and sis can make one. You made me smile!!! Keep doing you sis
Latifat Shekoni: So detailed I love this ❤️
Oluchi Lucia: So detailed. Thank you for this.
Salami Flourish: This wig is absolutely gorgeous
Grace Meniru: OMG I love the hair...u did an amazing job and it’s so pretty❤️❤️❤️
Mama Cita: This is beautiful! Great job!
Ngozi Nwamarah: Excellent!!! Very detailed. The best tutorial period.
GEM Academy: Love this. I will give this a try
chinonso Joy: You did very good
Ngozi Nwamarah: Best tutorial period!!
Marvy Kim: I wonder how this will look on my natural hair
Branon Nayiga: Hello mercy,which hair inch is used first starting from the back
Precious Imaobong: Hi... Mercy pls is it possible to use a straight needle to sew dis ?